
An issue of the Society’s newsletter, transcribed from the original. Download as PDF.
(10 pages, 3804 KB)
Page 1
The Canadian Society for Creative Leathercraft CANADIAN LEATHERCRAFT
Volume LXVI No. 4
Summer 2018 0045-5121
In this Edition…
Page 2 Notes from the Editor, Highlights of the past Executive Mtgs, Membership Info, CSCL Larmour Library Page 3 Pictures of the display boards at the 68th Annual
Page 4 - 6 CSCL Library Review By Members-At-Large
Page 7 – Leathercraft Quiz from Members At Large, A 30-SECOND ELEVATOR SPEECH: “Out-of-town”
Page 8 – 9 Magic Braid Kit by Karen Gunna
Page 10 – How to make a box from the Craftsman Magazine
©2018 Canadian Society for Creative Leathercraft All rights reserved. Reproduction in whole or in part without permission of the copyright holder is prohibited.
To contact any of our Executive please refer to the CONTACT section of our Website.
Website: www.canadianleathercraft.org
Facebook “Canadian Society for Creative Leathercraft”
President: Lauch Harrison
Membership: Eugene Pik
1st Vice-Pres.: Jim Wilkes
Editor: Barbara Chynoweth
Past President: Jim Wilkes
Website: Eugene Pik
Treasurer: Della Chynoweth
Privacy Officer: Lauch Harrison
Secretary: Richard Borrow

Page 2
Note from the Editor….
The Norland Branch will be hosting the 2019th Annual, stay tune for information on it. The Theme is going to be “Western”.
The Quarterly Newsletter “Canadian Leathercraft” is your source of information about CSCL and its members. Also check out the CSCL website at www.canadianleathercraft.org and CSCL’s Facebook page.
Highlights from the Past Executive Council Meetings….
CSCL Membership
Have you paid your membership? It’s a new Membership Year (April 1 to March 31).
- Send your membership along with your cheque made out to “The Canadian Society for Creative.
- If you are joining trough a branch pay your membership to the Branch Treasurer if you are joining as a Member-at-Large or Sustaining Member send your membership payment to the CSCL Treasurer: Della Chynoweth, 3350 Monck Road, Norland,
Ontario K0M 2L0
| General Member | General Member – Student* | Member-at-Large | Sustaining Member |
|---|---|---|---|
| Individuals interested in leathercraft who belong to one of the CSCL Branches. (Need not be a leathercraft person.) $40.00 | A registered full-time student shall pay $5.00 | Individual interested in leathercraft who does not belong to one of the CSCL Branches. (Need not be a leathercraft person.) $40.00 | Commercial Organizations interested in supporting the Society. $100.00 or material equivalent to $100.00. |
CSCL Larmour Lending Library
The CSCL lending Library of Books and Patterns can be referenced on our web site www.canadianleathercraft.org. Head to Gallery and click on CSCL Library of Books and Patterns. Under the Patter option there is 80 pages of patterns that may give you ideas of things to make. Under the Book section there is 13 pages of titles of Books and DVD’s about Leather crafting, design and colour. Remember these patterns and books are there for you to borrow from the library. Select item(s) you would like to borrow and send your list to Paul Kitchener at [email address removed]
Branch Presidents will assist in pickup and delivery of the orders from branch members.
Members-at-large may order directly from Paul and arrange shipping or printing options, fees may apply.
Memberships are due March 31st have you sent yours in.
Page 3
Our Deepest condolences from The Canadian Society for Creative Leathercraft to Bill’s family. Bill was a former long time member of the CSCL
In Memory of William Whittingham
1957 - 2018
Date Of Death: Sunday, September 9, 2018
Skwarchuk Funeral Home - Lathangue Chapel
30 Simcoe Road, P.O. Box 318, Bradford, Ontario [telephone number removed] [telephone number removed]
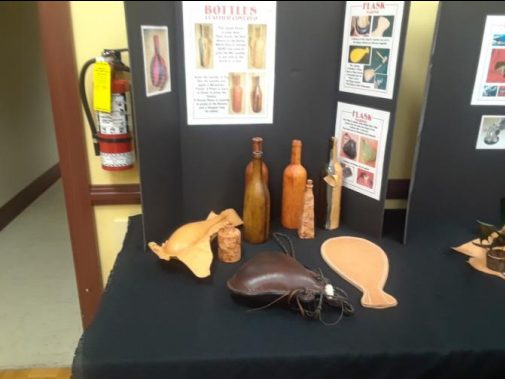
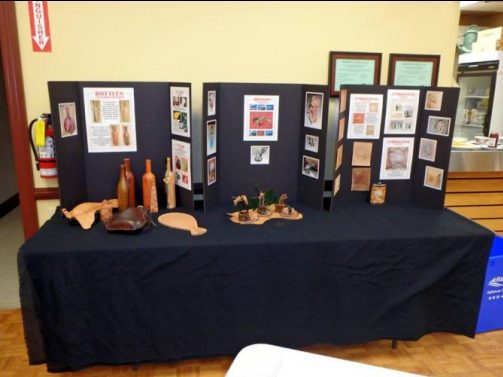
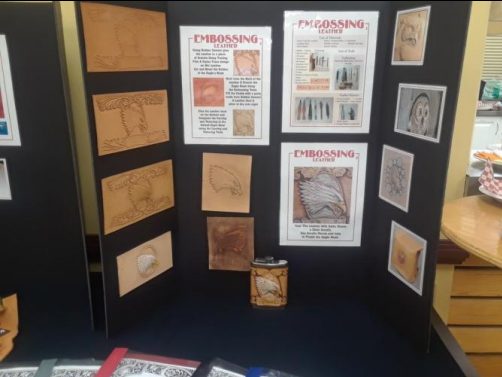
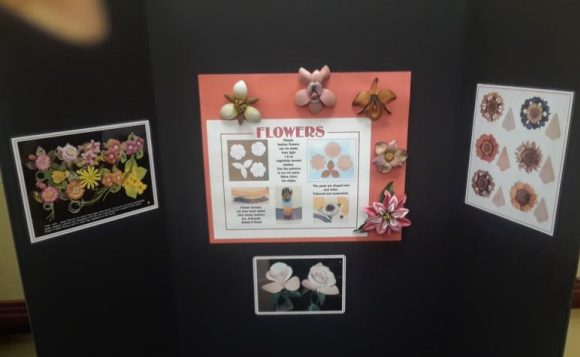
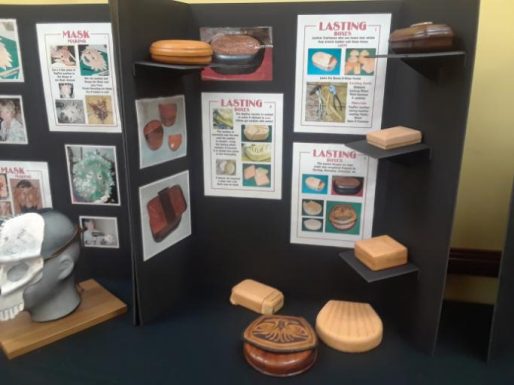
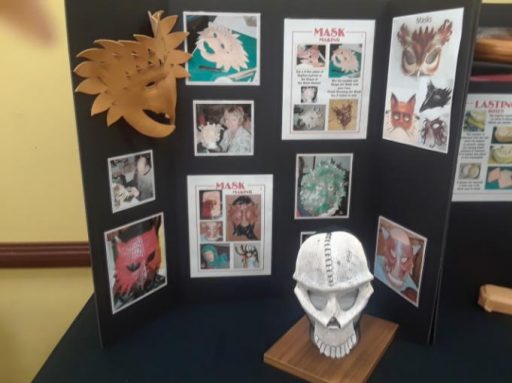
More pictures of the Display Boards at the 68th Annual Convention
Covered Bottles Covered Bottles, Dragons, Embosing
Sculptured Flowers Embossing
Page 4
Covered Boxes Masks
These books are all available from our CSCL Library
You never know what secrets you will find.
CSCL Library Review By Members-At-Large
#10 – The Heritage Hands of Irva Ford, Susan, Peter and David Ford, Copyright February 1985, 16 pages, softcover This small square, interpretive pamphlet is a tribute to the spirit of Emily Irva Ford and begins with early examples of her creativity and talent in music, woodworking, art and craft work. She was a public school teacher and over the course of 40 years she continued as a speaker to many groups, leathercraft demonstrator, prize-winning photographer and world fair craft juror. Irva served as the first president of the Hamilton Leathercraft Guild (CSCL, 1956-58) acquiring her
Associate (1957) and Fellowship (1958) standing. “She spent much of her life in the pursuit of excellence and encouraging others to do so.”
#20 – Inverted Leather Carving, Al Stohlman, Craftool Co., Fort Worth, Texas,
Copyright 1961, 48 pages, softcover In this landscape (17x11 inch) copy, inverted carving is classified into 3 groups: Silhouette Stamping, Inverted Carving (background areas remain raised) and Rough-out Carving (all stamping or carving is done on the flesh side and then sanded for a suede-like effect). Key instructions include: cut the design carefully with a swivel knife making all cuts towards you; bevel where possible which will bring depth and cleaner edges to the pattern; mat down the design using the bevelers to ‘tap and walk’ inside the outlines. Silhouettes symbolizing occupations, sports, hobbies and zodiacs are included. Tool numbers are listed beside a dozen more

Page 5
patterns of leaves, the Wild berry and a page of alphabets. For example, the pine cone uses 976, 893, 936, 198, 120.
#23 – The Leather Box Bag Manual of New Techniques in Design and Construction, Harvey Frick & Larry DeRosia, Copyright 1961, 117 pages, letter size surlocked The author has abandoned the use of a gusset in his design of ‘end panel box-bags’, uniquely made from a single piece of leather with no lacing or sewing. Working with ‘box bags’ relies on the use of cements and Chapter 17 is dedicated to its proper use. Cement end panels to end tags in order to construct The Utility Box Bag. It is optional to add rivets to install a carrying strap, attach a flap-covered pocket to the bag wall, make a partition or install a lining. Pattern versatility is emphasized in The Master Series of Five Box-Bag Patterns which refers to the need to alter only the dimensions while using the author’s General Procedures. How To Make The Thin Brief Case is included.
#40 – Leathercraft Lacing and Saddle Stitching, Pacific Arts and Crafts, Inglewood, California, Copyright 1958, 16 pages, softcover Popular styles and techniques are featured as black and white concise pictorial instructions. Printed in the U.S.A., this landscape booklet contains instructions of Double (60 steps) and Triple (60 steps)
Cordovan Lacing, The Top Plait Lacing (59 steps), and How to Hand Stitch a Purse (45 steps), a Billfold (15 steps) and a Round Box (15 steps).
#59 – Practical Leatherwork, F.R. Smith, Pitmans Craft-for-All Series, Copyright 1930, 103 pages, hardcover A Fellow of the Royal Society of Arts (F.R.S.A.), F.R. Smith provides a 3-page glossary at the end of his leatherwork digest. Chapter VIII, Modelled Leather Designs, discusses 3 classes of ornamental art, namely, the aesthetic, the symbolic, and the mnemonic. The author’s full approach involves selection of skins, tools, fittings and suggestions of small articles to make. More than 30 figures of workmanship and techniques intersperse throughout 13 chapters.
#87 – Design By Accident, James F. O’Brien, Copyright 1968, 215 pages, softcover This DOVER ART INSTRUCTION AND REFERENCE BOOK begins with a quote by
Aristotle: ‘Chance is beloved of Art, and Art of Chance’. An early chapter contains the method of ‘drip, dribble, drop’ to obtain design. Every page is filled with a photo and corresponding methodology; the reader is encouraged to experiment. Origins are referenced and variation in design due to results of natural forces and physical laws is studied further. ‘Splash and Run’ finds designs formed by impact and gravity on page
91. Six pages at the end suggest caution, materials and equipment.
#163 – Make It with Leather, March 1979 Issue, Magazine Published Bi-monthly, Fort Worth Texas, 64 pages The main cover line, Tour 1979, refers to the Tour Europe, May 1979 Sweepstakes draw for “a chance to travel to watch students work inside the ancient cloister of the Santa Croce Church in Florence learning techniques of the Old World master craftsmen, the workmanship of leather art hundreds of years old in the
Page 6
museum at Offenbach and visit with European leathercrafters in shops and factories.”
Four featured projects are pictured on the cover and the reader will learn about special ‘hair’ tools for the portrait of a dog, a study of prehistoric cave drawings for primitive mud paintings, the ‘resist’ technique on a pocket billfold, as well as find pull-out patterns for the pixie hat. In every issue readers share their how-to-do-it ideas and tricks (Tricks of the Trade, Readers Tell Us) and report leather in the news (Talking Leather) including show results (Guild News). Below the masthead, a subscription order for this magazine: $6.00 for 6 issues (one year).
#209 – You Can Make Your Own Gloves, Edith M. Hummel, Copyright September 1946, 63 pages, softcover This step-by-step instruction book guides the reader to complete handmade mittens and glove projects. Glove terms include trank, quirk, fourchette, point. The author believes handmade gloves are “superior in the fact of custom stretch, attractiveness and fit.”
#211 – Batik Leather, Larry and Pat Raynak and Luciano, Copyright 1975, 136 pages, softcover In this calligraphical book the process of Batik (wax) dying is illustrated with more than 300 instructions. Full-size project patterns are included in step-by-step plans for twelve functional leather projects: clogs, belt, Mystery Three Braid, overbraid belt, suspended wine rack, pj’s bag, picnic bag, round shoulder bag, chess board, camera case, tripod case, director’s chair. Latigo leather is preferred over oak tanned for batiking. Paint your leather in heated wax and then cool. Next, the cooled, hardened wax is to be cracked so that the dye will reach the leather surface. This process is very similar to that used in the Batik dying process of fabrics.
#235 – A Manual on Lettering and Layout, L.A. Doust, Copyright 1934, 85 pages, hardcover Foremost, good lettering necessitates legibility followed by suitability of style and layout. The artist is encouraged to value hand-lettering over common type: there is opportunity for inventiveness. Historical masterpieces of decorated capitals are unquestionably beautiful and the Roman style is pervasive even today. Experiment,
experiment and experiment with balance, style and materials to design slogans, headings, titles and advertisements.
#372 – The Making and Framing of Handbags, Fully Illustrated by Bagmaker, 14 pages, softcover This pamphlet immediately begins with a photocopy of 4 tools employed for the making of a ladies’ handbag: leather cutting knife, framing pliers, framing pusher, framing clamp. Photocopied images such as Figure 4 show how the metal frame is closed using the framing pliers after inserting the sheen. This educational text was published by G.W. Russell & Son, Ltd., Hitchin, England.
Page 7
LEATHERCRAFT QUIZ
- _ _ _ _ _ _ _ increases the softness of the candle wax when applied to leather during the process of _ _ _ _ _ leather.
- A special glove ruler is called a French ruler or _ _ _ _ -ruler.
- The Irva Ford Memorial Award is given for the best _ _ _ _ _ _ piece submitted in competition at the CSCL Annual.
- Using multiple dyes plus a _ _ _ _ _ _ prevents colouring; a coat of the _ _ _ _ _ _ is painted onto those parts of the design you wish to _ _ _ _ _ _ the dye or antique.
- In _ _ _ _ _ _ _ Leather-work, which consists in cutting out a design from one leather like a stencil, always work to cut away from the centre of the design outwards.
- _ _ _ _ _ Patterns is an example of one of the nine areas of ‘controlled accident’ where paint is rejected by an unsuitable surface.
A 30-SECOND ELEVATOR SPEECH: “Out-of-town”
ILLO is a system of borrowing and lending books between library systems across Canada. You can use your local public library card to borrow books from any Canadian public library. A Woodstock, Ontario library patron could borrow “Designing with Leather and Fur“ or a Barrie, Ontario resident borrows “Footwear: Leathercraft“, just 2 selections from the 18 leatherwork books on the shelves at the London Public Library. Ask about THE VISITING LIBRARY SERVICE, a free local delivery to housebound cardholders. Search the holdings of other Canadian public libraries along with the CSCL Members’ catalogue of 400 plus books for great year round reads!
Page 8
Magic Braid Kit www.karengunnadesigns.etsy.com
Keep everyone mystified! With two closed ends people continue to be puzzled as to how these leather braids can be started and finished. Follow these simple instructions to learn the secret.
Strands are labelled A to E, from left to right.
4.
Now bring strand B to the right over strand C and E into the middle.
7.
Please note the small gap at the bottom of the strap between strand C and D that the arrow is pointing to.
2.
FIRST HALF Section I
Bring strand A over strand B and C into the middle position.
5.
Next strand
D comes to the middle over A and B. You can also see how some braiding is happening at the bottom of the strap. Don't worry about that!
8.
With one hand holding everything tight in place at the top of the strap, take the bottom and flip it forward through this aforementioned gap. Do not worry that everything is now looking tangled at the bottom.
Holding strand A in place bring strand E to the left over D and A into the middle.
[you are always working from the outside into the middle of the braid]
6.
Now C passes over E and D coming to rest in the middle.
9 . PIRST HALF Section IT
Take A again from the outside and pass it over B and C into the middle of the braid. Repeat this from each side 4 more time [5 in total]. Do not worry that everything is getting even more twisted lower down. At the bottom of the strap the arrow is pointing to the gap where C crosses under A. This is a bit higher up than in section 1.
Continued on other side...
Page 9
10.
Again, holding firmly the braided part at the top, take the bottom end and bend it forward through the aforementioned gap.
12. second HALF
Magic Braid Kit (continued)
11.
If you have done everything correctly the lower part of the braid will now straighten itself out. This completes the first half of the braid.
The trick in this second half is to keep your braid as tight as possible towards the top of the strap. You will again do 5 turns starting with A. You'll then do the first flip forward between strand C and D. Continue with 5 more turns and do the flip forward again through the gap where C passes under A.
13.
Now with your fingers gently ease the tightness out of the top part pushing it evenly towards the bottom.
Have fun!
14.
The braids come with button studs which allow for great adjustability. For smaller wrists you may want to trim away a bit of the excess leather. Your last step is to slice a 3/8" slit into the holes opposite the button stud. The slit is always on the side of the hole closest to the braided section. A utility knife does this job well,
Keep in mind that these bands can be used as embellishments on your other projects. Also great for an older child's or teenager's party. The kids will have a keepsake that will last them for years.
Page 10
An Ideal from the Craftsman Magazine
Handerkerchief Box
The completed box with overlapping closure
By TANNIS POND
At first, T piled the hankies neatly in a corner of my husband’s top drawer, to be hunted and re-piled the following week. Enough of that! Into a small box they went and re-mained for a number of years. Fi-nally the idea came—a decorative leather box that sits on top of the dresser rather than hidden under socks and other numerous odds and ends men seem to collect in their top drawer.
Out came a large sheet of paper, ruler, pencil, eraser and a hanky. The hanky measured 4” x 4” ironed and folded. This formed the base.
' The height of the sides corresponding with the number of hankies measured three inches. In the front panel I made a one inch slit to ease a hanky out still folded.
The five ounce leather was cut out, dampened, the fold lines gouged, on the inside, over-lapping folds skived and the outside carved.
Fold into shape while still damp, wrap a strip of cloth around the sides and using a clothespin, join the cloth ends to hold the box shape un-til the leather is dry. Glue the flaps in place and saddle stitch.
The first box I made was lidless but to make it look complete and to hold off the dust a lid is the thing. This is made the same as the bottom with a base of four and one-eighth inches and the flaps 34” deep. Make a chap button (Vol. V No. 5) for handle.
Rather than a fitted lid, an overlapping closure could be used as on a purse only without the clasp. This is made all in one piece. Work on the back top gouge so the lid lifts easily without tipping over the box.
Why stop at a square box for men’s hankies? What about a triangular box for Grandma’s lacy hankies? Or a smaller version that holds one or two spares for the travelling man?
Note: Be sure to measure your handerkerchiefs! Not all of them measure 4” x 4” folded.
10
For an overlapping closure —all in one piece
The Craftsman