
An issue of the Society’s newsletter, transcribed from the original. Download as PDF.
(12 pages, 5355 KB)
Page 1
The Canadian Society for Creative Leathercraft CANADIAN LEATHERCRAFT
Volume LXVIIII No. 2 January, February, March, April -0045-5121 2021
In this Edition…
Page 2 Notes from the Editor, Highlights of the past Executive Mtgs, Membership Info, CSCL Larmour Library Page 3 – CSCL LeatherWork Virtual Competition, Creases & Burnishing on Light Weight Leather
Page 4 - Using a head Knife?
Page 5 – Cutting Surface for LeatherWork. Cutting Boards of End Grain Hardwood, Aluminum & Glass
Page 6 - Broadening the Understanding of Leathercraft
Page 7 – Projects from the MAL
Page 8 & 12 – Threading the Needle
©2021 Canadian Society for Creative Leathercraft All rights reserved. Reproduction in whole or in part without permission of the copyright holder is prohibited.
Website: www.canadianleathercraft.org Facebook “Canadian Society for Creative Leathercraft”
President: Lauch Harrison
Membership: Kim Winchester
1st Vice-Pres.: Jim Wilkes
Editor: Barbara Chynoweth
Past President: Jim Wilkes ECO ( Electronic Communications Officer): Eugene Pik
Treasurer: Della Chynoweth
Privacy Officer: Lauch Harrison
Secretary: Richard Borrow/Lauren Malec Workshops: Lauch Harrison, Jim Wilkes, Lester Pinter
Page 2
Note from the Editor….
The Newsletter “Canadian Leathercraft” is your source of information about CSCL and its members. Also check out the CSCL website at www.canadianleathercraft.org and CSCL’s Facebook page. I am always looking for articles for the Newsletter, do you have a project that you have done that you think everyone would be interested in seeing, we are looking for articles?
Highlights from the Past Executive Council Meetings….
Your CSCL Executive have been holding Zoom meetings each month. This year we are going to hold the AGM by Zoom on May 8th from 10 a.m. to Noon. We are also holding a virtual competition for judging entries. See page 3 for the judging requirements.
CSCL Membership
Have you paid your membership? It’s a new Membership Year (April 1 to March 31).
- If you are joining trough a branch pay your CSCL membership to the Branch Treasurer along with your branch membership fee.
- if you are joining as a Member-at-Large or Sustaining Member send your membership payment to the CSCL Treasurer: Della Chynoweth, 3350 Monck Road, Norland, Ontario K0M 2L0 or you can e-transfer to [email address removed] Please be sure to include your contact information.
| General Member | General Member – Student* | Member-at-Large | Sustaining Member |
|---|---|---|---|
| Individuals interested in leathercraft who belong to one of the CSCL Branches. (Need not be a leathercraft person.) $40.00 | A registered full-time student shall pay $5.00 | Individual interested in leathercraft who does not belong to one of the CSCL Branches. (Need not be a leathercraft person.) $40.00 | Commercial Organizations interested in supporting the Society. $100.00 or material equivalent to $100.00. |
CSCL Larmour Lending Library
The CSCL lending Library of Books and Patterns can be referenced on our web site www.canadianleathercraft.org. Head to Gallery and click on CSCL Library of Books and Patterns. Under the Patter option there is 80 pages of patterns that may give you ideas of things to make. Under the Book section there is 13 pages of titles of Books and DVD’s about Leather crafting, design and colour. Remember these patterns and books are there for you to borrow from the library. Select item(s) you would like to borrow and send your list to Paul Kitchener at [email address removed]
Branch Presidents will assist in pickup and delivery of the orders from branch members.
Members-at-large may order directly from Paul and arrange shipping or printing options, fees may apply.
Memberships are due by March 31st
Page 3
CSCL LeatherWork Virtual Competition
This was the information sent out the middle of March to all the CSCL Members.
Open To All Members
The Annual General Meeting has been on hold since May 2020, and so has the Judged Competition. The AGM will be held virtually on a ZOOM Conference Call on May 8, 2021 Saturday Morning at 10am. Prior to the Annual, the Competition for Leatherwork will be judged from Photographs. The Council of Fellows set the Criteria for the Competition as follows:
Must be a paid up member (2020-2021) to submit photos.
Articles must not have been in competition prior to entry.
Articles made after May 01, 2019 are eligible.
Photos are to be uploaded to the CSCL Web site prior to April 17, 2021
Maximum of articles/item per Member is 5.
Minimum of 4 photos per item photos, Maximum of 12 photos per item
Photos must be in focus and 5 MP or above 2000 pixel on the longest side. Larger photos are better.
Brief Description and Membership level – General, Associate, or Fellow must accompany photos.
Judging will be anonymous. Judging Committee will not be privy to the Maker.
Zoom Judging Meeting will be on Sunday April 25 at 10am
Prize Category will be set by Judges in attendance at Zoom Meeting.
No Associate, Fellow or Weston Trophy will be Judged.
Photos will be scored by at least 4 Judges
Judge will score each article/item from 0 – 5, scores will be averaged for a percent.
Photos of each article/item should be emailed separately to [email address removed]
From there the photos will be uploaded to google albums and made available to all our Members.
This is the first Virtual Judging and the Fellows in the Council would like to see lots of entries from more Members. The Judges will be concerned with the leatherwork, construction, design, and colouring, more than the photos. It is a leatherwork competition not a photo contest.
Yours truly, Lauchlan Harrison FCSCL
Creases & Burnishing on Light Weight Leather
Creasing - 3 – 4 oz light weight leather is not problematic, hot or cold, damp or dry, wood, bone or steel, the leather will crease just as well as heavier stock. The light weight leathers are generally stretchy so heavy pressure can distort the edges.
Here are some things to watch out for:
• When using Natural Veg or light colours a steel burnisher may stain the leather.
• Test a hot tool on some scrap prior to running the crease, you can always darken the line, you can't remove a burn.
• Lightly passing the tool on the first go can set enough of a line that will prevent a run off. Your dividers can give a good line when set the same.
• Generally Creasing is done prior to beveling the edges, practice on some scrap to see what gives the best burnish.
• Use moderate pressure then increase as needed.
• Creasing is usually the same distance from the edge as stitching – about one thicknesses but there is a choice for every leatherworker.
Page 4
Beveling - a single piece of lightweight leather is difficult due to stretch and limpness of the edge.
The Bevel can be made with a Round Edge Beveler, Edge Shave, or extra small French Edger. The Shave has to be small - 0 or 1. The tool must be sharp and well polished otherwise the tool will “chatter” on the edge and leave raggedness that will not burnish. The best way to polish the inside top of the tool's groove is to use a piece of thread covered in polishing compound. Tie the thread off at one end and pull the tool along the thread holding you thumb on the string to force it down into the groove. Different thicknesses of thread can be used for the sizes you need. It is best to practice on some scrap to see if the back of the leather requires trimming, beveling the back can make the leather edge to flimsy to burnish.
• Use the Edge shave at low angle to decrease chance of “digging in” and starting the tool chattering
• Round edgers are easier to work with and are forgiving
• If the surface was dampened to get better burnish from the Creaser let the edge dry prior to beveling.
• use a light touch, the bevel is very small and shallow. Pushing down will create concave edge and make it very flimsy.
• Bevel the top only at first.
• Check to see if the back is hairy or ragged it will require trimming.
• Keep the Edge Shave at a low angle and try to take more off the back than the edge.
Burnishing - The real trick is to burnish a single edge of 3 oz leather, better yet crease and burnish the edge. Here are some things to try and watch out for:
- Use Gum and water mixture to help stick down the fibres (Xantham, Guar, Tragacanth)
- Burnish both sides of the leather, keep the leather flat on the table.
- Use a cloth against the edge of the leather with your finger nail.
- Start softly then build up speed and pressure.
- Burnish in one direction can sometimes make a better edge.
- Try not to burnish the top grain past the bevel, don't burnish the top grain if the crease is to stand out.
Lauch Harrison FCSCL
Using a head Knife?
Tips and Safety Measures
Using a Round Knife or Head Knife is the best way to cut veg tanned leather heavier than 4 oz. The Knife is pushed into the marked pattern lines so you can clearly see where to cut. The Knife can be held up right to make a perpendicular cut or it can be offset at a chosen angle to undercut when needed. The broad area of the blade is used to make long straight cuts, the points can be used on curves. Knife Safety is very important to reduce the chance of injury, here are some tips and rules:
- Never place your free hand in front of the blade
- keep the Knife sharp so you can predict the force needed to cut
- use a cutting surface with “glide” so the surface is not “sticking” the blade.
- Use a strop to remove invisible oxide on the blade prior to use
- strop often when cutting damp Veg as blade will rust inside the veg
- in heavy Veg 10 oz or more trim out the pattern leaving 3/8” excess this allows the Veg to flex out of the way and not trap the blade
- practice on some scrap to gauge the force needed to cut and to check blade's keenness
- touch up the blade on 800 grit sandpaper then strop if the edge has been rolled or dulled
Page 5
Cutting Surface for LeatherWork
Things to look for
The Cutting Board is very important to the safe use of the Round Knifes the wrong surface can be dangerous to the user and cause mistakes in cutting. Self healing mats can not be used, you will cut completely through the mat or the soft sticky surface will slow the knife down and make it “jump” ahead.
The surface must be hard enough to allow glide but not so hard it will chip or craze. The best cutting surface are smooth plastics Nylon, Teflon & UltraHigh Molecular Weight PolyEthylene the draw back is the cost of these polymers. So the next best thing is High Density PolyEthylene (HDPE) and some of the PolyPropylene (PP) boards.
The best way to test the Board is to run your knife on the board, it should run smoothly and freely without any hitches. The mark left behind should be minimal. This run test gives you the feeling of the downward pressure you should use with your knife. Now when you put the leather in the way it should cut almost as easily, most of the force should be forward not downward. You can Purchase HDPE in different thicknesses, I use 1/2” thick board from P&A Plastics in downtown Hamilton.
Safe Cutting
Cutting Boards of End Grain Hardwood, Aluminum & Glass
Interesting Facts
These materials can be used of cutting boards, as long as the knife does not sink into the surface.
Hardwood cutting blocks have been used in butcheries and leather shops of hundreds of years, very heavy and unwieldy, the cutting on the end grain the knife will not follow the path of the grain so it is safer & easier to use. Aluminum can be used it is softer than the steel, knife will require dressing much more often but if just the point is riding on the board the knife will remain sharp. Glass presents a similar but opposite situation the glass is much harder than the steel and will roll the edge, but if just the point is on the glass the knife will cut the leather quite easily. The difficulty with glass is downward pressure can flake the glass and create all sorts of problems.
CSCL 1950 - 2020
Page 6
Broadening the Understanding of Leathercraft
It is with profound sadness that the family of Dorothy McPherson, Honorary Life Member, Member-At-Large (MAL), announce her peaceful passing on Wednesday, February 24, 2021 and yet remember her passion for all things creative, especially leathercraft.
Former Hamilton (1990) and Woodstock (1997) branches member, Dorothy had opened her home to small, informal meetings to maintain and nurture an interest in leathercrafting for London (2010) leathercrafters.
Over the past decades Dorothy successfully competed, retailed and exhibited leather. She founded and was curator of TRC Gallery, London, that staged monthly exhibitions of fine hand art by dozens of skilled Canadian craftsmen including CSCL members. Two of those exhibitions focused solely on leather thus providing a professional CV credit.
Dorothy conducted two workshops and served as LEATHER 2010 liaison with Ontario Crafts Council and CANADIAN LEATHERCRAFT Editor/Contributing Writer. A jewellery maker, she co-founded CSCL’s LONDON JEWELLERY AWARD. Dorothy wrote leather biographies for fifty-three CSCL artists for their Ontario Volunteer Service Award proposals. She also successfully acquired for 3 CSCL artists further distinguished awards: Governor General’s Caring Canadian Award, The John Mather Award (OCC), and Queen Elizabeth II Diamond Jubilee Medal. On the ceremony, an MAL (FCSCL) winner shared that Dorothy “has held a special spot in my heart for her belief in me and what I was doing to contribute to both our local and national community.”
In 2000, at the September CSCL executive meeting in Cooksville, she and her husband David, were asked to consider producing a newsletter for Members-At-Large as a way to informally chat with, and keep in touch with, members scattered across North America. That launch of a decadesrunning MAL-designated summer issue of CANADIAN LEATHERCRAFT was instrumental to my young family’s (2006) enthusiastic approach to learning the basics of this time-honoured craft.
Dorothy retired in 2013, further dedicated to supporting the arts, World Vision, MFPA Canada, neighbours, family and friends. She will be greatly missed.
An inspiration for talents shared – please feel free to visit the February 2021 Archives online at http://www.westviewfuneralchapel.com
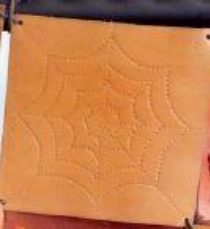
Photo of Dorothy’s CSCL Quilt square.
Respectfully submitted by Daughter Lauren, CSCL Members-At-Large (MAL) Representative
Page 7
Emails To The MAL REPRESENTATIVE
From: Madeleine Mitchell, MAL, Life Member
As with many of my projects, pastand present, it was born out of necessity: New cellphone needed a case.
The outside is tan Morocco, the inside has 2 Morocco card pockets: on the left side, and the molded Morocco phone frame on the right, with a skiver lining.
The outside decoration is a design idea I learned from David McPherson, FCSCL, at one of his box workshops. It is simply 3 parallel lines about 1 cm apart made with a straight edge and a modelling tool (stylus).
All held together with whipstitching.
The whole project took longer than anticipated, likely because there was a lot of skiving around the phone frame, and I'm out of practice.
Page Corner Protector A General Member MAL Project
EQUIPMENT: diamond blade awl, 2 harness needles, stitching wheel, leather scissors, paper scissors, metal ruler, X-Acto knife, pencil
MATERIALS: waxed thread, chrome tan leather, contact cement, sandpaper, sheet of photocopy paper
DIRECTIONS:
1. Read the instructions and consider making multiples.
2. Design aheart pattern based on: two circles joined to a 90-degree comer on paper. Photo: circle drawn with disposable water bottle cap.
3. Cut two of leather, stack them, slide the top heart corner down to reveal the bottom heart resembling a shadow, and trim the sides to match. Maintain the 90-degree corner so that the page will fit at the end. TIP: paper pages slide into the protector more easily when next to smooth leather (bumish suede for smoothness).
4. Mark 2 stitching lines by starting at the 90-degree comer on both sides having the seam allowance equal to the stitch length and the same number of holes per side.
5. Glue the side seam allowances (roughen a shiny surface to aid adhesion). Use a seam roller.
6. Punch accurately placed diamond-shaped holes.
7. Thread the needles with thread, three times the length of the stitching line.
8. Saddle stitch. Use aseam roller. Trim the seam allowances for neatness and uniformity.
9. Gift your new! Valentine’s Day-inspired Page Corner Protector.
[saddle stitching near the end]
Page 8
Threading the Needle
Stitching with Drill'd Ey'd Needles
Part 1 History of the Drill'd Ey'd Needle
Harness Needles are blunted so they will follow the path of the awl strike, rather than cutting into the leather making their own path. Blunted but still with enough point to easily draw blood if you poke yourself. The Needles are matched in size for different threads and the different threads are matched to the number of stitches per inch. In bygone days some Harness Makers were stitching as many 19 per inch I can say this because I've seen the Pricking Irons. I've heard of 20 or 21 per inch stitched with single strands of silk on #7 needles using a 1 1/4” awls. Incredible!
Needles are made by flattening one end and then punching a hole and the gutters in that end. The holes can be square, round or oval. The needle is then filed round or redrawn thru a die to make it round. The problem was flash and sharp edges at the punched hole caused the thread to wear and break. The needles needed to be deburred and polished. Drill'd Eye drilling was done by hand on very fine countersink mills and grindstones spinning at high speeds. Pointing was also hand work, the Pointers made a very good wage, due to stone dust from grinding meant they weren't at it long before (12 Years) they were unable to work or they were dead.
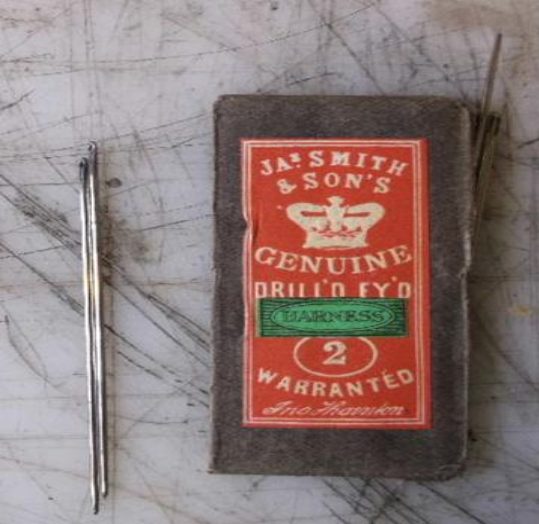
The needle drill was slow, a new idea was patented to remove the flash and smooth the eyes of the needles, long wires 7 Smith & Sons Drill'd John James Drill'd Egg Eye of hardened steel with a rough exterior like Round Ey'dNeedles #2 a miniature round file. Thousands of needles were strung on the wire. The wire was agitated until the eye was smooth. This is improved Drill'd Ey'd Needle. The Square punched needles were not easily smoothed so round punches were used as shown in photo. Oval shape punched needles could use the same wire drilling and were easier to thread leading to the Drill'd Egg Ey'd Needles. By 1852 the Egg Ey'd was suggested for people of poor sight and by 1855 the Round Drill'd Ey'd Needles were superseded by the Egg Ey'd Needle .“But it is still a question if any needle is so good in use as one with a perfect round eye, carefully drilled and then burnished by the best method known in the trade.” Taken from the Sewing Machine Gazette.
The Needles having been polished were heated then quenched to harden them, then tempered to about 600° F this resulted very many curved needles. A separate cottage trade done by women in their homes with tiny hammers on small anvils - straightening needles. In Redditch and London in 1847 over 100 manufacturers employing over 10,000 people were needed to point, drill & straighten 50 million needles per week! Incredible despite the amount of hand work.
Most of the information came from the History and Description of Needle Making written by Michael T. Morrall in 1882. He was the son of the Holder of Drill'd Ey'd Wire Machine Patent Abel Morrall.
Lauch Harrison FCSCL
Page 9
Threading the Needle
Stitching with Drill'd Ey'd Needles
Part 2 Pointing the Thread
The Older needles don't swell at the Eye and the eye was smaller, so the thread must be finer to be threaded. The only way to thread the needle was to reduce the size and “point the thread”. This is done by scraping the thread with a blade. The scraping opens the twist and pares fluff of all the cords. This reduces the diameter of the thread cleanly so when it is re-twisted it is smooth and tapered. Skilled workmen would roll their own threads from floss by offsetting the ends of the cords making the threads with a taper.
Barbour's 5 Cord/18 The unwaxed thread is scraped with a blade.
The scraping opens the twist and pares fluff of all the cords. This reduces the diameter of the thread cleanly so when it is re-twisted it is smooth and tapered. I used Barbour's 5 cord /18 This means there are 5 strands of #18 floss twisted into thread. It is best to start the scrape more then two inches from the end of thread, as the thread will shorten as the fluff is removed.
’ The thread tip is gently scraped getting rid of the fluff and knots By slightly pushing the blade in the Drill'd Ey'd Needles opposite direction to the twist the thread can be untwisted and scraped into the individual cords. The cords are thinned down and flattened ready for the waxing.
Untwisting the thread
The wax is applied to the thread by pulling it between your thumb and a beeswax block, put a fair amount of pressure on the thread and pull it through as many times as needed to get a firm tight thread. If you smell melted beeswax you are on the right track.
Untwisted - Scraped thread
The ends are re-twisted, but not too tightly, and the tip is clipped off to Gyisted ready for clipping get rid of “angel hair”.
The needle is threaded and pushed on the past the taper, the needle is reversed and poked thru the taper about half way down to the end.
First poke thru taper
Page 10
Threading the Needle
Stitching with Drill'd Ey'd Needles
The remaining tip of thread is twisted harder and the needle is poked thru the thread. By Pulling the tail down the needle and over the eye it locks the thread in place.
This places the thread lock halfway down the taper, so when the thread is doubled over the eye the total diameter is the same as the thread. (in theory) this makes the needle and thread pass much easier thru the cut made by the awl.
Advantages are many: easier pulling, less need for the pliers, less “needle pop” on the reverse side, small awl cuts, smaller awl, easier awl strike, neater stitches, better thread lock in the leather, better water resistance.
In Part Three Stitching with Drill'd Ey'd Round Needles I'll use some of this 5 cord linen thread to stitch some different
Second poke Stitches per inch using the same awl. The Thread Locked on Taper Lauch Harrison FCSCL
10
Page 11
Threading the Needle
Stitching with Drill'd Ey'd Needles
I'll use some of this 5 cord linen thread to stitch some different Stitches 8 to 14 per inch using the same awl. Stitching finer than 10 per inch is generally done with finer thread and a smaller awl. You can use your regular 2 1/2” awl but if you push to far it will make the hole larger than needed. As the Stitches get finer the angle of the awl has to change slightly to allow the leather between RE the stitch remain as large ' as possible. This is key at I some point the number stitches per inch will » weaken rather than strengthen the seam.
I'm using some * kangaroo leather, two pieces of 4 oz veg tanned I - contact adhesive glued
Ss, together. I struck a line Horn Handle Awl 2 3/4" blade With my compass setat © the thickness of the glued piece. I then used some HFO Stationary Wheel Prickers to do 7, 8 &10 stitches per inch. The Awl is about 2 3/4” and set in a horn handle. The front of the ferrule is padded with a disc of leather to prevent marking the piece if there is an overstrike.
The piece should be set as deep in the jaws of your clam as possible to get a clean strike while not digging into the wood. The jaws of a harness makers horse are normally angled to give the maker a better view of the pricks so that the awl strikes can be lined up. The thin leather likes to bend out of the way of the awl strike so it is necessary to lift your arm quite high to get a parallel needle path.
Se
Stitch Prickers 7,8 & 10
Jaws of Harness Makers Horse
To achieve a tight fit for the two threads the awl strike has "to be just wide enough but not so tight that the needles can't pass or that need to pulled thru the leather with a pair of pliers. The _ awl is tapered so practice different depths of strike to give the . best result. The best practice is to stitch toward yourself when possible this gives you a good view of the pricks and when you , pull the stitches up you can see the “plumpness” of your last stitch.
i After you pull up the stitch give the needles a spin to keep HF Osborne Stationary Pricking the thread well twisted but not so much the thread curls back on Wheels itself. The wax will wear off the threads during the stitching if
11
Page 12
Threading the Needle
Stitching with Drill'd Ey'd Needles.
you prefer you can re-wax at any time. I pricked out the side and lower line of stitches with 12, 13 & 14 stitches per inch. As the stitching gets finer normally I would switch to finer thread, the finer thread gives a better view of the angle of the awl strike and the resulting “dogleg” and makes the stitch line more pleasing to the eye.
The threads can be made to cross in hole by “throwing” the stitch, the thread on the back of the piece placed over the needle so the needle is pulled thru the loop. This technique will take some of the “dogleg” out of the front stitch and make the stitch on the back less straight. It makes both lines of stitches look similar. The example piece is a thrown stitch you can see it best in the larger stitches 8 per inch. When the stitches are very close together with heavy thread it is less apparent.
Line of Pricking from 7 to 14 per inch
The best thread size for a given stitch size is a personal choice but in rough terms 6/18 & 7/18 cord threads for 4 & 5 stitches per inch. 5 cord for 6, 7 & 8 per inch 4 cord for 8, 9 & 10 per inch. 3 cord for 9, 10 & finer. The weight of leather can make a difference the heavier threads may look clunky on a fine leather but look great on 80z — 10oz. The contrasting colour like the example yellow on brown will highlight the stitching, showing both good and bad so practice is essential.
Please comment or ask questions about the needles, thread & stitching, I'm available most days thru email or telephone.
Back View
Lauch Harrison FCSCL
12