
An issue of the Society’s newsletter, transcribed from the original. Download as PDF.
(8 pages, 14820 KB)
Page 1
[Transcribed from the original 8-page issue. Paragraphs are reflowed from the original setting; spelling, punctuation and wording follow the original, including its own inconsistencies. Editorial notes appear in [square brackets]. [Although dated Winter 1997, this issue reports the opening of Leather '98 on 8 January 1998 and a death on 1 January 1998, so it was produced early in 1998.]]
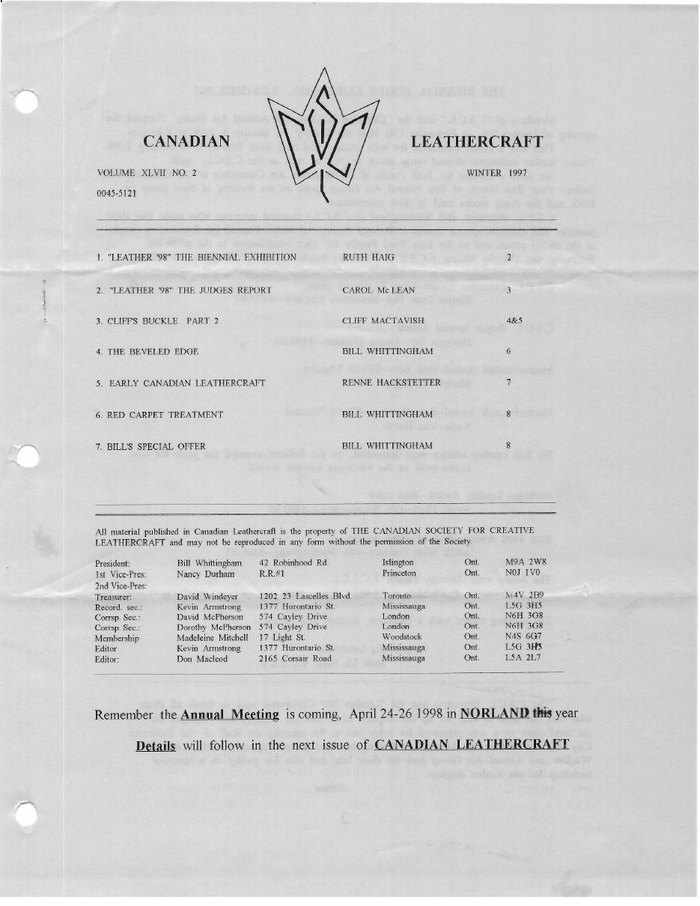
CANADIAN LEATHERCRAFT
VOLUME XLVII NO. 2 — WINTER 1997 — 0045-5121
1. "LEATHER '98" THE BIENNIAL EXHIBITION   RUTH HAIG            2
2. "LEATHER '98" THE JUDGES REPORT         CAROL Mc LEAN        3
3. CLIFFS BUCKLE PART 2                    CLIFF MACTAVISH    4 & 5
4. THE BEVELED EDGE                        BILL WHITTINGHAM     6
5. EARLY CANADIAN LEATHERCRAFT             RENNE HACKSTETTER    7
6. RED CARPET TREATMENT                    BILL WHITTINGHAM     8
7. BILL'S SPECIAL OFFER                    BILL WHITTINGHAM     8
[The contents list prints the surname MACTAVISH and the forename RENNE; both appear elsewhere in this run as McTavish and Rene.]
All material published in Canadian Leathercraft is the property of THE CANADIAN SOCIETY FOR CREATIVE LEATHERCRAFT and may not be reproduced in any form without the permission of the Society.
President:      Bill Whittingham    42 Robinhood Rd.       Islington    Ont. M9A 2W8
1st Vice-Pres:  Nancy Durham        R.R#4                  Princeton    Ont. N0J 1V0
2nd Vice-Pres:
Treasurer:      David Windeyer      1202-23 Lascelles Blvd Toronto      Ont. M4V 2B9
Record. sec.:   Kevin Armstrong     1377 Hurontario St.    Mississauga  Ont. L5G 3H5
Corrsp. Sec.:   David McPherson     574 Cayley Drive       London       Ont. N6H 3G8
Corrsp. Sec.:   Dorothy McPherson   574 Cayley Drive       London       Ont. N6H 3G8
Membership      Madeleine Mitchell  17 Light St.           Woodstock    Ont. N4S 6G7
Editor          Kevin Armstrong     1377 Hurontario St.    Mississauga  Ont. L5G 3H5
Editor:         Don Macleod         2165 Corsair Road      Mississauga  Ont. L5A 2L7
Remember the Annual Meeting is coming, April 24-26 1998 in NORLAND this year.
Details will follow in the next issue of CANADIAN LEATHERCRAFT
Page 2
THE BIENNIAL JURIED EXHIBITION, "LEATHER '98"
Members of "C.S.C.L." and the "Canadian Wildlife and Animal Art Group" attended the opening of Leather '98, at Etobicoke City Hall Art Gallery on January 8, 1998 at 8.00 p.m.
This was a juried exhibition for both groups, and runs from January 8 to Febuary 1/98. Twelve leather craftsmen showed thirty seven articles, as well as the C.S.C.L. quilt.
We were welcomed by, June Parish, of the Women's Art Committee of the Etobicoke Art Gallery. Pres. Rita Naras, of The Animal Art Group, spoke on the forming of their group in 1995, and the many media used in their presentation.
C.S.C.L. President, Bill Whittingham (F.C.S.C.L.) thanked everyone who made this show possible. Bill extended special thanks to Richard Pearsall of Moore-Pearsall for donating a couple of the award prizes, and to the Irma Ford Family for their contribution to the prize list.
Following this, Dorothy Muma, F.C.S.C.L. Chairman handed out 6 Juror's Award as follows:--
C.S.C.L. Executive Award -- Most Functional piece
Blotter Desk Pad -- Madeleine Mitchell --- $100.00
C.S.C.L. Judges Special Award
Hexigon Box -- Nancy Durham --- $100.00
Moore-Pearsall Award -- Best Belt --- $75.00 Voucher
Muriel McKnight
Moore-Pearsall Award -- Best Carving --- $75.00 Voucher
Karla Van Horne
No Soft Leather articles were submitted, so the Fellows awarded the prize for best colour work as the Michigan Leather Award.
Michigan Leather Award -- Best color
Small Flask -- Bill Whittingham --- $100.00
Irma Ford Award -- Best Moulded Article
Mask With Feathers -- Bill Whittingham --- $100.00
The Jurors were Dorothy Muma F.C.S.C.L. and Carol Mclean F.C.S.C.L.
The evening closed with a luncheon, desserts and punch.
Respectfully Submitted Ruth M. Haig F.C.S.C.L.
[The award and the family are both printed Irma Ford here. Every earlier issue in this run prints Irva Ford, including the award's own name at the 1996 and 1997 Annuals.]
The C.S.C.L. Executive and the "Leather '98" Committee wish to thank all those who took the time to help set up the displays cases and the displays and arranged the total show as it was presented for every one at the opening, the Staff of the Etobicoke City Hall Art Gallery for their aid in finding bits and pieces that were needed. Also the Wildlife and Animal Art Group both for their help and also for giving us a beautiful backdrop for our leather displays.
Editor
Page 3
"LEATHER '98" -- JUDGES COMMENTS
RE: "THE JUDGE'S SPECIAL AWARD"
C.S.C.L. LEATHER '98, ETOBICOKE CIVIC CENTER, January 8, 1998
CAROL Mc LEAN FCSCL
First of all, I would like to say what an honour it was to be one of the judges for "THE SPECIAL AWARD" in this beautiful "LEATHER '98" Exhibition. You should all be very proud of the work included in this widely varied show. Every piece invites a caressing touch and it was indeed a pleasure to handle and enjoy each one, as we worked through the jurying process.
Sometimes when we work in a particular medium for many years, we become blase and overly familiar with it; to the point that we almost take it for granted. Look again to-night. and see the absolute beauty in these pieces here assembled, for everyone to see. Also enjoy the high level of workmanship displayed here. I want to commend you for maintaining C.S.C.L.'s very high standard of leathercraftsmanship and I ask you to continue to strive for this exellence in the future.
As you can see, it is a very rounded display of work. The beauty of the leather shows through for itself, and that is what we like to see most of all. The only other item we would liked to have seen, was a handbag. Perhaps you could keep that in mind for next time.
It was a very exciting show to judge. Lots of innovations and creative ideas put into leather. Both functional and decorative pieces some almost whimsical.
Judging is so very subjective and personal. What one panel loves, another may not. But, C.S.C.L.'s standards to use as a judging framework, it helps formulate the quality from the very begining. We all strive for the same goal.
The award that I am to present this evening is called, "The Judge's Special Award". I shared this specific task with Dorothy Muma, Chairman of the Council of Fellows. We performed our duties after the, The Board of Selection, had chosen the entire content of the show. What a lot of soulsearching we did! Put yourself in the position of trying to select JUST ONE EXTRA SPECIAL PIECE from all the exceptional articales included in this show and yiou will know the great amount of contemplation we faced. We slowly and painstakingly kept eliminating pieces, one at a time, until three pieces remained, It was like pulling teeth.
I want to say, too, what a pleasure it was sharing this jurying process with Dorothy. I always learn something very useful from each time. I think we work well together. No fights or major differences of opinion. Still friends when all is over. Aiming for a common goal.
I want you to know that it took us almost as long to do the judging for this "one piece of our choice", as it did for all of the other separate awards beforehand.
We went over all the pieces once more as we worked through the elimination process. We looked for the finest details which would make the ultimate decision for us - in those three pieces. We then privately and silently, made our individual choice from the three remaining articles, took a deep breath, and said it out loud at the same time. We had both selected the same piece! What an exciting moment!
Now to the award presentation, It gives me great pleasure to present "The Judge's Special Award" to Nancy Durham for her Six-Sided Box! Congratulations Nancy!
I thought you may like to hear some of the comments about the box as it was judged... The lid fits so beautifully...and you can turn the lid to any of the 6 positions and it still fits well. If you have ever made a four-sided box you know how difficult it is to get a nice fitting lid. Well, just add two more sides to the situation, and you have increased the dilemma and difficulty even more so. ...The box sits very square and solid, it doesn't wobble. ...The lifting knob on the lid is in lovely proportion to the overall box and serves its purpose well, in that it is easy to take hold of and strong enough to carry the weight of the lid but still not be cumbersome. Tastefully decorated, allowing the leather to be the major focus of interest. It is a piece of leatherwork that you would enjoy using on a daily basis. All in All, a very lovely, yet very functional article. Congratulations again, Nancy.
Page 4
CLIFF McTAVISHES RAISED INLAY BUCKLE — part 2
This is Part 2 of the write-up from the last fall issue. Cliff wrote this up after his presentation at the workshop at Hamilton. He had'nt expected it to be done as an article but we did a little arm twisting and finally he consented and sat down and wrote the complete article. The Big Brackets { } on the insert are mine, I added it because of trial and error, after making a couple of Buckles following a workshop in Mississauga, a couple of years ago, when Cliff first put on the exhibition for our group.
5. Rough up the metal sirfaces of the buckle blank, both sides, with sandpaper. Do the bottom side first. The leather will still be damp. Punch a hole for the buckle hook, and cut out the slot for the billet aitachment. N.B. If you can remove the Wire Belt Attachment piece with a pair of pliers, then cutting the slot will not be necessary, but you will need holes to allow the Wire to go back in place after you have finished the Buckel, One at the each end of the holder.
While the leather is still damp and pliable, mold it to the shape of the back of the blank. Use a bone folder or modeler to get all the crevices. { If a smooth back is required, cut pieces of scrap leather, thickness of clasp holder .2 or 3 oz. and fit around the welded attachment holding the hook and belt attachment piece. Glue onto the buckle back, trim the edge and skive so the surface is flat along the edges before you do any further work on the leather back piece. } It is also important to form the back piece of leather over the outside edges. The leather should follow curve of the top surface. looking at the bottom, you should see the outside edge ridge of the buckle all around. This shows your stitching line and is also used to mark off your cutting line. We are now ready to glue the back on.
6. Hold the leather back with your fingers and glue (contact cement) the metal back. When glue dries, glue the leather and mold it back on while glue is still wet, This gives you a chance to get it back in the right place.
7. Now glue the lining piece (1 1/2 -- 2 oz.) to the top surface.
8. With sharp dividers, scribe a line 3/16" from the buckle edge formed on the back. This is your cutting line. Cut this now.
9. Now take the top piece with the pattern already transferred and with a Double Zero punch, punch holes in all the tight corners of cut outs. With a sharp pointed knife, or scalpel, cut out the pieces. I usually do two pieces at a time, separated by at least one piece. This keeps the pattern from becoming too distorted when fitting the inserts back in. Place your morocco face down. Be carefull not to scratch the surface. Place your cut out piece face down on the back of the morocco. Make sure you have 1/4" clearance all around. With a pen, trace around cut out piece. Draw another line about 1/4" outside this line. This will be your cut out line. Before you cut, take a stitching groover and groove around just outside the tracing line. I find this helps me in the skiving. Cut this piece out now and skive from the groove to the outside. Take your dividers and adjust them to the thickness of your morocco. On the grain side of the cut out piece, scribe a line all around the cut out. Now cut this strip off. This is done to allow for the thickness of the morocco molded over top. Scruff up the top surface of cut out piece with sandpaper. When glueing these small pieces, I like to use a cheep paint brush with the bristles cut halfway down to make them stiffer. Now glue the top surface and side edges of cut out piece with contact. Also glue matching morocco piece, being careful not to get any glue on skived edges. Now glue that cut out piece to the back of the morocco with an equal distance all around to the tracing line. With another paint brush, run some water around the edge of the groove made in the morocco. This should make it easier to form the morocco over the edges of the cut out piece.
Page 5
Flip the piece over face side up and with a bone folder, mold the morocco over the cut edges. Make it a right angle. Take this insert piece and try it in place. I usually find the insert slightly too big. This is good because the edges need to be sanded anyway. Slightly bevel top edges with sandpaper. When piece fits (without distorting shape), dye and smooth the edges will compress the fibers, giving you more space. Take this into account so your insert doesn't become suddenly too loose. Dye your edges. Rough up the edges of the morocco with sandpaper. Apply glue to both surfaces carefully and stick in place. Continue in this way for all pieces.
10. Now comes the hard part - glueing the top piece to the rest of the buckle and keeping the pattern centered. I would suggest that you make a tracing of the shape of your buckle on a piece of light cardboard and cut it out (save the outside piece with the cutout, you will be using this). Turn the top piece face down and taking the cardboard (the part you can see through), centre that over the top piece and draw a line. Now glue the top piece to the rest of the buckle using the line to centre it. Work with the glue still wet to give you time to move it around, and get it into proper position.
11. When dry, cut excess leather off.
12. Groove a stitching line about 3/16". I usually dampen the groove and press it in more with a bone folder. Then while still damp. run a #7 stitching wheel around the groove. Prepare your thread and stitch. Bevel your edges, sand smooth and dye. We are now ready for the finish coat and I think we are done.
For those who can't find the last issue for the pattern we are printing it again. and again:- Do not cut the outside edge or mark it on your leather
[The two pattern outlines from the Fall issue are reprinted, labelled Top and Bottom.]
Page 6
THE BEVELED EDGE -- Winter 1997 Bulletin
"Scrape Bin Santa" — Bill Whittingham
Here is a fun little project to get you "in the Spirit" made from 4-5 oz. vegetan scrap. (Use any year, every year)
1. Trace pattern in Fig. 1 on film, then case leather and retrace onto vegetan scrap.
2. Strop your swivel knife and carve all lines.
3. Bevel all lines using smooth bevelers only.
*** Remember your figure carving principles... the moustache is on top of the beard which is on top of the face etc. Freehand nose in with a modeler.
4. Using your fine hair blade, do the moustache hair as in Fig. 2.
5. Using the same blade, do the beard as in Fig. 3 starting in the centre of the beard under the lips and working out to the sides. If you don't have a fine hair blade you can substitute a small lined pear shader (P234), and just use it in your fingers with a long sweeping motion.
6. Texture the pom pom and fur trim on Santa's hat with a stippler. If you don't have a stippler, you can substitute backgrounder (A104) once again just using it in your fingers.
7. The eyes are done with plain seeder S633 and the eyebrows are put in with figure tool F925, if you do not have a tool small enough to do the eyebows, you can always glue a small piece of cotton batting into place after the project is finished.
8. Thoroughly case leather again and using the spoon of a modeler emboss the pom pom out, working from the back of the leather to give it more "life". Use a ball point modeler, the large end, and push out Santa's cheeks in the same manner.
9. Cut Santa out using an art knife, (Scalple or Exacto Blade) and finish the edges using a bone folder.
10. Gently cup the broach in your hand flesh side up and gently squeeze adding a slight curve to the body of the pin.
11. Bake pin on a board in the oven at 200 degrees for one hour.
12. Using acrylics, dye in traditional manner. Don't forget the "roses" in Santa's cheeks.
13. Apply finish and afix pin on back with Epoxy glue.
[Three pattern figures accompany the article, labelled Fig. 1, Fig. 2 and Fig. 3.]
Page 7
EARLY CANADIAN LEATHERCRAFT
by Renne Hackstetter
Shown here are Canadian National Exhibition, First Prize Cards, which offer us evidence that prizes were offered for leather embossing and carving as early as 1908! Agricultural and Industrial Exhibitions promoted leather crafting by offering prizes under the Home Handcraft sections at the fairs. Class 267, Section 13, No. 2, may have been the section of the CNE which leathercrafting came under in 1908. We see from the card that a Mrs. G.E. Gresham won possibly two years in a row.
It is tantalizing to think of what the items might have been. We don't know what the style of leathercraft Mrs. Gresham practised. However, from the evidence of books and craft magazines of the period we might suppose that the style was an organic, flowing style, based on natural forms such as plants and flowers.
The idea that leathercraft in Canada had it's genesis in the Fifties was acceptable at one time, as there was scant evidence of earlier artisans, let alone an actual "movement". These two First Prize Cards offer us evidence both that Canadian Leathercraft has early beginnings and that the C.N.E. has had a long association with leather as a craft.
[Two CNE First Prize cards are reproduced. Only the heading THE TORONTO — the opening of the Exhibition's formal name — resolves; the handwritten entries do not.]
NEWS AND VIEWS
Robert (Bob) Quinn, an ex-member of Mississauga Group, passed away on Jan. 1, 1998. "Bob" belonged to Mississauga for about 5 years, but dropped out about 6 years ago. Bob's wife preceeded him about 2 years ago. Our condolences to the Quinn family for their loss.
Page 8
RED CARPET TREATMENT
(Bill WHITTINGHAM)
On behalf of the C.S.C.L. I would like to extend a warm welcome to our new member-at-large Bonnie Goguen from Newcastle, New Brunswick. Bonnie started leathercraft in 1986, when I hired her as an employee for Weston Tandy store. She was a quick study and genuinely interested in the beauty and versatility of leather.
She moved to New Brunswick in 1987, and although she was no longer in a leathercraft store environment, her love of the craft remained. Since that time, she has kept her hand in creating leather gifts for friends and family.
After researching the market in her area, Bonnie decided this summer to start up her own leathercraft company, and thus, "Shooters Leather Crafting" was born.
She says she can "hardly wait to attend the leather annual" so she can take part in our workshops and demonstrations. Bonnie is a very enthusiastic and energetic person and a genuine joy to talk to, so I hope you will all introduce yourselves to her when you attend the annual.
SHOOTERS LEATHER
762 King George Hwy.
Miramichi, N.B.  E1V 1P8
Ph: 622-4988   Fax: 624-1094
Prop: Bonnie Goguen
[The business card's own heading is partly obscured in the scan, reading HOOTERS LEATENR; the article names the business Shooters Leather Crafting.]
BILL'S OFFER AND CHALLENGE
As owner of Garnet Dye Co., I have decided to offer everyone in the C.S.C.L. a chance to win a prize. The next five members of the C.S.C.L. who recrute a BRAND NEW MEMBER to the C.S.C.L. will each win a free litre of Garnet Polish Coat.
***** Please note. Brand New Member means just that. I'm not talking about someone who is late paying their dues, or has otherwise abstained from membership for one reason or other. We're looking for new people and new ideas. *** Garnet Chestnut Brown Antique, Golden Tan Antique or Rouge Antique can be substituted if you wish.
Now, YOU, have yet another reason to spred the word about the, "Canadian Society for Creative Leathercraft".
Respectfully submitted William H.G. Whittingham Pres. F.C.S.C.L.
[Bill Whittingham identifies himself here as owner of Garnet Dye Co. The dye is spelled Garnet throughout this notice; The Beveled Edge in Winter 1996 spells the same product Garnett.]