
An issue of the Society’s newsletter, transcribed from the original. Download as PDF.
(8 pages, 16919 KB)
Page 1
[Transcribed from the original eight-page issue — the first in the bulletin's smaller typewritten format. Paragraphs are reflowed from the original setting; spelling, punctuation and wording follow the original, including its own inconsistencies. Editorial notes appear in [square brackets]. The volume is printed "XXXX" (forty) on the masthead.]
CANADIAN LEATHERCRAFT
VOLUME XXXX NO. 1                  FALL 1991                        0045-5121
TABLE OF CONTENTS
Index                                                                     1
A Small Portmanteau                                                       2
By David Windeyer, Hamilton Branch
Message from the Editors                                                  7
Workshop                                                                  7
By Ruth Haig, FCSCL
At St. Margaret's Anglican Church, Hamilton, Ontario
Nominating Committee, 1991 - 1992                                         8
All material published in Canadian Leathercraft is the property of THE CANADIAN SOCIETY FOR CREATIVE LEATHERCRAFT and may not be reproduced in any form without the permission of the Society.
EXECUTIVE
President:       Don MacLeod        2165 Corsair Road       Mississauga  Ont.  L5A 2L7
1st Vice-Pres:   Jack Meharg        36 Bailey Cresent       Scarboro     Ont.  M1G 2P3
2nd Vice-Pres:   Bill Whittingham   42 Robin Hood Road      Islington    Ont.  M9A 2W8
Treasurer:       Lea Love           311-3695 Kaneff Cres.   Mississauga  Ont.  L5A 4B6
Record. Sec:     Kevin Armstrong    1377 Hurontario Street  Mississauga  Ont.  L5G 3H5
Corrsp. Sec:     Rotating Sec.      1357 Baldwin St.        Burlington   Ont.  L7S 1K1
Membership:      Madeleine Mitchell 17 Light St.            Woodstock    Ont.  N4S 6G7
Editor:          Lois MacPherson    1407-350 Lynnwood Dr.   Oakville     Ont.  L6H 1M8
Editor:          Betsy Rennie       1357 Baldwin St.        Burlington   Ont.  L7S 1K1
Page 2
A SMALL PORTMANTEAU
By David Windeyer, Hamilton Branch
In the early 1980's, a friend of mine was confined to his home after a back operation, and he took up leathercraft to pass the time. I was impressed with his work and the craft, itself; so I borrowed his tools and took a course in creative leathercraft at a summer school. At the school I met five Hamilton Leathercraft Guild members and joined their guild in 1987, when I moved near Hamilton.
For a few years I worked on the basics of leathercraft and made bags, belts, purses, etc., for friends and family. But, after a visit to the leathercraft shop at Colonial Williamsburg several summers ago, I became intrigued with the work being done there and with the idea of creating replicas of leather items used in the late 1700's and 1800's.
The leather craftsmen at Williamsburg said that leather in those days was like plastic today - plentiful and cheap! It was used for all kinds of items - household items, clothes, harness and belting; from heavy, thick leather, shoe soles to tavern mugs; from fine leather, ladies' shoes and sewing kits.
It occurred to me, when visiting museums and pioneer villages, that there was a noticeable absence of leather items. The reason, I suspect, was that leather items were used mainly for work and thrown out when worn out. Also, as we all know, leather is very bio-degradable and over the past century or so, these items have simply rotted away. And so I became interested in recreating those leather goods of yesteryear, as true to the original as possible. This would help to visualize and fill in the void of leather goods of the past which no longer existed in any quantity. Besides, there are many items which could be used in our environmentally sensitive atmosphere today, or just be lovely or interesting display items for our homes or museums and pioneer villages.
The "small portmanteau" I made was adapted from a design in one of the reference books I use. Portmanteaus were the suitcases of the colonial days, and early 1800's. This one is made of heavy veg tan leather (10 oz) and lined with a light weight buckskin. It is oval at the ends, but could be round or hump-backed, with a modification to the body. It has only one carrying handle on the end. They seem to have been small enough to carry in one hand and would have contained small personal items such as clothing, trinkets, personal papers and maybe a pistol, or other valuables.
HOW THE PORTMANTEAU WAS MADE
Only basic tools are required: knife, edge beveler, edge creaser, groover for the stitching line, awl, punch, needle, thread, dye (black, brown or British tan), white glue and Barge (contact) cement and scissors.
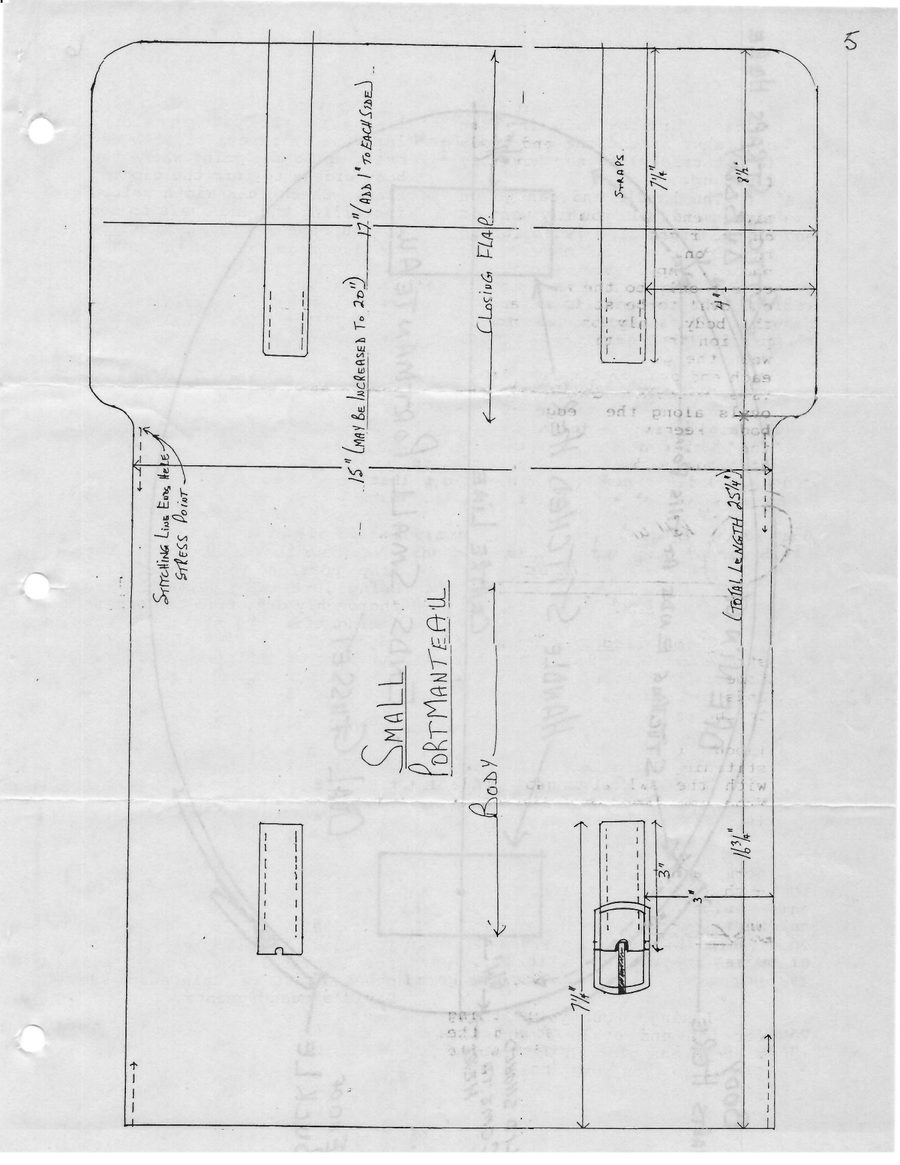
Cut the pieces as shown on the pattern. Use 10-12 oz veg tan for the body, ends and handles, 7-8 oz for the straps, or skive the 10 oz down so the dyeing will match better.
Page 3
YOU SHOULD HAVE:
A. 1 body piece B. 4 end pieces C. 2 - 14" x 1" straps D. 2 - 5" x 1" buckle straps E. 1 piece 10" x 1-1/2" for the outside of the handle. F. 1 piece 8" x 1-1/2" for the inside of the handle. G. 2 small keepers 1-1/2" wide, if you are not using harness buckles.
For the interior lining you need 2 pieces the same size as the end ovals and a piece the size of the body, except that the part inside the case will be narrower by the thickness of the end of each Side. The lining can be any light-weight upholstery leather, suede or buckskin.
Edge bevel the pieces as follows: the top side of A, E and F, and both sides of the straps, C and D.
Gouge stitching lines on the straps, handle and body, being careful not to go all around the body, but only along the end and sides and only part way around the end ovals, as shown on the patterns.
Dye all pieces except the inside of the end ovals, as they will be covered with lining.
End Ovals: glue flesh sides together and when dry, trim the edges very flat.
Handles: skive the shorter inside piece to about half the thickness at the ends and back a couple of inches (see diagram below.
Glue flesh sides together with the short piece in the centre of the longer outside Piece. This will leave the outside piece with a 1" overhang on each end.
When the glue is dry, saddle stitch just to the end of the short inside piece. The overhanging ends will be bent and stitched to one of the oval ends. To bend these ends, dampen he whole handle, as shown below, and clamp to the end oval where it is to be stitched on. When dry, glue to the end oval and stitch through the two layers of the -end piece. Gouge a stitching line on the inside, so the stitching sits flush with the leather and won't bulge through the lining.
Straps: Punch three holes at 3/4" centres starting 3-12" from the end. Glue and stitch to the body in the position shown on the pattern.
Buckle Straps: These should now be assembled. -Skive the ends. With the buckle in position, glue in place in the strap and then glue the buckle assembly to the body in the position shown on the pattern and stitch in place. Doing this now makes the stitching easier and will help to hold the end ovals in place when gluing them to the body.
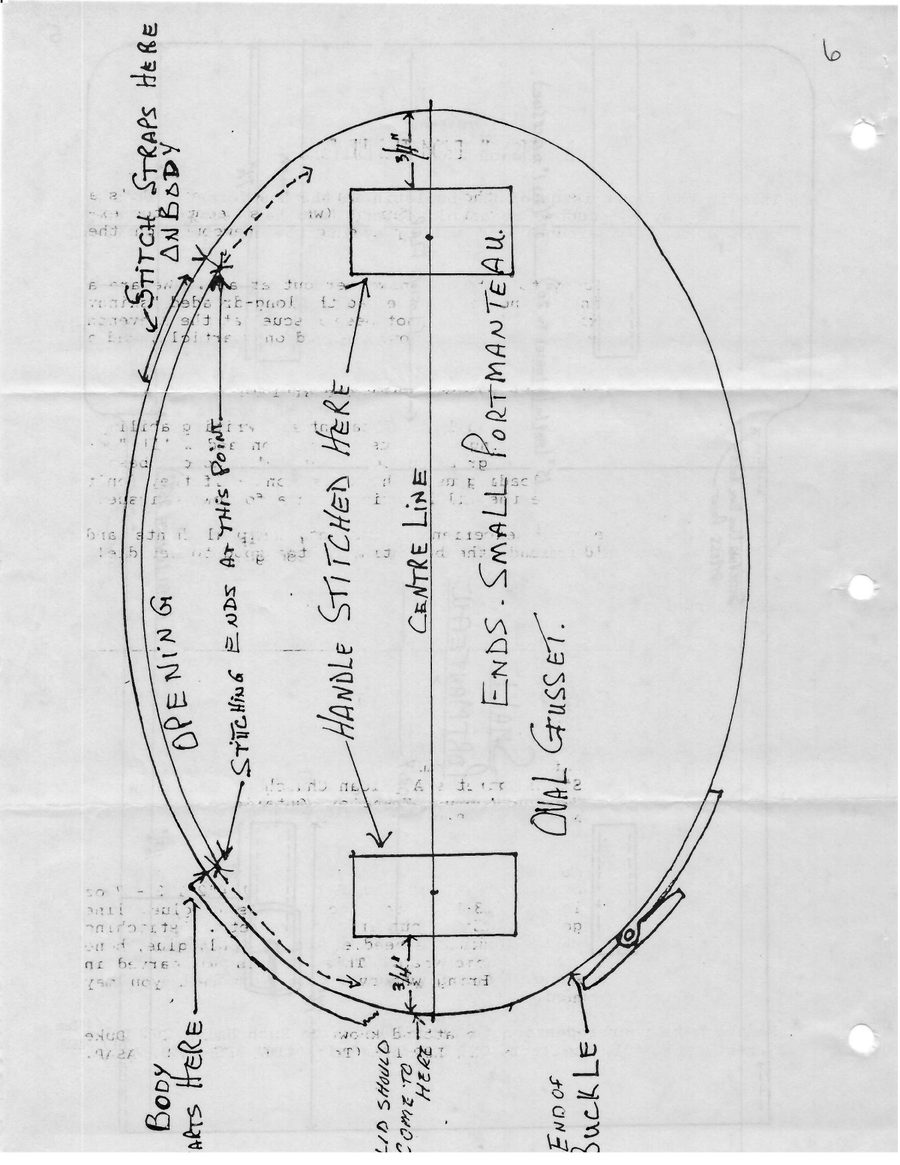
Installing the end ovals: When the straps and buckles are attached to the body and the handle to the end oval, locate the front opening mark on each of the end ovals, as shown on the pattern. Line that mark up with the front lip of the body.
Page 4
I dry-ran this alignment process just by buckling the case shut around the end ovals (a bit tricky) to see how they lined up.
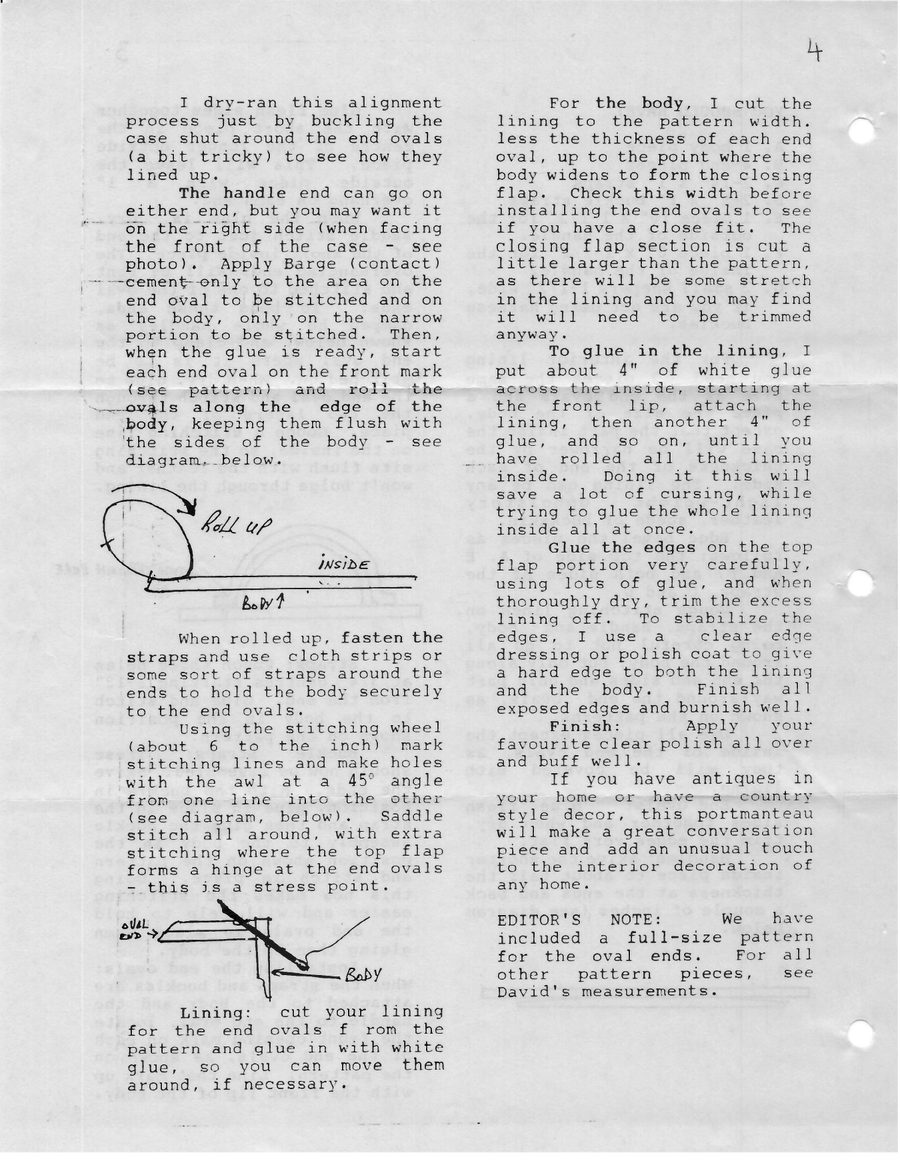
The handle end can go on either end, but you may want it on the right side (when facing the front of the case - see photo). Apply Barge (contact) cement only to the area on the end oval to be stitched and on the body, only on the narrow portion to be stitched. Then, when the glue is ready, start each end oval on the front mark {see pattern) and roll the edge of the ovals along the body, keeping them flush with 'the sides of the body - see diagram,..below.
When rolled up, fasten the straps and use cloth strips or some sort of straps around the ends to hold the body securely to the end ovals.
Using the stitching wheel (about 6 to the inch) mark stitching lines and make holes with the awl at a 45° angle from one line into the other (see diagram, below). Saddle stitch all around, with extra stitching where the top flap forms a hinge at the end ovals - this is a stress point.
Lining: cut your lining for the end ovals from the pattern and glue in with white glue, so you can move them around, if necessary.
For the body, I cut the lining to the pattern width. less the thickness of each end oval, up to the point where the body widens to form the closing flap. Check this width before installing the end ovals to see if you have a close fit. The closing flap section is cut a little larger than the pattern, as there will be some stretch in the lining and you may find it will need to be trimmed anyway.
To glue in the lining, I put about 4" of white glue across the inside, starting at the front lip, attach the lining, then another 4" of glue, and so on, until you have rolled all the lining inside. Doing it this will save a lot of cursing, while trying to glue the whole lining inside all at once.
Glue the edges on the top flap portion very carefully, using lots of glue, and when thoroughly dry, trim the excess lining off. To stabilize the edges, I use a clear edge dressing or polish coat to give a hard edge to both the lining and the body. Finish all exposed edges and burnish well.
Finish: Apply your favourite clear polish all over and buff well.
If you have antiques in your home or have a country style decor, this portmanteau will make a great conversation piece and add an unusual touch to the interior decoration of any home.
EDITOR'S NOTE: We have included a full-size pattern for the oval ends. For all other pattern pieces, see David's measurements.
[Two hand-drawn assembly diagrams accompany the text, showing the end ovals rolled along the body and the 45° awl angle between stitching lines.]
Pages 5–6
[Two full-page hand-drawn pattern sheets for the portmanteau, with hand-lettered labels for the body, end ovals, straps, buckle straps and handle, stitching lines, and dimensions. Page 5 carries the body and strap layouts (the pattern is noted to be increased to size); page 6 carries the full-size end-oval and handle pieces. There is no body text.]
Page 7
A MESSAGE FROM THE EDITORS
This is the first issue of the bulletin in the new format. It's a bit like saying goodbye to an old friend (who has become too expensive to keep around) and warily eyeing the newcomer on the block.
Actually, we're lucky to get this newcomer out at all. We are a little late in doing so and would have had the long-dreaded "skinny issue" - really skinny - if we had not been rescued at the eleventh hour by Dave Windeyer, who sent us our one and only article, and a very good one.
That's right folks! Only one article! We know you're out there with lots of talent and writing ability. If you really hate composing, give us permission and we'll "rewrite" for you. We're not great writers, but we'll do our best. Don't worry about overloading us with submissions - if they don't all make the next issue they'll be printed in a following issue.
Come on! Share your experiences, talent, helpful hints and projects. Our old friend, the bulletin, is too good to let die!
Betsy and Lois
WORKSHOP
DATE:          Saturday, November 16, 1991
PLACE:         St. Margaret's Anglican Church, Emerson Avenue,
Hamilton, Ontario
[a character before "Emerson" is obscured by the page border]
TIME:          All day - 9:00 a.m. to 4:00 p.m.
FEE:           To be decided
DEMONSTRATOR:  Ruth Haig
TOPIC:         Molded Credit Card Holder
YOU WILL NEED: Wooden block, 2-1/4" x 3-1/2" x 1/4"; 2-1/2 - 3 oz leather (3-4 oz for back of case), glue, line gouge, knife, cutting board, etc., stitching wheel, saddler's needle, thread, awl, glue, bone folder, dome snap. This list is not carved in stone. Bring whatever else you feel you may need.
Please make your intention to attend known to Ruth Haig, 264 Duke Street, Ste. 401, Hamilton, ON, L8P 1Y3 (Tel: (416) 525-0780), ASAP.
Page 8
NOMINATING COMMITTEE 1991-1992
The proposed slate of Executive Council for Canadian Society for Creative Leathercraft is:
OFFICERS:
Past President            Ruth Haig           (416) 525-0780
President                 Don MacLeod         (416) 277-2058
1st Vice-President        Jack Meharg         (416) 439-5873
2nd Vice-President        Bill Whittingham    (416) 239-3742
Recording Secretary       Kevin Armstrong     (416) 278-4666
Corresponding Secretary   Betsy Rennie        (416) 639-0771
Treasurer                 Lea Love            (416) 276-7340
DIRECTORS
 1.  Fred Brown           (416) 626-3184
2.  Jessie Little        (416) 783-8603
3.  Gladys Riddell       (416) 762-7466
4.  Madeleine Mitchell   (519) 537-7821
5.  Bea Austin           (416) 522-8282
6.  Muriel McKnight      (416) 529-9149
7.  Lea Love             (416) 276-7340
8.  George McPhail
9.  Joyce Scruton        (416) 844-9471
10.  Harold Brister       (416) 279-0333
11.  Richard Fielding     (416) 486-8109
12.  Laura Bush           (613) 392-1475
13.  Jim Edwards          (416) 699-8214
14.  Art Cousins          (705) 454-1013
15.  Lois MacPherson      (416) 842-1383
BRANCH PRESIDENTS
Hamilton       Betsy Rennie        (416) 639-0771
Mississauga    Bill Whittingham    (416) 239-3743
Norland        Carol Broumley
Toronto        Bruce White
Woodstock      Nancy Durham
EX-OFFICIO
Chairman of the Council of Fellows   Dorothy Muma        (416) 654-5635
Teaching Standards                   Bob Muma            (416) 654-5635
Archivist                            Kevin Armstrong     (416) 278-4666
Librarian                            René Hackstetter    (416) 535-8509
Membership                           Madeleine Mitchell  (519) 537-7821
Co-Editor                            Lois MacPherson     (416) 842-1383
Co-Editor                            Betsy Rennie        (416) 639-0771
Respectfully Submitted
Ruth M. Haig, F.C.S.C.L.,
Past President
[The original prints "Muriel McNight" for McKnight.]