
Hinged Box — CSCL Workshops, Mississauga, March 19, 2017: outline, history, pattern and steps
Filed as “Hinged Box”.
the original (PDF) · 10 pages · 733 KB · the full-resolution scan, 5.1 MB, for close research
Page 1
CSCL Workshops presents
Hinged Box
Sunday, March 19, 2017 10:00am to 4:00pm
Focused on Food 885 Rangeview Road, Mississauga
Registration - $45 members $50 non-members Materials - included
Outline
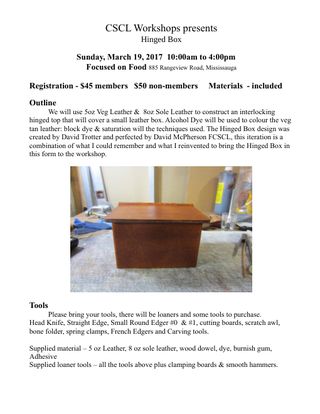
We will use 5oz Veg Leather & 8oz Sole Leather to construct an interlocking hinged top that will cover a small leather box. Alcohol Dye will be used to colour the veg tan leather: block dye & saturation will the techniques used. The Hinged Box design was created by David Trotter and perfected by David McPherson FCSCL, this iteration is a combination of what I could remember and what I reinvented to bring the Hinged Box in this form to the workshop.
Tools
Please bring your tools, there will be loaners and some tools to purchase.
Head Knife, Straight Edge, Small Round Edger #0 & #1, cutting boards, scratch awl, bone folder, spring clamps, French Edgers and Carving tools.
Supplied material – 5 oz Leather, 8 oz sole leather, wood dowel, dye, burnish gum, Adhesive
Supplied loaner tools – all the tools above plus clamping boards & smooth hammers.
Page 2
History of Leather Boxes
Leather boxes of many sorts were the sold over the years, but only to a select market. The cost of leather makes many other materials more economical. The necessity of leather as a material can be justified when the boxes are used for personal items. The line between a box and a purse, satchel or kit bag is definite. Hard boxes are mostly decorative and of limited use.
The Tools as used in order of appearance
Round point Awl,
Straight Edges, Set Squares, Rulers
Round/Head Knives well sharpened/polished knives will be able to cut skirting or other heavy leather without undue strain on the hands. Safety Issue – any skin touches the knife - there will be blood.
Dye and Gum Tragacath
Rampart Round Edger #1, CSO French Edger #0
CSO Carving tool 1/8” and 3/32”
Excel #18 flat Chisel replacement blade
Shoe Anvil and Smooth Faced Hammer, Bone Folder
Clamps and glue up boards
Sandpaper, mandrels and blocks
The Materials
4 - 5 oz or heavier vegetable tanned cowhide, sole leather 8 - 10 oz, contact adhesive and/or white glue, dye, wood dowel
The Skills
Proper techniques for cutting and trimming heavy leather. Round Knife angle and Safety.
Edge rounding and burnishing, Dye techniques: Block Dye, Saturation Dye,
Gouging & skiving
Glue up tips and techniques
Page 3
The Pattern
Our project can be made entirely of 5oz veg tanned leather or using sole leather for the base and centering top piece. The lay out will be done on a rectangle of leather 20” x 11”. Three pieces; the side, lower hinge and hinged top will be traced and cut. The sole leather base will be precut to save time. If you use 5oz leather the bottom is made from two pieces. Full size patterns of the hinge are at the back of the booklet.
Decoration and Design
The box will be dyed. Molding and creasing work can be incorporated onto the top and sides of the box. The first dye will be a saturation dye of Saddle Tan, then block dye with Mahogany. Participants are encouraged to use their own favourite colours.
Glue up
White glue will be used on the Top Hinge piece, this allows reposition without distorting the leather. The lid has to be flat and regular. The sides and bottom are attached using contact adhesive, the grain side of the leather has to be well scratched and roughed up to get a good glue bond especially near the hinge dowel. Contact adhesive is only ready to bond when both sides are dry enough that no adhesive transfers when touched with a finger. A shoe anvil and smoothed faced hammer will be used to get a firm bond.
Trimming
The lid gets trimmed if the glue up is off kilter, using pattern lines and a knife. A spoke shave or coarse sandpaper can be used to smooth the edge of the top if needed. A corner rounder will be used to finish the corners, if you wish you can hand trim the corners or leave them square. The edges will be very slightly beveled this will leave a flatter unrounded edge. This square edge can be sanded and burnished.
Page 4
The Project
Layout and trace the pattern on the grain, the leather can be slightly dampen to achieve visible marks. Proceed to dye and decorate the entire piece of leather and, this will give an even smooth transition between the pieces. Cut out the edges of the pieces.
Top Hinge
Cut the short edges of the slots on the top hinge using a 1/2” chisel blade – angle the blade at 30º so that the grain side sticks out farther than the back. Use the 30º guide for accuracy. Cut the long edge of the slot with head knife or scalpel. Make sure to under cut to get all the “hairy pieces” out of the slot.
Round the edges of slots on the back side/flesh side only using a #1 round edger.
Round or Bevel the grain edges top only using a #0 edger.
Dye the edge of the top
Burnish the slots using the wood dowel and some gum trag.
Extend a lines on the flesh side along the short edge to the slots to the edge of the leather.
Damped the hinge and fold over the dowel to get some memory of the fold.
Paint on the white glue getting the up close to the line.
Fold the top and position in the glue clamps.
Page 5
Clamp for 10 minutes then remove from clamp and place the dowel in the hinge.
Push down near the hinge with a bone folder to flatten the top and tighten the hinge.
Side
Bevel or round the top and bottom edges of the grain side with #0 edger.
Position the bottom piece on it's long side. - centered approx. 9” in from the edge.
Trace down the both short sides of the base.
Gouge the line on the right hand side on the right hand side of the line using a square or straight edge.
Gouge the line on the left hand side on the left hand side of the line using a square or straight edge.
Page 6
Spin the base 90º and place on the edge of the Gouge.
Trace down the side of the base. Do both sides and gouge outside the lines on both sides.
Bevel or round the top edge of the flesh side using #1 edger.
Skive the two short sides on the flesh side only. Make the skive about 1” wide.
Scratch the grain side skived edge overlap on the right hand end.
Dye and burnish the top edge.
Dampen and fold the gouged corners, to give them some memory.
Open the corners up and apply contact adhesive.
Page 7
Apply Glue on the flesh side bottom edge of the side and on the edge of the sole leather.
Squeeze the middle two gouges make the corners sharp all the way up and down.
Attach the front of side to the bottom plate, keeping the bottom plate flat on the table. Start at the front of the box, fitting the two corners evenly on both sides then flatten out any bumps.
Squeeze the corner on the right end, the one that has been skived and scratched
Attach the corner to the bottom plate, Start at the front of the box, fitting the corner evenly.
Apply Glue on the flesh side of the open end skive and the Grain side of the corner already on the sole plate.
Squeeze the last corner.
Attach the last corner to the bottom plate, Start at the front of the box, fitting the corner evenly. Press the overlap together.
Check for fit on the bottom, if it looks good tap glue joints with a hammer.
Lower Hinge
Cut the short edges of the slots on the lower hinge using a 1/2” chisel blade – angle the blade straight up and down. Cut the long edge of the slot with head knife or scalpel. Make sure to under cut to get all the “hairy pieces” out of the slot.
Page 8
Round the edges of slots on the back side/flesh side only using a #1 round edger.
Round or Bevel the grain edges top only using a #0 edger.
Dye the edge of the lower hinge and burnish with gum.
Dye the short edges of the slot.
Burnish the slots using the wood dowel and some gum trag.
Fit the hinges together and work it back and forth til it get smoother. Keep at it til the joints start to work. The two hinges are the same size and to fit both of them have to give a little. Ensure measurements are correct, wiggle and move the hinge to compact and burnish the leather. This can be a trying experience as the leather may be damp and un cooperative.
Extend a lines on the flesh side along the short edge to the slots to the edge of the leather.
Damped the hinge and fold over the dowel to get some memory of the fold.
Mark the side with 3 1/2” distance to the edge with pen
Centre the hinge on the back of the box over the joint. With the 3 1/2” facing out.
Mark the edge of the hinge lightly with a scratch awl.
Scratch & Scuff the grain of the leather with sand paper or knife. Top and bottom edges are key.
Apply glue on the flesh side of the hinge making sure to get the adhesive right up to the lines.
Apply glue to the grain side of the box.
Assemble the hinge with the 3 1/2” side is out, making sure the slots are even with the top of the box, and the lower edge is even with the bottom.
Fold the hinge over and settle it on the bottom plate mark the sides, then lift the hinge and apply the adhesive to the marked lines.
Glue the bottoms together flesh to flesh.
Tap with a hammer is the hinge is right.
Apply gum trag and burnish the inside edges of the hinge
Top Hinge after the glue has cured or dried
Page 9
Trim and sand the edges. Use the coarse sandpaper in one direction only. Use finer sandpaper to get the edge nice and flat.
Round the edge if needed with #0 edger.
Dye the edges.
Apply gum trag and burnish the edge.
Apply gum trag to the hinge and burnish the slots with the dowel.
Fit the hinges together and work it back and forth til it get smoother. Keep at it til the joints start to work.
Top Hinge Lid Alignment Spacer if required
Cut two pieces of 5oz leather or one piece of sole leather in the same pattern as the bottom.
Glue the two pieces of leather together flesh to flesh.
Colour or Dye the leather.
Cut 1/8 of an inch off one of the long edges
Trim, sand and smooth the other edges
Round the top edges of the Dyed side.
Dye the edges
Burnish the edges with gum trag
Fit spacing piece for hinged top, Use double sided tape to get a good fit.
Mark the position with an awl.
Scratch and scuff the area on the Top Hing Lid and the back of the alignment spacer.
Assemble the spacer making sure it is tapped down securely.
Moisten the box and Rub it down with a coarse cloth to burnish and smooth the leather.
Spray with Super Sheen, Lacquer or your favorite finish
brought to you by,
Lauch Harrison, ACSCL
Page 10
Notes
The words above are the document’s own, as the paper prints them. Spelling and spacing are left as they stand.