
An issue of the Society’s newsletter, transcribed from the original.
(12 pages, 2.0 MB)
the full-resolution scan, 34 MB, for close research
Page 1 — Notice of 31st Annual Meeting; Canadian National Exhibition, 1981
CANADIAN LEATHERCRAFT
Volume XXIX, No. 2
0045-5121
Winter
December/January 1981
The Canadian Society For Creative Leathercraft Notice of 31st Annual Meeting
May 1, 2, and 3, 1981 at The Beacon Motor Inn, Jordan Station, Ont.
Our 31st Annual Meeting will be hosted by Hamilton, and we know that many of the members of the Society have already booked their reservations for our big weekend. Just a reminders A special display table of gloves made by the members is planned, and either new or used gloves for this display should be brought with you. Branch members, and members-at-large are also asked to bring their leathercraft articles for the group display tables. Join in this informative and social event!
Canadian National Exhibition, 1981
Once again we will have the Pleasure of participating as a group at the C.N.E,, Toronto. The excellent renovations to the Arts, Crafts and Hobbies Building last year, along with our new booth location, gave our Society a high profile in the show, and we hear that Jack Meharg has developed some new ideas to finish our booth face-lift. Of particular note will be new lighting of our display area. We hope that all members are planning to contribute work for the sale, and display items are always invited. Your applications will soon be out in the mail, so plan to participate, The schedule for manning the booth will be available at the Annual, and we ask that you fill in your hours at that time, as your support of the Society is essential.
All material published in "Canadian Leathercraft" is the property of the Canadian Society for Creative Leathercraft, and may not be reprinted in any form without the permission of the Society. President: Hope C. Drysdale, ACSCL, 130 Young St., Hamilton, Ont,
Vice-Pres.: Jack Meharg, 36 Bailey Crescent, Scarborough, Ont,
Editor: Mrs. Mary Patterson, 270 Durie St., Toronto, Ont. M6S 3G3. Corr. Sect.: Lorna Robson, R.R.#1, Fonthill, Ont, Reporters this issue; Belleville Branch Members
Membership
Chairman: Miss B. Austin, 167 Emerson St., Hamilton, Ont,
Page 2 — THE NATURAL APPEAL OF LEATHER; FROGGIE LEATHER WEIGHT
THE NATURAL APPEAL OF LEATHER by Margaret Hunt.
Who can resist touching things made of leather? Every characteristic of leather - its' warm colours, rich texture, and clean, natural aroma - provokes luxurious and sensuous feelings.
The greatest appeal of working with leather is certainly the beauty of the material itself, but this is not the only attraction, Leather is an extremely versatile and durable material that can be used on a large or a small scale, for furniture, luggage, clothing, or shoes. Also for such accessories such as belts, wallets, purses, gloves, and jewellery. It can be made into beautiful lamps, wall hangings, pictures, clocks, covered bottles and boxes, as well as albums, book covers and jugs, etc,
Its rare combination of beauty and function gives leather an appeal amounting to almost a mystique. And creating with leather satisfies both your esthetic and practical instincts, allowing you to make handsome articles that will last for years, often improving in appearance with age,
FROGGIE LEATHER WEIGHT by Laura Bush
Cut two places, one green leather for the back, and one of chamois for the bottom,
Glue around the edges, leaving a small opening for insertion of the filling for the body, with cooking bran or dry sand being suitable "stuffing" materials.
Glue opening shut and buttonhole stitch around with D.M.C. embroidery cotton.
Add eyes by either "satin-stitching" or sew on commercial "wiggle-eyes",
Page 3 — The End of an Era; Re-using Old Leather
3.
ANNUAL DUES: These are now due, (as of April 1st). Members who do not submit through a Branch are asked to please forward $5.00 to the Membership Chairperson, Miss Beatrice Austin, at 167 Emerson St., Hamilton, Ont. L8S 2Y1
The End of an Era
For many, many years we have taken for granted the address of Robert and Dorothy Muma, at 118 Hazelton Ave., Toronto, as the "headquarters" for the judging by the Council of Fellows. This will soon be at an end, as the Mumas have accepted an offer for their property, and will be moving later in the summer,
We wish them much happiness in their new quarters (as yet not chosen), and express the appreciation of all of the Society members who have used Bob and Dorothy's home for these many years for both jurying, and storing all those countless items that are essential to exhibitions of a busy society such as ours.
Re-using Old Leather by Margaret Hunt, Belleville Branch
Never discount the idea of reusing old leather taken from articles that have either broken, or worn out in some area, Sources can be belts, wallets, briefcases, purses, luggage and clothing items. Even torn or scuffed leather can be salvaged, and recycled into useful items.
First make sure, before starting to take the article apart, that it is irreparable, as perhaps all that is needed is to renew a clasp, or change an unstylish belt buckle, or add a few more holes for buckle fastening on a belt. Even redyeing can be tried, and a suitcase may need only new hinges to make it once more a perfect item.
Conditioning, refinishing, or touch-up dye can often surprisingly restore the life to old leather,
***Editor's Notes Saddle soap can be used to clean the surface of older leather items, but various leathers react in different ways to such cleaning, we have noticed, and it is wise to "test" clean an out-of-sight area before tackling the main part of the item to be cleaned,
This type of cleaning will remove surface finishes to a degree where the leather will need "re-feeding" with a good polish coat to restore its lustre. Polish Coat itself, on a soft cloth, sometimes will remove surface smudges, rather like a "cleansing-cream" for leather, (This, of course, only works on lightly soiled areas, not deeply ingrained soil.) I prefer small strips of J-Cloth material, as there is a slight friction effect created by the surface texture of the J-Cloth... this seems to clean better than smooth cloth surfaces do, M.M.P.
Page 4 — GUSSETS
GUSSETS submitted by Margaret Hunt
Gussets, although cut out at the same time as the rest of a pattern, may need special attention, as they can present a multitude of problems if not pre-planned precisely.
Type of leather:
(1) If the main part of the item is not made of an unusually heavy weight of leather, it is generally wise to use the same leather for cutting out the gussets.
(2) If the leather being used is very thick, or the gusset is a more complicated one, or has divisions in it, then a bulky look can be avoided by using a thinner leather. Make sure, however, to try and match the grain of the main piece, and the natural, undyed colour as much as possible.
(3) Linings for gussets should generally be exactly the same as that used for the other pieces.
There are a great number of different styles of gussets, but we will content ourselves with dealing with five major types, (and their minor variations.)
#1. The End-piece Gusset
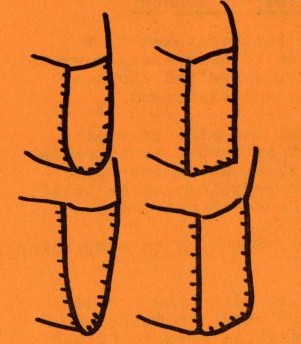
As can be seen by the sketches at the left, there can be four main shapes of these gussets, which consist of a straight strip of leather cut with either a round bottom, square bottom, oval or rounded square bottom edge. The items that these fit, either handbags or similar case-shapes, have their front, back and bottom all cut in one piece, with these gussets fitted in at the ends. You will note that the sides of the gussets can be parallel, or, as shown with the oval-bottomed one, wider at the top than the bottom, thus allowing the purse to open wider.
To fix the gusset in place, mark the centre bottom of it, and then measure down the side of the gusset and around to the mark. A cloth tape, or piece of string is handy for this job.
Mark this same distance accurately down the front piece of the item, beginning at the top edge. Mark this, and then continue to measure up the same distance up the back of the article to obtain the mark for the back half of the gusset. Insert the gusset with these points matching.
To keep the gusset in place while marking for either stitching or lacing, one can temporarily "tack" the gusset in place with a few stitches through a small hole at the top front, centre bottom, and back top. Other people suggest a trial application of a small amount of rubber cement, which can allow for removing and changing the position if not correct. Or you can hold in place by various types of metal clips, (stationer's items), or even sturdy spring clothespins.
[This part of the Gussets article is numbered 4 in its own running count, with the parts numbered 5 and 6 printed on other pages of this issue rather than the ones immediately following.]
Page 5
Note: When using any kind of metal clip or clothespin to hold the gusset in place, be very careful not to leave marks on the leather. Metal clips, in contact with leather that can become dampened with glue application, will rust. It is a good idea, as these clips are rather expensive, and often you need quite a few of them, to insert a small strip of thin plastic wrap between them and the leather..... or try keeping the clip surfaces cleaned, and coated with clear nail polish.
The variations of this gusset shape all are measured in a fashion similar to that listed above. There is another variant, in which the top part of the gusset is creased, as used in a travelling bag, and a zipper fastener is fixed to the top of the bag, and then continues along the top of the gusset. When using a square-bottomed gusset, the bottom corners must be rounded a little in order to fit.
#2. The All-round Gusset
This gusset piece is a long continuous piece, extending down one side of the leather item, across the bottom, and back up the other side. In "mod" purses, it is common to see a seam across the bottom, often just an overlapped section, laced or stitched through. This can conserve leather as two short pieces can be fitted into a hide sometimes easier than one long piece. Also, this bottom overlap and stitching can add rigidity as a type of "cross-brace" on the bottom. A neatly stitched "inside-seam" is sometimes used on a soft dress back, particularly when small hides are used.... this also strengthens the bottom, at least slightly.
To fix the gusset in place, place the front piece of the article on top of the back piece, and pierce through the top corners, and the centre bottom as a mark. Then measure the centre of the gusset and mark. Attach the gusset to the front piece of the article first, once again tacking in place at top corners and bottom centre with a few stitches. Then carefully punch for lacing, or sewing. Proceed with the back in the same manner.
If you have noticed that you get a "twisted" effect when lacing a gusset of this all-around type, an easy way to prevent this is to lace the gusset front and back in opposite directions, so that the lacing stitches slope in opposite directions.
Variant #2(a) illustrated above is useful in shape for a handbag as it folds away inwards when the bag is closed. The extra width allows easy access when the bag is opened, yet presents a neat slim profile when closed.
When planning the width of an all-around gusset, it sometimes can appear slightly wider than a similar-width end-piece gusset, somewhat "boxy", so it is wise to make a paper model for any of these types to make sure that the proportions are pleasing to the eye.
[This page sets the Note on metal clips, a paragraph on gusset variations, and the All-round Gusset heading and instructions down the page in that order; read straight down instead, two sentences run together mid-page and the closing paragraph breaks off after "a neat" and picks up again four lines later. It is set out here in the order the page is meant to be read.]
Page 6
#3. The Folded Gusset
This is also an all-round, (continuous) gusset, with the gusset being folded and creased before insertion. Dampen the leather and fold the leather, face surface to face surface, and mark 45 degree creases at the corners as indicated by dotted lines. It is wise to copy this on a piece of paper, and make your trial creases on the paper pattern first. The folds in this style must be hammered flat, as the idea of this gusset is to form a gusset that will lie flat between the sides of the purse.
#4. The All-round Folded Gusset
This is similar to the Folded Gusset, but it is folded along the centre before insertion, and the corners are eased, and worked around with a modelling tool to make the corners turn smoothly. (see sketch.) Measure the gusset length by marking along the side of the purse, as the gusset length may vary by the corner-folding work, as this is done while the leather is wet. Final folding should be hammered. Running lacing can be used.
#5. The Envelope Gusset.
This gusset is a straight piece of leather, folded and hammered down the centre while damp. At the lower edge approx. 1/8" is cut from the folded edge to the outer corner, with a slope being formed. Along this edge two or three stitches are placed beginning 3/8" away from the cut edges to allow room for lacing stitches, as in diagram 5(a).
Summary: Work your gussets in smoothly with a bone folder, and crease them carefully and thoroughly. Mold the leather with your hand until the article opens and closes smoothly, with the gusset folding back into the piece neatly, with no bulging. A good gusset can "make" a piece a winner!
[This page sets three gusset styles side by side, a diagram beside each block of instructions, with a closing "Summary" paragraph running the full width beneath. Read column by column instead of straight down, the three descriptions run together and the Summary paragraph breaks off after "in smoo".]
Page 7 — Making Patterns for Leather Vests
7.
Making Patterns for Leather Vests - Workshop Summary by Mary Patterson, Toronto Branch,
This past autumn the members of the C.S.C.L. were most fortunate in having a one-day workshop with Wally Klassen, owner of "Asylum", (Creative Leatherwork), located at 1949 Queen St. East Toronto.
Our workshop involved the elements of development of a pattern for a custom-fitted leather vest, and discussion about the types of leather that are suitable, as well as a discussion about other leather garments, such as jackets. Our own Jack Meharg provided the leather for the demonstration, and was the "guinea pig" for the day, with Wally Klassen creating both a pattern, and a finished vest to Jack's measurements.
Leathers
If the leather chosen is very heavy, a pattern should be developed that is cut for only one overlap at the seams. Light leather may have more layers at the seams, and this allows a more "finished" seam, as the raw edges may be turned in completely,
Sheepskin, pigskin, fine cowhide and goatskin are all functional as vest leathers. Each vest will need between 8 and 15 feet of hide, with the wide variation caused by the possibility of holes in such soft skins as deerhide. Pigskin leather should be worn for some time before you can consider it "broken in",
Sheepskin leather is difficult to work with, as the leather is loose in density, thus allowing the bottom layers and top layers to separate easily.
Hair-on-calf hides may be used for panel overlay, using an overlap stitching method. Don't attempt to "reverse-stitch" these seans, as this will force the hair of the hide to stick out roughly,
A special note that must be remembered; These leathers will stretch from 10 to 15% after wearing, so the garment should be made quite tight to start with, especially form-fitted vests, Equipment:
The best type of needle to use is a glover's needle, as they are quite sharp. When using a sewing machine, nylon thread is recommended, and the ends of this should be Singed after cutting to prevent them pulling back through at the end of a seen,
If you are fortunate enough to be using a sewing machine that can handle leather, make sure that your stitch length is adjusted to a rather long stitch, as short stitches can cut through a hide.
Scissors are quite suitable for cutting the many curved Pieces that make up garments, and the leather is usually thin enough to be handled well by scissors, There are now special shears on the market which require sharpening only about once a year, even with constant use,
Page 8
Patterns are best when cut out of soft paper, so that they can be fitted snugly to the body to try for fit. After you feel that they are correct as to size, translate the pieces into firm cardboard pieces so that the pieces will not stretch out of shape while being held against the leather for cutting.
When planning your pattern, remember to mark seams for such items as inserted pockets, etc., as leather pieces are weakened, are marked forever if the stitching has to be re-opened, unlike fabric!
Contact cement should be used to "tack" the pieces together, taking the place of basting stitches in fabric sewing. This is a very quick way of fitting your leather garment, as the pieces can be peeled apart and reset into the correct place immediately. A good variety of this type of glue for garment fitting is Helmifix Rubber Cement. Some other varieties are more suitable for pieces that are to be set together permanently, Cat's-Paw brand being one of these more permanent types. For lacquer-finished leathers, LePages Contact Cement is best,
Stitching should not be attempted directly.... only after the pieces are fitted perfectly with glue.
Measuring for Pattern Pieces:
The Back
(1) Shoulder top line, measure from point A to B (see diagrams) (2) Neck line, (Back) from point C to point D
(3) From mid-point of top shoulder seam to just below waist... line E-F, and G-H. (If this length varies slightly, it is because most people have one shoulder lower than the other, )
(4) Shoulder length.... measure from neck to point of shoulder,
(5) J-J is the centre back seam, to be measured from nape of neck to same bottom line as (3).
(6) Chest (back) is designated by line K-K
(7) Bottom line is marked L-L. If this pattern is being made for someone with a curved-in back, keep this bottom line up closer to waist to avoid more problems with fitting.
(8) Rib measurement... marked line M-M
(9) Line N-N shows the armpit to armpit measurement, (10) P-P is the length from armpit to bottom line, and Q-Q is same measurement on other side,
(11) Allow a small curvature on dotted line from point P to point A and on other side from point Q to point B. Adjust this curve later in the fitting process.
(12) Do the same with the neck line C-D, as this line must have a gentle curve as well,
*** Cut out one half of the back pattern, fold it over, and make sure that it seems to be fairly well duplicated by the other side as a quick check for your measurements.
Page 9
General Pattern Measurements — Front and Back
A lettered body-pattern outline (points A-Q marking shoulder, neck, chest, waist and hem reference lines) with the waist line called out, and a small inset sketch of a buttoned vest marking the "Slope of Shoulders": "This will have to be adjusted by fitting. — Very important."
[This page is a diagram: a pattern outline for a vest, front and back, with points A–Q marking the shoulder, neck, chest, waist and hem lines, and a small sketch showing the slope of the shoulders — "This will have to be adjusted by fitting. — Very important." The lettered outline itself is not reproduced here. No names appear on this page.]
Page 10
The Front
Measure all points as for back, (1) through (11).
Remember to work on only half of the front at a time, of course, as the fastening opening is up the front seam. It is wise to measure the whole chest, (i.e. 40") = subtract back width (i.e. 21"), thus leaving front width of 40" minus 21" = 19", This balance of 19", for example, is then split into two widths of 9 4", and allowance is added to the pattern pieces as needed for buttonhole overlap, (about 2"), or snap fastening overlap (1"),
The other main change, of course, is the centre front seam length, with its shorter length from the throat to the bottom line. It may be desired to make a V-neck front, or a more pronounced curve. Also, one should find a suitable curve for the front bottom line generally a little lower than the back.
Special Notess
If you split the front (and the back!) into more panels, (and don't forget to add seam allowance extra on each side of the extra pieces !), the fit will improve greatly.
On the diagrams on the opposite page, you will see the suggested placement of these extra curved panels. Any number can be added,
Also to be noted are "Z" and "Y" marked on these panelled
Pieces, These suggest where one can allow a fuller bust area for women on the seam line, and a fuller stomach area for men. Do NOT place the panel insert seams too far forward, as it will draw the curves into unnaturally forward areas, and the fit will be wrong.
We have marked a small diagram with shaded areas, as these are key areas for fitting improvements. These, if the suggested panel inserts are used, can be cut out areas, pushed closed where gaps occur during fitting. When trying the paper pattern against a woman, the upper shaded area may need to be pulled apart, and extra allowed for comfort.
Oversize all pattern pieces by 1/2", and add even more at the top line, as this line may need considerable adjustment to make it "sit" on the shoulder properly. It is THE key line! This is where the use of glue seams that can be reset while it's being tried on can be of utmost importance. It is also important to allow a fairly long shoulder line (A-C or B-D) and this can also be trimmed away later.
Watch the slope of the shoulder carefully to make sure the vest "hangs" right,
Pockets inserted in seams should be sloped to fit the position where your hands would be inserted in them. This is, of course, more of a feature with jackets.
Wally Klassen suggested that for those who wished to make jackets the purchase of a regular garment pattern be purchased, but that it be consulted mainly for the sleeve fittings,
Another sugggestion, that of using some very inexpensive leather to experiment with the first time, seems wise, and it was also mentioned that there are a number of firms that deal with salvaged leather, an extremely inexpensive way to start off.
Page 11
Ladies
VEST
MENS
VEST
INCREASE
Curve
AT"Y
Cutting the Leather:
Check for flaws - circle these on back of hide with chalk. Use mid-weight pieces for back of garment, and thickest parts of hides for sides (as they take the greatest strain. )
Watch carefully for cuts that may occur in the tanning process as they will not stand the strain of tight fitting of garments. Scarred areas, and belly areas of hides will stretch more than most pieces, so do not use these in important fitting areas. Cut front out with the snap or button areas placed on centre of hide, once again fo¥ strength.
Stitching the Leathers
Glue seams first, then stitch with faces of leather together, as with garments, to hide seams, Fit on wearer, and, while worn, mark areas needing changes with chalk. Fit very tightly.
After you are satisfied that seams are all correct, and do not need to be taken in any more, trim away excess, glue all seams to the side, and then top stitch, as this once again prevents tearing. Finish by hammering all seams lightly with a steel hammer, and Singe all thread ends, if they are nylon as advised, to prevent pulling loose at ends,
If a patch pocket is required, glue the edges of it in, all the way around, top stitch the top edge, glue in place while the jacket is on the wearer, and then finish by top stitching around, with restitched corners at the top for strength,
Page 12 — Ontario Crafts '81
*** Notes in closing***
Mr. Klassen is a graduate Mechanical Engineer, who was born in Brazil. He studied in Germany, and then moved to Canada where he decided to start his own business about three years ago. The major part of his early sales, and an area of expertise much needed here, was in the creation of custom-made guitar, violin, etc. cases. He has done considerable work in this field for the Toronto Symphony orchestra, as the fitting of cases for instruments is truly a specialist's field. We are indebted to him for the fine workshop presentation, an excellent day for all of us!!
Ontario Crafts '81.
Once again the C.S.C.L. will be contributing the prize money for the Best Functional Design in Leather piece in the annual juried exhibition of Ontario crafts.
We are informed that this year's exhibition, Ontario Crafts '81, will travel to five locations: from June 18 to July 15, it will be on display at the Thunder Bay National Exhibition Centre, coinciding with the Jeux Canada Games; from July 29 to August 21, at the Art Gallery of Algoma, Sault Ste. Marie; from September 3 to September 27, at the City of Brampton Public Library and Art Gallery; from October 15 to November 12 at the McMaster University Gallery, Hamilton,;and from Nov. 23 to December 6 at the Macdonald Gallery, Queen's Park, Toronto.
The works in the exhibition will be chosen by juries in the six provincial regions. When the selections from each region arrive in Thunder Bay, judges will award the provincial prizes,
Members-at-lar ge
Your help is requested! We have set aside the summer issue this year for a combination effort of Norland Branch and the Members-at-large, and we trust that we can count on some very interesting articles, shop tips, or brief news items from as many of you as possible. We request that the bulk of the material be sent on directly to The Editor, Canadian Leathercraft,
Mrs. Mary M. Patterson,
270 Durie St., Toronto M6S 3G3 by May 29th, 1981. Please contribute to your special issue!
Our next issue will be written by the members of the Hamilton Branch, !