
An issue of the Society’s newsletter, transcribed from the original.
(12 pages, 2.1 MB)
the full-resolution scan, 33 MB, for close research
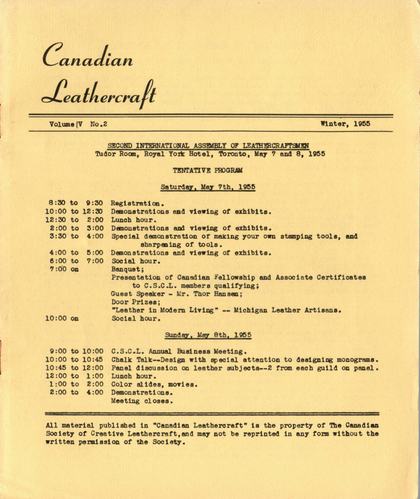
Page 1 — TENTATIVE PROGRAM
Canadian
Leathercraft
Volume IV No.2 Winter, 1955
The volume numeral is set hard against the word before it, with no space between them. It is IV: the I stands where the space would be.
SECOND INTERNATIONAL ASSEMBLY OF LEATHERCRAFTSMEN Tudor Room, Royal York Hotel, Toronto, May 7 and 8, 1955
TENTATIVE PROGRAM
Saturday, May 7th, 1955
8:30 to 9:30 Registration.
10:00 to 12:30 Demonstrations and viewing of exhibits. 12:30 to 2:00 Lunch hour.
2:00 to 3:00 Demonstrations and viewing of exhibits. 3:30 to 4:00 Special demonstration of making your own stamping tools, and sharpening of tools.
4:00 to 5:00 Demonstrations and viewing of exhibits. 6:00 to 7:00 Social hour.
7:00 on Banquet;
Presentation of Canadian Fellowship and Associate Certificates to C.S.C.L. members qualifying;
Guest Speaker - Mr. Thor Hansen;
Door Prizes;
"Leather in Modern Living" -- Michigan Leather Artisans.
10:00 on Social hour.
Sunday, May 8th, 1955
9:00 to 10:00 C.S.C.L. Annual Business Meeting. 10:00 to 10:45 Chalk Talk--Design with special attention to designing monograms. 10:45 to 12:00 Panel discussion on leather subjects--2 from each guild on panel. 12:00 to 1:00 Lunch hour.
1:00 to 2:00 Color slides, movies.
2:00 to 4:00 Demonstrations.
Meeting closes.
All material published in "Canadian Leathercraft" is the property of The Canadian Society of Creative Leathercraft,and may not be reprinted in any form without the written permission of the Society.
Page 2 — SECOND INTERNATIONAL ASSEMBLY OF LEATHERCRAFTSMEN
SECOND INTERNATIONAL ASSEMBLY OF LEATHERCRAFTSMEN
Tudor Room, Royal York Hotel, Toronto, May 7 and 8, 1955
This Second International Assembly of Leathercraftsmen is the most important event to date in C.S.C.L. history. We are to be hosts to the Detroit Leathercrafters, the Frontier LeatherArt Guild of Buffalo, the Eastern Leathercraft Guild of Rochester, and visitors not affiliated with these groups. We are looking forward to the support of every member who can possibly attend to help make our guests welcome and this occasion a memorable one.
Here will be concentrated all the accumulated skills, techniques, ideas and enthusiasms of craftsmen expert in many facets of the craft, and in two days you should leave this meeting with more ideas,information,inspiration and friends than you could possibly acquire anywhere else at one time on this continent. This assembly is a MUST for all leathercraftsmen.
Committees have been working hard in Rochester, Buffalo, Detroit, and Toronto to plan an unusual program as a study of the tentative program on Page 1 will indicate. Each guild is endeavoring to bring the best they can provide in the way of unusual demonstrations and handcrafted articles. Each guild will have its own display,and there will be a special display table for unaffiliated craftsmen. Judging from the quality of the articles seen by those who were fortunate enough to attend the First Assembly in Buffalo,we look forward with anticipation to displays in Toronto.
As you will note, our own Annual Meeting will be held at this time, although it is earlier than our usual date. Our own meeting will be limited to one hour, and will cover only the important business necessary to the conduct of our Society affairs. This should please members who last year expressed the wish that there would be more demonstrations and less business.
Since we plan to award the Associate and Fellow Certificates as a feature at the banquet, we hope that we will have a number qualify for these classifications. You should be starting work immediately, as articles for judging should be in the hands of the committee by April 15th. You will find requirements for Associate and Fellow rating in the Summer,1954, bulletin, and further information on another page of this issue. Any suitable articles submitted for rating may be exhibited at the Assembly.
C.S.C.L. articles for display will be carefully chosen for the amount of space available. We plan to use the present Travelling Exhibition as a nucleus around which to build our display, but are anxious for new, excellent and unusual articles. Many of the T.E. articles have already been seen at the Hobby Show and in the T.E., and we feel it is important to have new pieces. Articles to be accepted for display should be sent to Mrs. Reta Larmour, 59 High Park Blvd., Toronto, by April 15th. This early date is necessary in order to plan display arrangements.
Just to whet your appetite, we will give you a few of the highlights of the program. Thor Hansen, with whom many of you are familiar, will talk in his own inimitable fashion on "Design", and will show us slides and describe the new B.A. Building in Vancouver, just completed, the decor of which was in his charge.
Page 3
The fashion show will be brought from Detroit by the Michigan Leather Artisans, and will feature leather clothing, shoes, accessories, handbags, etc. Gordon Drummond and Ervin Pope of Detroit, experts in tool design, will demonstrate how to design and make your own tools. They will also show us how to sharpen them, with special emphasis on the difficult ones, such as edge bevellers, French edgers, groovers, etc. This is a skill in which, alas, few of us are competent.
The bookbinding and skiving demonstrations from Rochester will be by an expert, as will the saddle stitching from Buffalo.
In our own C.S.C.L. demonstrations, Edith Roscoe will show how to make your own moccasin pattern and construct your moccasin from it. Nora Huyck is becoming an expert on the covering of many types of boxes, and this will be her contribution. Clarice Packham, as you know is tops in glove pattern making and construction. Dorothy and Bob Muma will demonstrate their own particular techniques in tooling and coloring. Don MacKinnon, whose "Don-Jane" pictures have brought fame to our Society, will demonstrate his speciality of figure carving, and will also do some silver engraving. Sadie Roebuck and Reta Larmour will show the latest developments in purse framing. Margaret Jennings will show dyeing techniques. Deane Russell will demonstrate molded leather trays and there is a possibility that he may bring along some extra blanks so that those who wish to try this interesting type of leathercraft may have an opportunity to do so.
From Detroit there will be a unique demonstration of leather repoussee by Bernard Wolff, who has been a leathercraftsmen for many years,and who has developed unusual and specialized techniques, such as none of us knew existed. Detroit plans to feature Mr. Wolff, and any of you who saw his short demonstration at Buffalo will be eager for a more detailed one.
Bob Hartmann of Detroit, one of the finest craftsmen in the country, will do figure carving and will demonstrate braiding, using the special Danny Duncan handcut lace. Larry DeRosia, who is in the same class with Bob Hartmann, will do figure carving, with special emphasis on wild life.
Anne Hook, Larry DeRosia, and possibly some others, will demonstrate their methods of designing for leather, showing how they select, conventionalize and fit their designs to the articles they wish to decorate.
You will be receiving further information, including registration cards probably in March. Do not fail to mark your calendar now for May 7 and 8 for the Second International Assembly of Leathercraftsmen in Toronto.
Page 4 — DESIGN
DESIGN by Anne Hook
Design, what is it? Any contrivance of man is a design - furniture, buildings, clothing, machinery, accessories, and the decoration of same. Good design never comes by chance. It is the product of clear logical thought, or trained intelligence, combined with the artist's vision and inspiration. It is good when it is based on the sound basic principles of order and unity, and bad when it produces disorder. It is essential to art creation, along with what we call the "tools of the trade", which are drawing, and a working knowledge of perspective.
Good Design and Function, or Fitness to Purpose are so closely related that the first question one should ask oneself is (1) Does this article fit the purpose for which it has been designed? Then, (2) Is the decoration so pleasing and satisfying that it is one with the whole, and not merely something added to camouflage a badly constructed object? Finally, (3) Do I like it well enough to live with it? Is it beautiful in itself, having interest, unity, harmony and balance?
Good design is functional. It is in good taste. What do we mean by good taste? And how can we develop it? Your taste is formed by what you have seen, what you have heard, what you have done, what you have read, where you have been, plus the emotion which all these factors have caused in you. Thinking, testing, improving,and working out designs will improve their standard and bring them into good taste. Do not think of a design as lines and shapes on a structure, but as something which you want to say, and are doing so in line and form. If it says nothing to you, it will say nothing to anyone else. A design is satisfying only when it expresses the feeling of the artist.
There are two distinct kinds of design, STRUCTURAL, which is three-dimensional, and DECORATIVE, which is two-dimensional. We are concerned here with decorative, rather than structural design.
Decorative design is again divided into two groups, (1) for UNLIMITED AREAS, such as wallpapers, fabrics, floor coverings, etc. These are known as repeats. (2) LIMITED AREAS, which require the consideration of two things, the Border, and the Enclosed Area which is outlined by the border.
Why do we decorate? Because the undecorated area has quiet unity, but lacks variety. The eye will shun monotony, but craves variety. And variety is created through the use of shapes, colors, values, lines and textures, masses and spaces. In using these, we strive for unity, not the same quiet unity, but something more interesting and exciting.
The basic principles of design are common to all forms of art, dancing, music, painting, drawing, decoration, and ornament, sculpture, architecture: BALANCE. The perfect example of balance is a bird in flight. An even balance of color and form is easy to feel, since it is satisfying, but an uneven balance can be more stimulating. This makes us think and wonder, and activates our powers of observation.
["cmstructed" is set out here as "constructed".]
Page 5
PROPORTION is closely related to Function. In a building, it is the height in proportion to its length which gives the building beauty as a whole. In music, it is the length of a soft passage in proportion to a loud. In color, we consider the amounts and kinds of color. In a design, it is the proportion of each shape and form in relation to all other shapes and forms which makes for good design.
HARMONY is the peaceful relationship of forms, and could be described as the result of perfect proportion and balance. It consists of shunning differences too pronounced, contrasts too startling. (Too much uniformity creates Monotony,which is desirable when decoration is intended for enrichment only.) The problem of the designer is to introduce the variety which the eye craves, and to know when to stop.
RHYTHM is a varied repetition of colors, lines, or forms: a measured repetition of accents. It is the repetition which creates a sensation of movement. We hear it in the waves on the ocean,footsteps coming and going; we see it in wallpapers, streamlined trains, transmission towers. It is something that has to be searched for by the individual, and imposed by him on his work.
UNITY is the quality in a work which gives the spectator a sense of satisfaction and completeness. It is achieved by the right use of the principles of design: balance, proportion, harmony, and rhythm. Good design is never aggressive.
These laws have not been drawn up by any person or persons. They were present in the primitive paintings made on the walls of caves,thousands of years Before Christ. The caves of Lascaux in France had not been entered by man for 40,000 years. They were accidentally discovered by some schoolboys about ten years ago. The walls and ceilings were covered with paintings, the work of prehistoric men clad in skins and carrying clubs, but so struck with the beauty and wonder of the world that they were determined to express it. These men were not geniuses, they only had what we all have-- a sense of the wonder and beauty of the world.
The Desire to express beauty, and the Ability to do so, are two different things, BUT the striving to express it, each in his own way, and within the limits of his own experience, opens the eyes to things previously unnoticed, things looked at but not really seen.
FORM and LINE: All forms can be grouped in four sensations - the vertical line, and its opposite - the horizontal, the oblique, and the curve.
The vertical line gives the feeling of energy:
The horizontal line suggests repose:
The oblique line is always controlled by the pull of gravity, and so can be used to weight a design which seems to be too high: The curve, when it is flattened may become almost a straight line: a When it is furthest from a straight line it is a circle:
Page 6
The sensation of the curve is grace rather than strength. Curves swelling outwards give the sensation of fulness and charm, and those curving in, give a feeling of poverty and emptiness.
The straighter the line, the more strength it denotes.
Drawings are read from left to right. The eye follows easily from left to right, but is obstructed when trying to go from right to left. This is an unexpected quality which should be allowed for.
Composition is a part of Design, but it is an arrangement of things already in hand, and is quite distinct from creative design, which is the product of trained thought plus vision or inspiration. But creative thinking is not limited to the highly trained, and the ability to draw accurately is less important than the idea to be expressed. The idea is the important thing, whether you say it in words or music or color or line. Training puts the polish on - the thing which is important is to have something to polish.
MAKING A START. Beginners often fail through trying to be too original, so work simply and directly, within the limits of what you actually know. To plan a design, using a flower or object, you must have a sympathetic appreciation of the flower or object which you draw. The problem is to decoratively fill the area with interesting shapes and forms BASED on this flower or object, to arrange interestingly not only the forms and shapes,but the backgrounds behind them. So, (1) Make a natural drawing of the flower or object.(As in Diagram 1, Page 7)
(2) Make an artistic arrangement from (1) preserving the TYPE of flower, leaf, stem. (Diagram 2, Page 7, opposite)
(3) Plan (2) to fit a given area. (Diagram 3, Page 7, opposite)
To sum up: A handmade article is worthy of being considered a WORK
OF ART when (1) the craftsman is the master of his materials and techniques; (2) his product has all the qualities associated with the elements of design; and (3) his work bears the imprint of his individuality.
Handicraft Leathers and Supplies
Fine Assortment of Beautiful Leathers
Complete range of Leathercraft Tools and Accessories
Comprehensive Detailed 64 Page Catalogue with 24 Page Supplement Experienced Personalized Service meme
THE BIRT SADDLERY CO. LTD. The Leather Goods House
519 Main Street Winnipeg, Manitoba
Page 7
Three leather-tooling pattern designs, numbered (1), (2) and (3): a morning-glory-and-leaf spray, a matching single stem, and a floral-and-scroll border strip. No caption or other text.
[Genuine illustration: three uncaptioned tooling patterns, no names.]
Page 8
CRAFT LEATHER DYES AND FINISHES
16 colors keyed to color originality Choose your color or create a new one SIX ANTIQUES FOR MELLOW AGED EFFECTS:
GOLDEN TAN HAVANA BROWN MAHOGANY
CHESTNUT BROWN ROUGE FOREST GREEN
TEN TONING DYES FOR FINE COLOR HARMONIES:
| YELLOW | BLUE TAN |
| ORANGE | LIGHT BLUE MIDDLE (Walnut) BROWN |
| SCARLET | GREEN BLACK DARK (Chocolate) BROWN |
POLISH COAT FOR SATIN-SMOOTH, WATER-RESISTANT FINISH EDGE DRESSING AND INLAY BACKGROUND DYE for that final professional touch.
Ask for the GARNETT INSTRUCTION MANUAL at your hobby supply store.
Dealers write for information to:
GARNETT COMPANY
1 HANNAFORD STREET - TORONTO: Phone OXford 4587
- buying of all your Leathercraft requirements from Lewiscraft gives You these Important Benefits - e CAREFULLY SELECTED, QUALITY MERCHANDISE ! e YOUR DOLLAR S-T-R-E-T-C-H-E-S 1 e TIME SAVING. CONVENIENT ORDERING %
Try It! - You'll Be Glad You Shopped at -
"For Handicraft It's Lewiscraft''
284 KING ST. WEST Lewiscraft TORONTO, ONTARIO
; Showroom and Mail Order
["ZL" between the address halves is the tail-flourish of the large cursive "Lewiscraft" script-logo wordmark stamped between "284 KING ST. WEST" and "TORONTO, ONTARIO" (the same wordmark also appears above the address as plain text, "For Handicraft It's Lewiscraft"); set out here as the plain word "Lewiscraft" in place of the flourish.]
["S-T-R-F-T-C-H-E-S" is set out here as "S-T-R-E-T-C-H-E-S".]
Page 9 — WANT TO COVER A JEWEL BOX?
WANT TO COVER A JEWEL BOX?
by Nora Huyck
Here is a very simple method for the first one. This is a hinged box of which the lid and the body of the box fit exactly and leave no room for leather between them. The lip of both the lid and body of the box - and the inside, if you do not wish to line it - will not be covered with leather. It is suggested that these parts be stained and finished before any work is done on. the box. Otherwise, spots of cement may get on the wood and prevent it taking the color evenly. If no wood stain is available, leather dye may be used, then waxed and polished.
You may work directly with the leather. However, it is advisable the first few times to make a paper pattern. This will give you not only the size and shape of the piece of leather to be used, but will also give you the size and shape for the design if the lid or sides or both are to be decorated. For ease in working, remove the pins from the hinges if possible, or the hinges from the box.
To Make the Paper Pattern:
Take a piece of brown paper and place the body of the box in the centre of it and trace around the bottom of the box with a pencil. Put arrows on the box and on the paper so that the box can be returned to the paper later in B] exactly the same position. This will avoid trouble in fitting if the box is not exactly true.Remove the box and you have a rectangle, ABCD.
With pencil and ruler extend the lines both ways and crease along same lines. Cut along the extensions of the lines AD and BC. Do Not cut the outline of the box. Do Not cut the extensions of the lines AB and DC. Instead, draw lines half an inch beyond these and cut these new lines. This is the turnover, which is turned onto the sides of the box after the ends are cemented into position and before the sides are cemented.
[This paragraph sits beside a hand-drawn pattern diagram (the box outline with corners labelled A, B, C, D); the diagram's own stray marks and labels are easy to weave into the prose as fragments ("C.", "f", "Do {", "Soe eeae here", "sae hp ce", "D C"); left out here. The diagram itself is not reproduced.]
Put the box back on the paper, matching arrows. Turn the paper up along the sides of the box and crease at the outer edge of the lip. Do the same at the ends. Remove the box and trim the paper along these creases. This is the completed paper pattern. Make the pattern for the top of the box in the same way.
Cut the leather for the top and body of the box slightly larger than these patterns.
The Decoration:
Dampen the leather. Lay the paper pattern on the wrong side of the leather and trace the outline of the parts to be decorated. Enough line will show through on the right side to tell you where to place the design. Also mark the
Page 10
position of the arrow on the leather. Complete the decoration and put the desired finish on all the leather. It is suggested that designs with a border along the edges of the top of the box be avoided for beginners. It takes a bit of manipulation to get the border exactly in place.
Preparing the Leather:
Set the body of the box on the leather and proceed according to directions for the paper pattern with this exception, that the top of the sides and ends are not, trimmed yet. Do the same for the top, being careful to have the design in the centre of the lid (the leather may have shrunk or stretched a bit and the position of the box may have to be adjusted to take care of it.) N.B.: Make sure the front of the design is at the front of the lid of the box.
The ends of the side pieces must be skived back ⅛" to match the ½" turnover which is also skived. Both are skived to a feather edge. The shaded parts on the accompanying diagram are the parts to be skived.
Covering the Box:
Gouge the outline of the box or crease it well with a bone folder. Put cement on the bottom of the box and on the corresponding part of the leather. Set the box in place, matching arrows, and press the two together fimly, pressing any air bubbles out toward the edges. Put cement on the ends of the box and on the ends of the leather. Working from the bottom to the top, cement leather to the box. Put cement on the turnover and the corresponding parts of the box. Pull the leather tightly around the corners and cement onto the sides of the box. Sand these turnovers where the side leather will be cemented to them, Put cement on the sides of the box and on the leather and, again working from the bottom to the top, cement leather to the box. With a bone folder press the corners down well.
If the edges are not adhering well, it is possible the turnovers were not sanded close enough to the edge of the box. With a sharp knife point, scratch the turnover a bit more, being careful not to scratch the leather which shows. Apply more cement and press down again.
Trim off with a sharp knife the excess leather along the top of the body of the box. Dye and polish these edges.
Cover the top in the same manner. If it is not to be lined, replace the hinges or the pins in the hinges, and the box is complete.
If desired, the top of the box may be padded before the leather is applied. Cut a piece of tailor's wadding ¼" smaller all around than the box top. If a thicker padding is desired, cut another piece of wadding ¼" smaller than the first piece. With a few daubs of cement, secure the smaller piece in the centre of the lid. Put the larger piece over this. Then cut a piece of brown paper the size of the top of the box; place it over the wadding and cement in place along the edges. Then proceed according to instructions for covering the box.
Page 11 — ASSOCIATE AND FELLOWSHIP RATINGS
11
If the inside of the box was not stained, it may be lined with cloth or leather. If leather is used, skiver or a thin lining leather is suggested. Cut a piece of leather the size of the inside bottom of the box. Cement in place and trim any excess. Cut one long piece to go around the sides and ends, meeting the bottom piece exactly and trimming away the excess leather at the top edges of the box. Line the top in the same manner.
If the inside of the top and bottom are to be padded, put the long strips around the sides first. Cut pieces of cardboard or stiffener about 1/16" smaller all around than the inside bottom and top of the box. Cut a piece of wadding 1/8" smaller all around than the cardboard and another piece ¼" smaller all around than the first piece. Cut a piece of lining 1/2" larger all around than the cardboard. Put the smaller piece of wadding on the cardboard first, then the larger piece, then the lining. Turn the extra lining to the underside of the cardboard and cement into place. Push these into the top and bottom of the box, padded side out.
ASSOCIATE AND FELLOWSHIP RATINGS
Members are reminded of the higher membership awards to be presented each year at the time of our Annual Meeting. With our Annual Meeting this year being combined with the Second International Assembly of Leathercraftsmen on May 7th and 8th, the awards are to be made at that time. In the Summer,1954, issue of this Bulletin, full details of the requirements for Associate and Fellow membership were given and anyone desiring to work for these awards is referred to that issue. However, there was one omission in this list of requirements, and that is the number of articles required to be submitted for Fellowship rating. These are the same as for Associate standing (Handbag or other large article,Belt, Two other optional) but must be of original design. Original design is not necessary when applying for Associate rating. Work to qualify should reach the Judging Committee before April 15th in order to be rated. Application forms may be obtained from the Secretary, Mrs. Louise Smyth, 40 Strathmore Blvd., Toronto,Ont.
INTRODUCING OUR EXECUTIVE
The Treasurer, Mrs. NORA HUYCK:
Nora Huyck is a leathercraftsman who has for several years been producing leather articles of excellent quality, of exact craftsmanship. Her previous experience as a schoolteacher has been of invaluable assistance to her in her many leathercraft teaching positions. She likes the north woods and has used this theme to advantage in her projects. Another hobby is bookbinding, which she is combining with her leathercraft interest. An article by her on covering boxes appears in this issue of "Canadian Leathercraft".
[The stacked half/quarter-inch fraction the page prints — a numeral 1 over a numeral 4 with a horizontal bar — is ¼".]
Page 12
YES, It's TRUE! Illustration (A) — a tool conjured up in our minds when asked this actual question not so long ago:
"Have you a tool with a SPOON on one end and a PIN on the other ?"
Too often, beginner craft students don't bother to learn correct names for their tools. They seem content to order by catalog number alone, or by wild description, without realizing that learning of proper names for equipment is in itself an aid to better understanding of the special functions of a tool.
It's equally true that some of the finest decorative leathercraft in Canada today was produced with tools little better than tool "A" — tools quickly beaten from nails and crudely bound with cord or tape for handles. But such work represents exceptions — accomplished in spite of tools used, and only because of highly developed skill in tool manipulation by the craftsman.
It is our firm belief that such masters of leather modelling could increase their enjoyment of leather decorating, if not their already excellent work by becoming the proud owner of a new OVLS "Canadian Modeller-Tracer" (B) — developed after long study of over 30 different typical modellers from Europe and North America. Made of rustproof, nickel silver, individually hand finished — this one tool suffices for over 90% of all modelling needs.
A finely-designed and finished tool adds pleasure to any craft. Send for your "Canadian Modeller" today. Price $1.10 — postpaid. Groups may receive 12 for the price of 10°
Ottawa Valley Leathercraft Studios, 116 O'Connor St., Ottawa a Our Catalogue Club provides a valuable service for you.
FOR INFORMATION
Write to:
Clarke & Clarke Leathers
| BARRIE | ONTARIO |
| BRANCHES | |
| MONTREAL | TORONTO |
| (636 Dorchester St. W.) | (523 Mt. Pleasant Rd.) |