
An issue of the Society’s newsletter, transcribed from the original.
(6 pages, 1.3 MB)
the full-resolution scan, 22 MB, for close research
Page 1
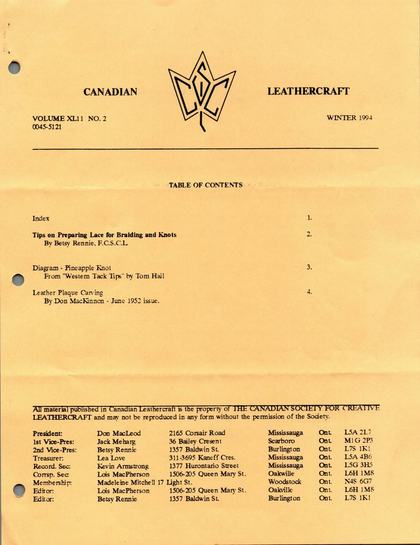
The masthead types the volume number "XL11" for XLII. XLII had already been printed once, from Fall 1992 to Summer 1993; this second run of it goes from Fall 1993 (No. 1) to Spring/Summer 1994 (Nos. 3 and 4), so this No. 2 is the January–March 1994 issue its masthead calls Winter 1994. The second article in this issue is itself a reprint of much older material — it first ran in Volume 1 No. IV, June 1952, among the oldest material in the Society's history, and was brought back at Fred Brown's request "when there wasn't any articles available to complete an issue".
CANADIAN LEATHERCRAFT
VOLUME XL11 NO. 2                 WINTER 1994                       0045-5121

                             TABLE OF CONTENTS
Index 1
Tips on Preparing Lace for Braiding and Knots                              2
     By Betsy Rennie, F.C.S.C.L.

Diagram — Pineapple Knot                                                  3
     From "Western Tack Tips" by Tom Hall

Leather Plaque Carving                                                     4
     By Don MacKinnon, June 1952 issue
All material published in Canadian Leathercraft is the property of THE CANADIAN SOCIETY FOR CREATIVE LEATHERCRAFT and may not be reproduced in any form without the permission of the Society.
EXECUTIVE

  President:       Don MacLeod        2165 Corsair Road       Mississauga  Ont.  L5A 2L7
  1st Vice-Pres:   Jack Meharg        36 Bailey Cresent       Scarboro     Ont.  M1G 2P3
  2nd Vice-Pres:   Betsy Rennie       1357 Baldwin St.        Burlington   Ont.  L7S 1K1
  Treasurer:       Lea Love           311-3695 Kaneff Cres.   Mississauga  Ont.  L5A 4B6
  Record. Sec:     Kevin Armstrong    1377 Hurontario Street  Mississauga  Ont.  L5G 3H5
  Corrsp. Sec:     Lois MacPherson    1506-205 Queen Mary St. Oakville     Ont.  L6H 1M8
  Membership:      Madeleine Mitchell 17 Light St.            Woodstock    Ont.  N4S 6G7
  Editor:          Lois MacPherson    1506-205 Queen Mary St. Oakville     Ont.  L6H 1M8
  Editor:          Betsy Rennie       1357 Baldwin St.        Burlington   Ont.  L7S 1K1
The Corresponding Secretary line prints "Lois MacPherson", matching the Editor line below with the same Oakville address.
Page 2 — Tips on Preparing Lace for Braiding and Knots
TIPS ON PREPARING LACE FOR BRAIDING AND KNOTS
by Betsy Rennie, F.C.S.C.L.
Preparing Lace: Cut about 1 metre of lace, any colour you choose, to make your pineapple knot. Put a lacing needle on one end then the weaving will be much easier.
To achieve a nice piece of finished work, bevel the lace on both sides, then either wet or wax the lace for the ease of using it while doing your knot.
A small piece of dowelling about an inch thick can be used to do the knot on or you may use the fingers as a basis to do your work on.
Proceed by laying the lace over the wood or fingers, this is called the standing piece. Follow the diagrams carefully. When the knot is finished, you pull the knot down to size by pulling the standing lace. Keep pulling the lace evenly until the whole knot is of even consistency.
Finish off by skiving the lace and gluing the ends underneath into the centre of the knot.
There are a few good books on Braiding and Knots. Tom Hall has two detailed books on "Western Tack Tips" and the "Turk’s - Head Knot Tips". Tom Hall is a member of the Rawhide and Leather Braider’s Association, and also a member of the International Federation of Leather Guilds in the United States. Any person interested in learning braiding and doing knots these books are available.
Another good source for braiding and knots is the book "Leather Braiding" and also the "Encyclopedia of Rawhide and Leather Braiding" by Bruce Grant.
The Diagram on the Pineapple Knot comes from the book "Western Tack Tips" by Tom Hall. This knot is known as the Seven part. Six Bight Casa. Starting with one strand of lace approximately 40 inches long, gives you enough lace to do this knot on a 1" dowelling. The Seven part indicates that there are seven strands of lacing that fall side by side on a 45% angle. The Six bight casa indicates the one strand is woven into the knot but falls opposite the 45% angle strand. Thus this knot creates a woven pattern that takes time to learn, but can be fun in the learning process.
By Betsy Rennie, F.C.S.C.L.
Page 3 — Diagram — Pineapple Knot
This page carries a full-page hand-drawn working diagram of the Pineapple Knot, reproduced from "Western Tack Tips" by Tom Hall. The lettering reads:
PINEAPPLE KNOT
Seven Part, Six Bight Casa (7P-6B CK) Make a clockwise pass
4.B  U1 O1 U1 O1                 * (5P-4B)
6.B  U1 O1 U1 O1 D1 O1           * (7P-6B)
The remainder of the sheet is a sequence of drawn passes showing the knot being formed. The notation is the standard over/under/diagonal lacing shorthand; the hand lettering is fully legible throughout.
Page 4 — Leather Plaque Carving
LEATHER PLAQUE CARVING
by Don W. MacKinnon
Fred Brown asked the editors to reprint this article when there wasn’t any articles available to complete an issue. This article comes from the issue Volume 1 No IV, June 1952.
The article proper, from Volume 1 No. IV, June 1952, follows:
Some of our readers have written to ask whether "Canadian Scenes” might be translated into leather. Our ambitious and versatile leathercraft friend, Don MacKinnon of Toronto, has already completed many experimental efforts in this phase of decorative leatherworking. His latest - a gift to the Editor is described in the current Bulletin of "Canadian leathercraft" for the information of readers interested in trying leather as a medium for interpreting "Canadian Scenes" suggesting plaque-like decorative possibilities.
Readers are invited to note particulary " the working of the creative mind” — through all phases of such a project: from receiving the original inspiration, to crystallizing the theme into a work plan; choice of leather, tools and finishing media. Much thought and time must be spent in this manner by all "creative craftsmen"
In order to better illustrate the interesting possibilities of "Leather Plaque Carving" we have, a reduced sketch (about 1/5" actual size) of the original by Don’s daughter, Jane. We feel sure readers will agree, the MacKinnon family had a lot of fun, and produced a fine example of their creative thinking about "One Misty, Moisty Morning..."
"One Misty, Moisty morning
When Cloudy was the Weather
I chanced to meet an Old man
Clothed all in Leather.
He began to compliment me
And I began to Grin
How do you do,
How do you do Agin?"
This bit of verse came to light some time ago, during a leathercraft discussion with our good friend Deane Russell. "Think it would provide a theme for a leather carved picture, Don?" "It might, Deane. Let’s mull it over for awhile. Perhaps it will clear in time."
Results?) Who was the Old Man all dressed in leather? Fur Trader? Trapper? Coureur des Bois? Dan’l Boone? Leatherstockings? Drums along the Mohawk? Kentucky long rifles? A trend of thought takes on meaning during discussion. Surely a background of Misty, trailing vapour, near a marsh. Getting closer. The old story of the boy and the fish, changed to the backwoods lad and the city dude, Good! Disdainful, aristocratic looking setters, potliker hounds? That’s it! Suggestions from all sides. Jane then goes to work with pencil and sketching pad.
Then the fun started. What to do with the sketch? how to translate it to leather with tools and finishing materials? A plump shoulder cut out of about nine-ounce russet cowhide was finally decided upon.
Page 5
The leather was thoroughly soaked and left to case between a piece of plate glass and a marble slab. After a few days, and when the material was judged to be of proper moisture content, the sketch was carefully traced with a sharp pointed, hard pencil.
Leather was again dampened and placed under glass. At the proper time, all figures were cut in by swivel knife, using three different blades: 1/2" hollow ground blade; 1/4" and one ground to less than 1/8". The smallest blade ground thin for fine detail cutting.
All figures were bevelled in with both plain and cross-checked bevellers, the latter used where deep shadow was required and of course at different depths. Undercut bevellers were used on all human figures, marsh grass, et cetera, were bevelled with plain and checked bevellers in conjunction with a narrow, spoon shaped modelling tool. The modelling tool was used to give soft lines to clothing wrinkles, mist wraiths and unevenness of foreground. Stamp 935 was reworked to about 1/16" to aid modeller in fine details of faces. Hair, dog ears, coonskin cap, et cetera, were cut in hanks, bevelled and finely cut with the knife. Different size dot stamps were used for buttons.
The sky background was stamped in with reworked 885 to give slightly contrasting textures to mist wraiths which were softly bevelled with modeller. Tree was slightly undercut. Deep shadows, where required, was stamped in with 889, deep, and 105, lighter. During all these operations, depth of dampness was sought at all times and the project was kept under glass during lapses in working time.
Upon completion of the tooling, figures were well dampened and embossed from the flesh side of the leather. When dry, cotton and glue were used to give stability. The project was again dampened and reworked from the grain side until satisfactory depth contrast was achieved.
When thoroughly dried a coat of thin shellac was applied with a cloth pad (use shellac with caution). Next, a coat of antique paste was brushed on and immediately removed from highlights and sky, securing good shadow background. When the assembly has sufficiently cured, we turned to the idea of colour. This phase was placed in more capable hands and the writer bowed out.
Jane took over and provided the colour sequence with artists oils and mostly in sympathetic colours. The big problem was to make the brown leather look "misty" white.
Altogether, this as a difficult, though satisfactory family effort. A wealth of experiences was gained and new ideas produced - and so - another on for the record.
Page 6
[This page carries a full-page hand-drawn ink illustration — hunters with dogs in a marsh scene — with no caption, no photograph, and no printed text of any kind.]