
An issue of the Society’s newsletter, transcribed from the original.
(10 pages, 2.8 MB)
the full-resolution scan, 43 MB, for close research
Page 1
[Transcribed from the original ten-page issue. Spelling, punctuation and wording follow the original, including its own inconsistencies. Editorial notes appear in [square brackets]. The volume is typed "XL11" for XLII. The masthead repeats a volume number it has already used: Fall 1992 prints VOLUME XLII NO 1, and Winter 1992 and Summer 1993 print XL11 as Nos. 2 and 4 of that same volume. A second run of XLII begins here at No. 1.]
CANADIAN LEATHERCRAFT
VOLUME XL11 NO. 1                  FALL 1993
INDEX
Page
"OH, WHAT A TANGLED WEB WE WEAVE"                                         2
     Bill Whittingham, A.C.S.C.L.

IN MEMORIUM                                                               5

BROOKS SADDLES FOR CYCLING COMFORT                                        5
     Rene Hackstetter, C.S.C.L.

RANGER BELT                                                               6
     Ruth Haig, F.C.S.C.L.

1994 ANNUAL                                                               9
     Toronto Branch

COMPARATIVE STATEMENT OF INCOME & EXPENSES                               10
1993 ANNUAL MEETING
     Lea Love, C.S.C.L.
All material published in Canadian Leathercraft is the property of THE CANADIAN SOCIEITY FOR CREATIVE LEATHERCRAFT and may not be reproduced in any form, without the permission of the Society.
EXECUTIVE
President:        Don MacLeod        2165 Corsair Road       Mississauga   Ont  L5A 2L7
1st Vice Pres:    Jack Meharg        36 Bailey Crescent      Scarborough   Ont  M1G 2P3
2nd Vice Pres:    Betsy Rennie       1357 Baldwin St.        Burlington    Ont  L7S 1K1
Treasurer:        Lea Love           311-3695 Kaneff Cr.     Mississauga   Ont  L5A 4B6
Recording Sec:    Kevin Armstrong    1377 Hurontario St.     Mississauga   Ont  L5G 3H5
Correspond. Sec:  Lois MacPherson    1506-205 Queen Mary     Oakville      Ont  L6H 1M8
Membership:       Madeleine Mitchell 17 Light Street         Woodstock     Ont  N4S 6G7
Editor:           Lois MacPherson    1506-205 Queen Mary     Oakville      Ont  L6H 1M8
Editor:           Betsy Rennie       1357 Baldwin St.        Burlington    Ont  L7S 1K1
[Lois MacPherson's address changes this issue, from Lynnwood Drive to 1506-205 Queen Mary. The original prints "SOCIEITY" for SOCIETY in the copyright line — the Society’s own spelling, kept exactly as printed.]
Page 2 — "OH, WHAT A TANGLED WEB WE WEAVE"
"OH, WHAT A TANGLED WEB WE WEAVE"
Bill Whittingham, A.C.S.C.L.
This is one of those projects that was completed in my mind, long before I physically started to work on it.
Five years ago, while walking through a friend’s garden, I noticed a large spider web in a prime location. It was a true piece of architectural magnificence, a virtual "Sky Dome" of the insect world. It was proudly decorated with cocooned trophies and the spider himself had set up housekeeping in a nearby rose bush, anxiously awaiting the arrival of his next meal.
Needless to say, it was then that my spider web bookends were conceived. Looking upon that magnificent web made me realize how versatile a pattern the spider web could be in our art form. Within minutes, I had the project completed in my head and it stayed there for three years without any further action.
My biggest problem in starting the bookends was finding the metal blank I wanted to use as a core. I talked to metal shops, friends, even the industrial arts teacher at my old high school, but no one could help. Just when I had finally given up, a "dear heart" came forward and gave me the necessary blanks from her own supplies. (You know who you are; thank you once again). So, my advice to you is, find the metal blanks first and then proceed with the project.
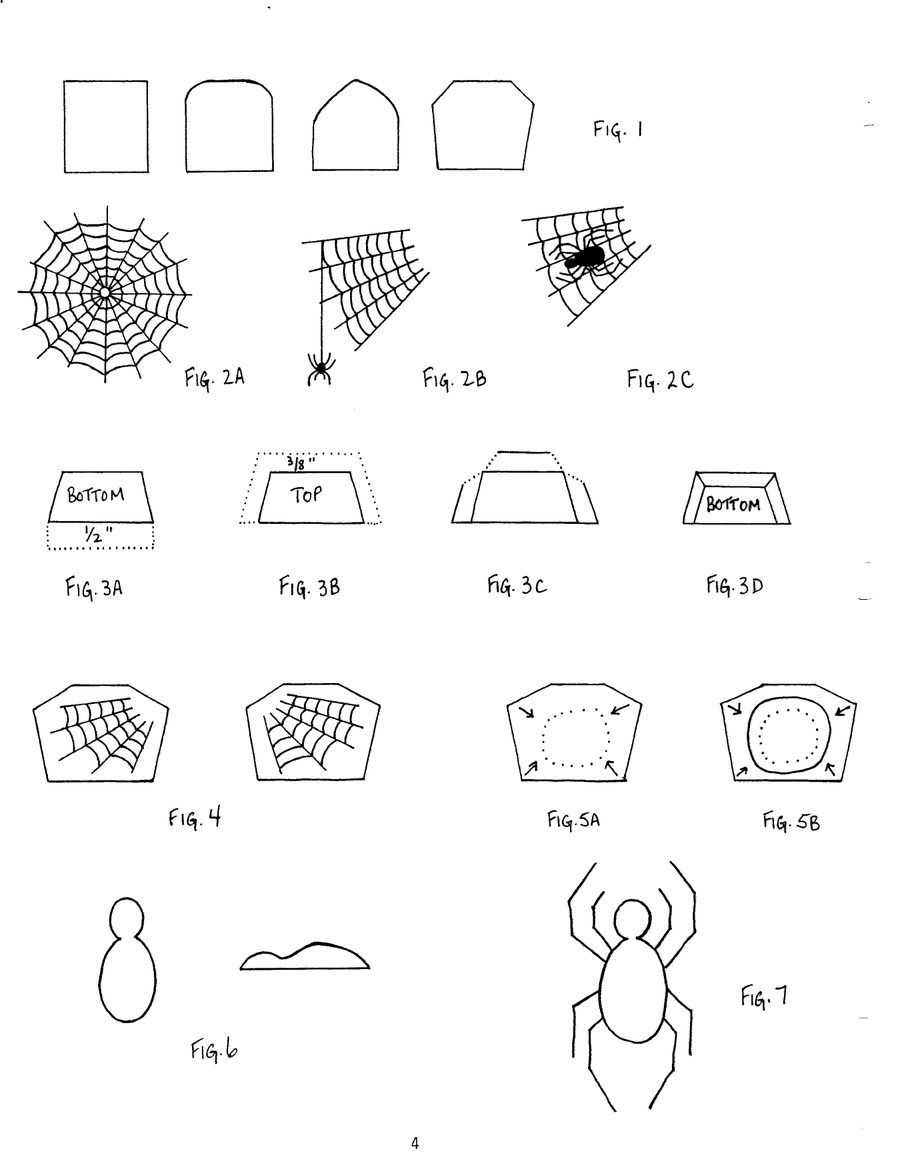
As you know, bookend blanks can come in a number of different shapes (See Fig. 1) and the spider web design is adaptable to each one of these shapes, depending on how you want to draw the web. (Fig. 2)
Skiving: the first step is to cover the foot of your metal blank with skiver or a similar leather of your choice. I chose a dark brown assisted morocco, because it skives well and has a rich lustre and feel, which adds to the look of the piece, overall.
Make a pattern for covering the foot of the metal blank. On a piece of cardboard, trace around the foot of the bookend and add about 1/2" to the base of the pattern, as shown in Fig. 3A. This piece will cover the bottom of the bookend. Cut two (2) from your leather.
To make the pattern for the top of the bookend foot, once again trace the foot on a piece of cardboard, then add 3/8" around the three sides indicated in Fig. 3B. This added 3/8" of leather will be skived, which allows you to completely cover the metal foot, as well as the edges. Cut two (2) from your leather.
Once you have done your skiving, you are ready to glue. Take a piece of steel wool or sandpaper and rough up the entire surface of both bookends, which prepares the surface for maximum adhesion. Spread contact cement on the bottom of each bookend foot and 1/2" up the face of the bookend, then on the flesh side of the two pieces of leather from Fig. 3A. Allow the cement to set, then adhere them, making sure there are no ripples in the leather.
Now spread glue on top of the bookend foot and on the flesh side of the skived pieces of leather, but not on the skived area. Adhere the two glued surfaces as before, making sure to centre the leather carefully. Take a piece of sandpaper and rough up 1/4" around the three sides of the bottom piece of leather that your skived leather is going to adhere to; cut the corners off the skived section, as in Fig. 3C. Glue the skiver to the sanded leather and use a bone folder to ensure maximum adhesion. It should now look like Fig. 3D.
[“assisted morocco” is what the page prints and is left as printed.]
Page 3
THE WEB: Trace the shape of the face of the metal blank on your tracing film and decide which variation of the web in Fig.2 looks best for your project. If you choose the full web, (Fig. 2A), one tracing is enough. If you choose one of the other designs, you may want to make two tracings as in Fig. 4.
THE LEATHER: Use 8 oz. cowhide for the body of the bookends. Cut 4 pieces of leather the same shape as the face of the metal blank, but make them 3/8" larger on each side and the top. Select 2 pieces to be the front of the bookends and case them. Trace your pattern onto the leather. Remove the tracing film and retrace the pattern, making the grooves deeper. Take your #7 overstitcher and run it down each groove you traced. Place the leather on a rubber mat and use your sewing awl to make your stitching holes.
THE COLOUR: Colour is always a matter of personal taste. I chose to go with a triple tone effect. For the base colour, I mixed three parts Fiebing’s TanKote to one part Fiebing’s medium brown dye. This gives the leather a rich golden tone. The second coat is full strength Fiebing’s medium brown, applied to a dry sponge with a Q-tip. Blot off almost all the dye onto a paper towel then start to burnish the dye onto the leather, moving from the edge to the centre, going in about an inch and stopping. (Fig. 5A) The centre area should be left the original golden colour, the sponged area should be light brown.
The third colour application is straight medium brown on the sponge, but this time just blot the sponge on the paper towel a couple of times and then burnish the colour from the outside edge toward the centre about 1/2" (Fig. 5B) You now have 3 colours, moving from light in the centre to the darkest colour at the edge.
The two remaining pieces of cowhide for the back side of the bookends should be dyed the same as the outside of the front section (medium brown). Apply a final finish to all four pieces.
THE SPIDER: This optional addition is also a matter of taste. I wet-moulded lizard skin that had been cut in the shape of a figure eight. (Fig. 6) To get the proper rounded effect, I used a ball point modeller for the head and the bottom of a glass cigar tube for the body. Once the lizard skin has dried, fill the cavity with caulking silicone or a mixture of leather dust and white cement. Use a thin piece of skiver for the bottom of the spider and cement this in place.
The spider legs are black, waxed thread, but these are not saddle stitched. each joint in Fig. 7 is an individual piece of thread, and is meant to sit on top of the web thread, just like a real spider. Once you have sewn the legs, slightly rough up the leather finish where the spider body is going to sit, with the point of an Xacto knife. Glue the body in place.
Now we're in the home stretch! You are ready to glue the front and back pieces to the metal blank. Carefully line the pieces up so that the edges are even. Use a #2 edger on all the edges and sand them until they are perfectly smooth. Dampen the edges with a sponge and burnish the edges with a bone folder.
Dye the edges with a Q-tip, (medium brown, again) and finish the edges with Polish Coat or Super Sheen. If the finish drys a little rough, rub a light coat of bees wax on the edges and burnish.
That’s it; you’re done! Next time you're in the garden, make sure you take the time to smell the roses. It’s amazing what may happen.
[A stray opening bracket before “Q-tip” is not on the page; removed.]
Page 4
[A full page of hand-drawn figures for the spider web bookends. The lettering, read from the printed page: FIG. 1, four bookend blank shapes — square, round-topped, gabled and cut-cornered; FIG. 2A, a full web; FIG. 2B, a corner web with the spider hanging from a thread; FIG. 2C, the same web with the spider in it; FIG. 3A, the base piece marked BOTTOM with 1/2" against the turned-under edge; FIG. 3B, the facing piece marked TOP with 3/8" against its edge; FIG. 3C, the two pieces brought together; FIG. 3D, the assembled base seen from above, marked BOTTOM; FIG. 4, the web laid on the blank; FIG. 5A and FIG. 5B, the glueing line marked by arrows; FIG. 6, the spider's body and its side view; and FIG. 7, the finished spider with its legs. There is no other text on the page.]
Page 5 — IN MEMORIUM; BROOKS SADDLES FOR CYCLING COMFORT
IN MEMORIUM
C.S.C.L. lost a longtime member and good friend when Sherle Bottrill passed away at the Barrie hospital on August 9th.
After years of secretarial employment in Toronto, Sherle joined Clarke and Clarke Leathers of Barrie in 1952. For some of the time with this company, she worked at the store at 523 Mount Pleasant Road, Toronto. Tandy Corporation later bought the retail division of Clarke and Clarke.
Sherle joined C.S.C.L. in the early days and took lessons from Bob Muma and Don McKinnon. She obtained her Associate standing in 1962 and, at that time, was President of the Barrie Branch, as well as being the Corresponding Secretary of C.S.C.L. Executive Council. She was awarded several Salon ribbons for her leather work and demonstrated at sales and Annual Meetings. At the Annual in 1985, she was made an honourary Life Member for her service to the Society.
Sherle’s husband, Geoff, passed away in 1978 and following that, she moved to Grove Park Home in 1983. Here, she continued to do leathercraft as well as the needlecraft and decoupage that she enjoyed so much. She was also a Life Member of the Simcoe County Arts and Crafts Association.
While not able to practice crafts in recent years, Sherle always maintained interest and kept in contact with her friends. She will be greatly missed.
The Hamilton Leather Guild mourns the recent passing of a long-time member, Jessie Strain. Jessie was a tireless worker, a good friend to all and a valued teacher, who will be missed by everyone.
BROOKS SADDLES FOR CYCLING COMFORT
Rene Hackstetter, C.S.C.L.
From time to time, I send for old catalogues on the cycle trade, from a fellow in Hartfordshire. I don't have much on cycle saddlery, but one of my prizes is the 1927 Brooks Saddles catalogue.
Brooks "Criterion Works" was located in Birmingham and in the cycle world, the model "B-17", now called the "Professional" saddle, is one of the benchmarks by which other all-leather saddles are judged.
The important points in saddle selection, claim the experts at Brooks, are first, correct shape that maintains itself, correct frame for the type of riding and finally, correct size and strength of springwork to suit the rider.
The leather is part spring and framework and, therefore, must be made of material to perform both functions. Only the highest grade and above medium quality.
As a cyclist who rides distance events, I can assure you that using a leather saddle is not only more comfortable than any modern plastic and foam type, but cooler to ride as well, because the leather "breathes".
The price of a genuine "Brooks" saddle is high, but after years of use, an old B-17 still retains its shape and provides a painless ride over the distance.
As the old adage goes, "There’s nothing like leather".
Page 6 — RANGER BELT
RANGER BELT
Ruth Haig, F.C.S.C.L.
The history of the Ranger Belt
The ranger belt design came out of necessity. Range riders found when they fastened their canteens, knives, ropes, etc. to their regular belts, the area where the tine of the buckle entered the billet end was a point of stress. The destruction from wear at this point left an otherwise good belt body useless, except as a smaller size belt.
By adjusting the length of the body of a belt and stitching on the buckle and billet ends (both removable for replacements) this problem was solved and the new belt became known as the Ranger Belt.
Al Stohlman’s book, "Belts Galore”, best describes the appearance and assembly of the Ranger Belt, with or without design. Our thanks to Al.
Tips before construction begins:
Before cutting the waist size, allow 6" extra, as casing the leather causes shrinkage - more so in latter years, with new tanning techniques. Casing the leather is a must. This is done by soaking the leather in tepid water with a mild detergent added, for 3-5 minutes. Do not rinse, wrap it in a towel, and place it in a cool area until the leather returns to a natural colour (barely damp), then proceed.
When putting a border line on the belt, do it before a slight bevel is put on the edges. Put a finish on the back before dying the front and edges.
Cutting Procedure:
From 8 oz. leather, cut a belt blank 1-1/4" x waist measurement + 6". (1-1/2" may also be used.)
From 6 oz. leather, cut the buckle strap 7" long by 3/4" for a straight strap (allow 1 end taper as above, if you wish.)
Using 6 oz. leather, make a keeper for the billet, 5/8" long, enough to fasten and slot the billet through. Use 6 oz leather, skived to half thickness, for the underside keeper, 1/2" x long enough for 1-1/2" coverage when finished. Construction:
Skive, as shown on the diagram. Mark grooving lines for saddle stitching. Groove the lines and, using a diamond awl, punch the holes of the #7 stitching wheel. Using a rotary punch, punch the holes on the buckle and billet ends, as indicated on the instructions.
The slot punch on the buckle end is along the length of the strap. The slot on the waist of the. belt is across the length of the belt. Very important: This slot placement is determined by the length of the buckle, e.g. 1" long - 1" in from the end.
When all the holes and skiving and pattern have been carried out, slick the back of all pieces, except where glue is to be applied, then finish dying the edges and body of the parts.
The billet end placement is now established, with the end of the strap at the end of the belt. (Any adjustment to waist size can be made at the buckle end with the slot.) When this is established, groove, mark stitch holes and proceed to stitch.
For the buckle end, have both keepers ready to place between the rivets, the 5/8" on top and the 1-1/4" on the bottom. (See diagram) I usually assemble this end by inserting the strap, with the buckle in place, into the slot, and set the first rivet at the end. Just under and behind the buckle is the 1-1/4" keeper, stitching, or cemented end up, then a rivet. The 5/8" keeper on top of the strap, then another rivet. The innermost part of the strap can then be cemented down and stitched.
These instructions are written in order of procedure. Study these and the assembly sheet carefully. If you take one step at a time, there should be no problem.
[Two readings set out here as printed: “Use 6 oz leather, skived to half thickness”, and “place it in a cool area”, where the words are easy to run together at a line break.]
Pages 7–8
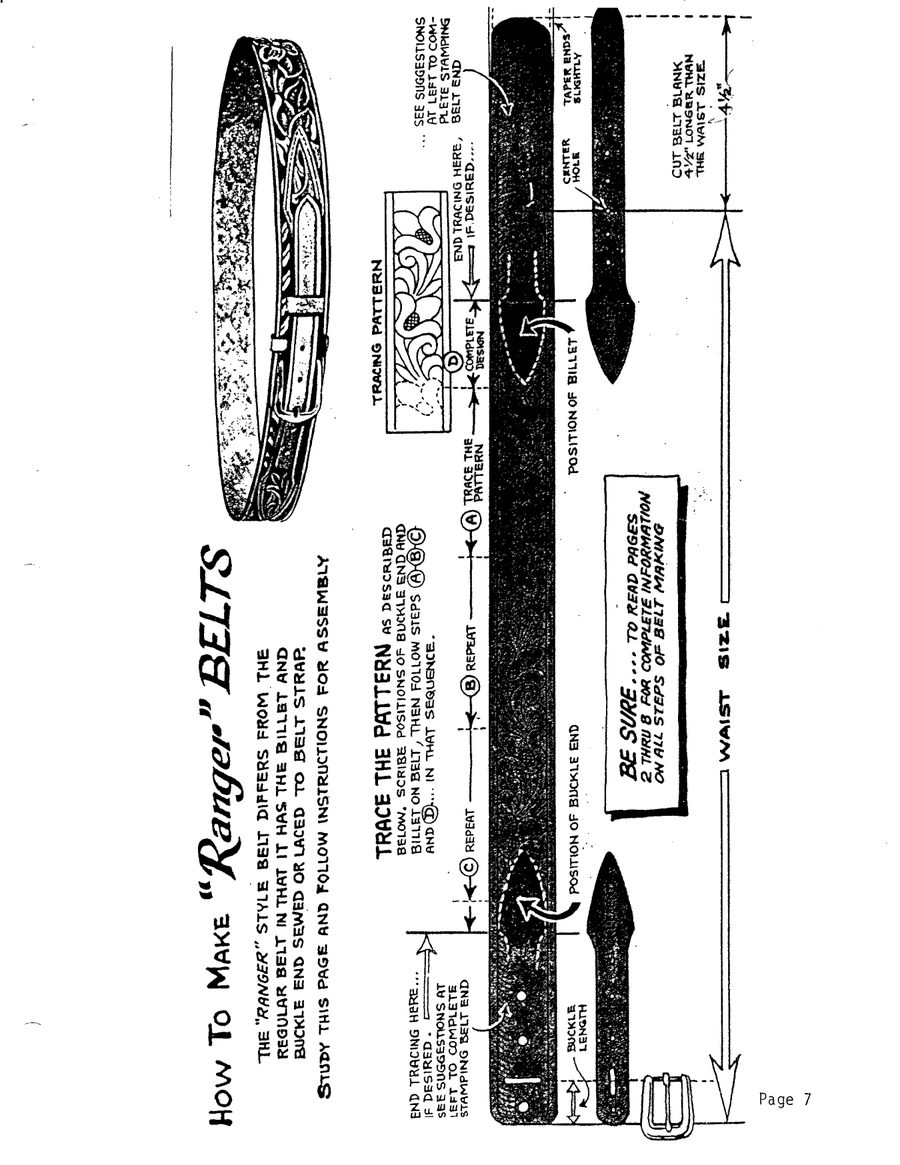
[Two full-page hand-drawn assembly sheets for the Ranger Belt, reprinted in the Al Stohlman manner and printed sideways in the original. A finished carved Ranger belt is photographed at the head of each. The lettering is reproduced in full below; page references within it are to the book the sheets were reprinted from, not to this issue.]
How To Make “Ranger” BELTS
THE “RANGER” STYLE BELT DIFFERS FROM THE REGULAR BELT IN THAT IT HAS THE BILLET AND BUCKLE END SEWED OR LACED TO BELT STRAP.
STUDY THIS PAGE AND FOLLOW INSTRUCTIONS FOR ASSEMBLY.
TRACE THE PATTERN AS DESCRIBED BELOW. SCRIBE POSITIONS OF BUCKLE END AND BILLET ON BELT, THEN FOLLOW STEPS (A) (B) (C) AND (D)… IN THAT SEQUENCE. END TRACING HERE… IF DESIRED. SEE SUGGESTIONS AT LEFT TO COMPLETE STAMPING BELT END.
(C) REPEAT   —   (B) REPEAT   —   (A) TRACE THE PATTERN   —   (D) COMPLETE DESIGN

BUCKLE LENGTH        POSITION OF BUCKLE END        POSITION OF BILLET
                     CENTER HOLE                   TAPER ENDS SLIGHTLY

|<———  WAIST SIZE  ———>|<— 4-1/2" —>|
BE SURE… TO READ PAGES 2 THRU 8 FOR COMPLETE INFORMATION ON ALL STEPS OF BELT MAKING. CUT BELT BLANK 4-1/2″ LONGER THAN THE WAIST SIZE.
Billet Pattern and Skiving Instructions
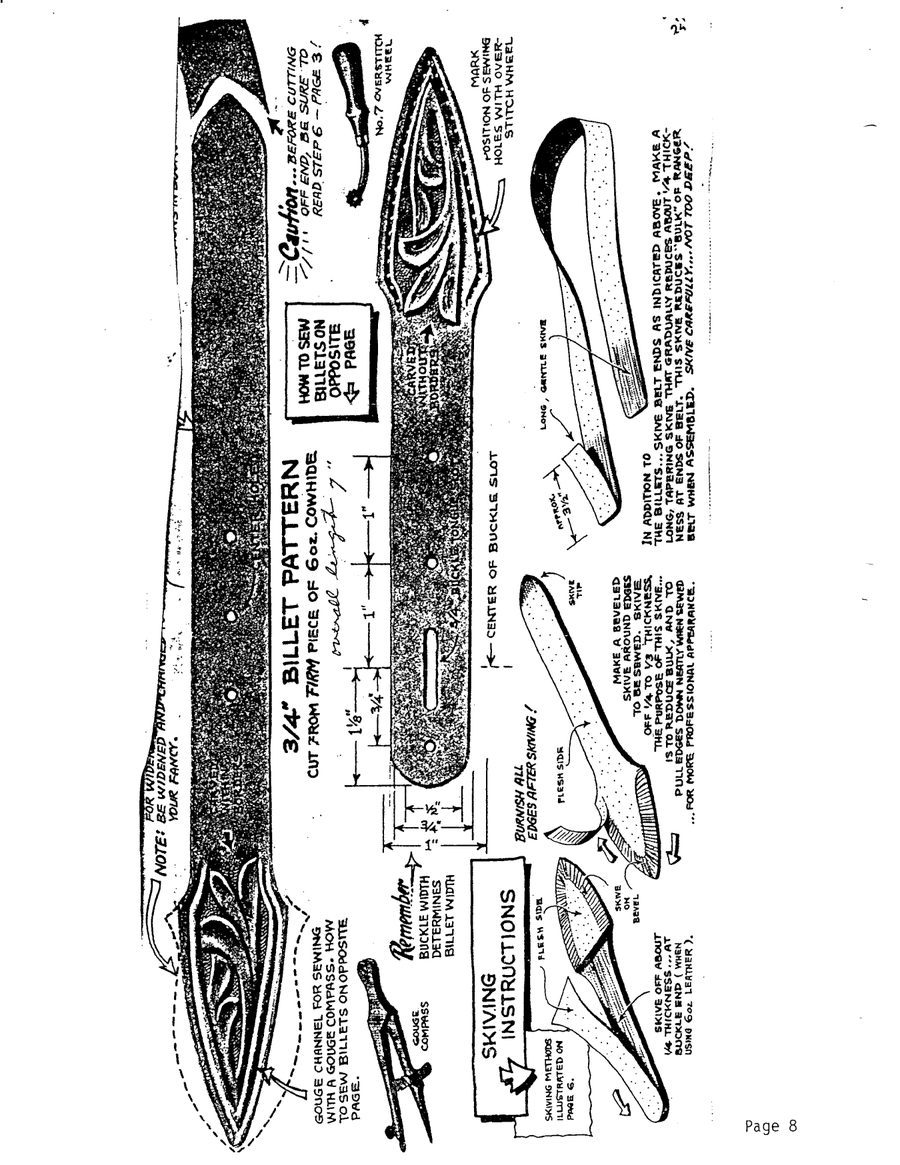
[The facing sheet. A carved belt runs across the head of the page; the note at the top left is partly buried under the heavily inked reproduction and cannot be read in full — the words given are those still legible. Its sense is that the billet pattern may be widened and altered for wider belts to suit the maker.]
NOTE: [illegible] FOR WIDER [illegible] BE WIDENED AND CHANGED [illegible] YOUR FANCY. [a further fragment to the right ends “…ONS IN BOOK”]
GOUGE CHANNEL FOR SEWING WITH A GOUGE COMPASS. HOW TO SEW BILLETS ON OPPOSITE PAGE.
3/4" BILLET PATTERN
CUT FROM FIRM PIECE OF 6 oz. COWHIDE — overall length 7"

|<— 1-1/8" —>|<— 1" —>|<— 1" —>|
|<— 3/4" —>|

CARVED WITHIN BORDERS        CENTER HOLE
3/4" BUCKLE TONGUE SLOT      CARVED WITHOUT BORDERS
Remember — BUCKLE WIDTH DETERMINES BILLET WIDTH. Caution… BEFORE CUTTING OFF END, BE SURE TO READ STEP 6 — PAGE 3! MARK POSITION OF SEWING HOLES WITH THE No. 7 OVERSTITCH WHEEL.
Skiving Instructions
SKIVING METHODS ILLUSTRATED ON PAGE 6. BURNISH ALL EDGES AFTER SKIVING! SKIVE OFF ABOUT 1/4 THICKNESS… AT BUCKLE END (WHEN USING 6 oz. LEATHER).
MAKE A BEVELED SKIVE AROUND EDGES TO BE SEWED. SKIVE OFF 1/4 TO 1/3 THICKNESS. THE PURPOSE OF THIS SKIVE… IS TO REDUCE BULK, AND TO PULL EDGES DOWN NEATLY WHEN SEWED …FOR MORE PROFESSIONAL APPEARANCE.
IN ADDITION TO THE BILLETS… SKIVE BELT ENDS AS INDICATED ABOVE. MAKE A LONG, TAPERING SKIVE THAT GRADUALLY REDUCES ABOUT 1/4 THICKNESS AT ENDS OF BELT. THIS SKIVE REDUCES “BULK” OF RANGER BELT WHEN ASSEMBLED. SKIVE CAREFULLY… NOT TOO DEEP!
Page 9
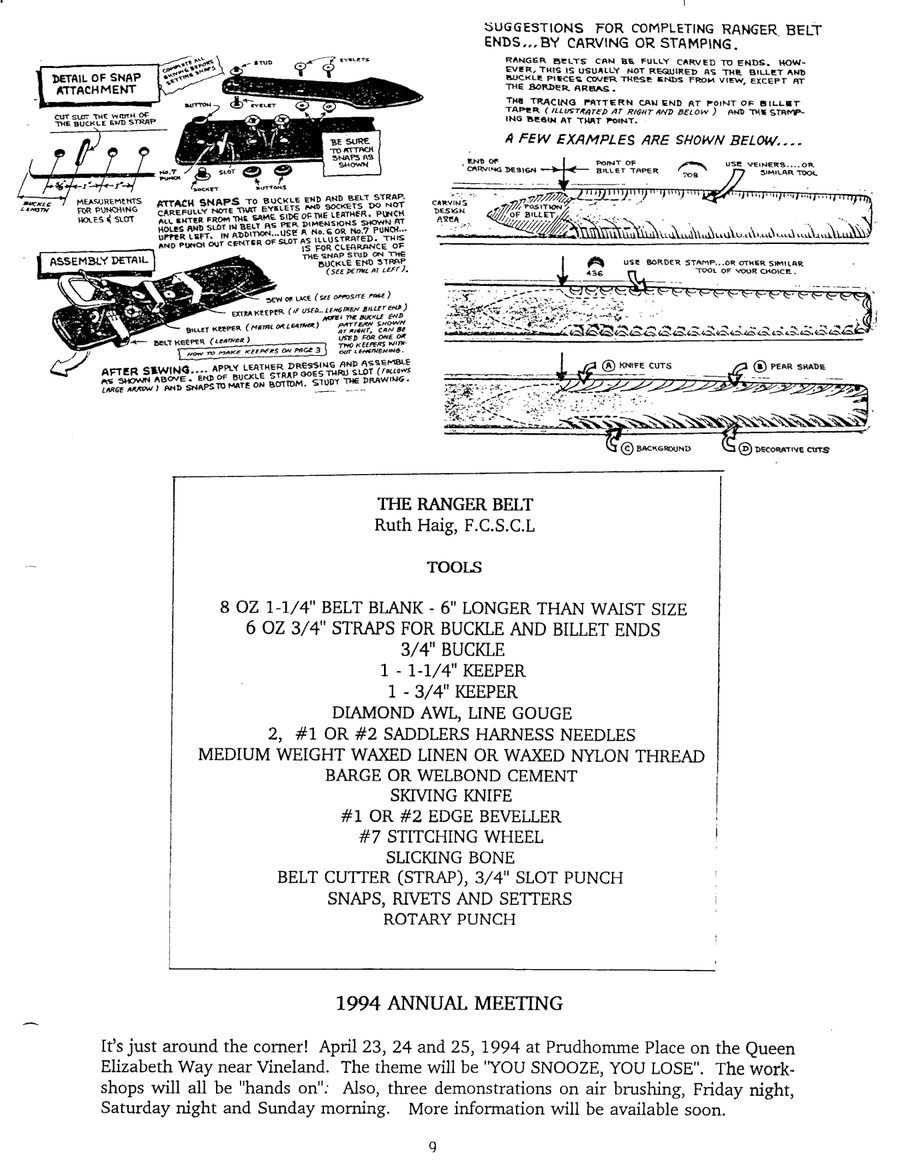
[The page carries two reprinted hand-lettered sheets side by side across its upper two thirds — the snap and assembly details at the left, suggestions for finishing the belt ends at the right — and below them, set in type, a boxed list of tools for Ruth Haig's Ranger Belt article and a notice of the 1994 Annual Meeting. All four are reproduced here. Read straight through rather than as separate sheets, the two hand-lettered sheets run together into a single paragraph, dropping the keeper labels and the assembly instruction, and the lower third of the page is easy to lose altogether; set out below in full instead.]
Detail of Snap Attachment
COMPLETE ALL SKIVING BEFORE SETTING SNAPS. CUT SLOT THE WIDTH OF THE BUCKLE END STRAP.
MEASUREMENTS FOR PUNCHING HOLES & SLOT — 5/8"  1"  1"

STUD    EYELETS    EYELET    BUTTON    SOCKET    BUTTONS
No. 7 PUNCH        SLOT
BE SURE TO ATTACH SNAPS AS SHOWN. ATTACH SNAPS TO BUCKLE END AND BELT STRAP. CAREFULLY NOTE THAT EYELETS AND SOCKETS DO NOT ALL ENTER FROM THE SAME SIDE OF THE LEATHER. PUNCH HOLES AND SLOT IN BELT AS PER DIMENSIONS SHOWN AT UPPER LEFT. IN ADDITION…USE A No. 6 OR No. 7 PUNCH… AND PUNCH OUT CENTER OF SLOT AS ILLUSTRATED. THIS IS FOR CLEARANCE OF THE SNAP STUD ON THE BUCKLE END STRAP (SEE DETAIL AT LEFT).
Assembly Detail
SEW OR LACE (SEE OPPOSITE PAGE). EXTRA KEEPER (IF USED… LENGTHEN BILLET END). NOTE: THE BUCKLE END PATTERN SHOWN AT RIGHT CAN BE USED FOR ONE OR TWO KEEPERS WITHOUT LENGTHENING. BILLET KEEPER (METAL OR LEATHER). BELT KEEPER (LEATHER). HOW TO MAKE KEEPERS ON PAGE 3.
AFTER SEWING… APPLY LEATHER DRESSING AND ASSEMBLE AS SHOWN ABOVE. END OF BUCKLE STRAP GOES THRU SLOT (FOLLOWS LARGE ARROW) AND SNAPS TO MATE ON BOTTOM. STUDY THE DRAWING.
Suggestions for Completing Ranger Belt Ends… by Carving or Stamping
RANGER BELTS CAN BE FULLY CARVED TO ENDS. HOWEVER, THIS IS USUALLY NOT REQUIRED AS THE BILLET AND BUCKLE PIECES COVER THESE ENDS FROM VIEW, EXCEPT AT THE BORDER AREAS.
THE TRACING PATTERN CAN END AT POINT OF BILLET TAPER (ILLUSTRATED AT RIGHT AND BELOW) AND THE STAMPING BEGIN AT THAT POINT.
A FEW EXAMPLES ARE SHOWN BELOW…
END OF CARVING DESIGN  —>|<—  POINT OF BILLET TAPER
CARVING DESIGN AREA        POSITION OF BILLET
708   USE VEINERS…OR SIMILAR TOOL
436   USE BORDER STAMP…OR OTHER SIMILAR TOOL OF YOUR CHOICE

(A) KNIFE CUTS   (B) PEAR SHADE   (C) BACKGROUND   (D) DECORATIVE CUTS
The Ranger Belt — Tools
[Printed in a ruled box across the width of the page, below the two reprinted sheets. It belongs to Ruth Haig's article on page 6.]
THE RANGER BELT
Ruth Haig, F.C.S.C.L
TOOLS

8 OZ 1-1/4" BELT BLANK - 6" LONGER THAN WAIST SIZE
6 OZ 3/4" STRAPS FOR BUCKLE AND BILLET ENDS
3/4" BUCKLE
1 - 1-1/4" KEEPER
1 - 3/4" KEEPER
DIAMOND AWL, LINE GOUGE
2, #1 OR #2 SADDLERS HARNESS NEEDLES
MEDIUM WEIGHT WAXED LINEN OR WAXED NYLON THREAD
BARGE OR WELBOND CEMENT
SKIVING KNIFE
#1 OR #2 EDGE BEVELLER
#7 STITCHING WHEEL
SLICKING BONE
BELT CUTTER (STRAP), 3/4" SLOT PUNCH
SNAPS, RIVETS AND SETTERS
ROTARY PUNCH
1994 Annual Meeting
It's just around the corner! April 23, 24 and 25, 1994 at Prudhomme Place on the Queen Elizabeth Way near Vineland. The theme will be “YOU SNOOZE, YOU LOSE”. The workshops will all be “hands on”. Also, three demonstrations on air brushing, Friday night, Saturday night and Sunday morning. More information will be available soon.
Page 10 — 1994 ANNUAL
CANADIAN SOCIETY FOR CREATIVE LEATHERCRAFT
COMPARATIVE STATEMENT OF INCOME AND EXPENSES — ANNUAL MEETINGS
                                            April 23-25      April 24-26
                                                1993             1992

INCOME
  Advance to Royal Resort                  $    250.00      $    200.00
  Banquet Income (Plus other foods)            1133.00          1350.00
  Donations                                      60.00
  Draw Tables                                    93.00           322.00
  Registration Fees                    (44)     660.00  (56)     840.00
  Special Draw                                   75.00            86.00
  M.S.C.L. Coffee Break                                           60.38
  Bank Interest                                                   15.18
  Total Income                             $   2271.00      $   2873.56

EXPENDITURES
  Repayment of Advance                     $    250.00      $    200.00
  Banquet and Food Costs                       1242.34          1548.35
  Bank Charges                                    1.01            15.25
  Miscellaneous                                  25.05
  Office Supplies                                 8.77
  Postage                                        49.34
  Printing and Reproduction                      11.00
  Speaker                                        50.00           160.15
  Room Rental                                                    600.00
  Early Registration Prize                                        15.00
  Advertising and Entertainment                                   48.10
  Total Expense                            $   1637.51      $   2586.85

  Gross Income from Operation              $    633.49      $    286.71

OTHER EXPENSES
  Prize                                    $     50.00      $     50.00
  President Room Allowance                      100.00            62.09
  Annual Report Cost                             69.53            89.70
  Ribbon etc. Estimate                 (a)      125.00           132.25
  Judging Facilities                            100.00           150.00
  Postage                                                         60.41
  Film, Development                                               23.00
                                           $    444.53      $    567.45

  Net Income (or Loss) on Activity         $    188.96      $   (280.74)
Note (a) Estimate as actual not available at time of Report
Completed 8/25/93 10:45 P.M. L. LOVE