
An issue of the Society’s newsletter, transcribed from the original.
(12 pages, 2.1 MB)
the full-resolution scan, 32 MB, for close research
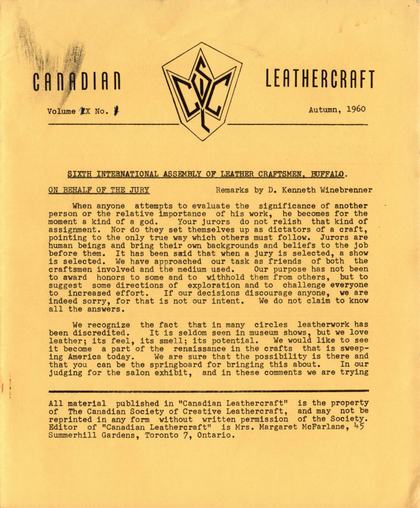
Page 1 — SIXTH INTERNATIONAL ASSEMBLY OF LEATHER CRAFTSMEN, BUFFALO. ON BEHALF OF THE JURY
Canadian Leathercraft
Volume IX No. 1 Autumn, 1960
The masthead’s own title, “Canadian,” had dropped out ahead of “Leathercraft”; restored above. The masthead prints Volume IX No. 1. This is in fact the first number of Volume 10: Volume IX ran from Autumn 1959 to Summer 1960, and the next issue, Winter 1961, prints Volume X No. 2. The archive lists this issue as Volume 10 and leaves the printed IX standing above.
SIXTH INTERNATIONAL ASSEMBLY OF LEATHER CRAFTSMEN, BUFFALO. ON BEHALF OF THE JURY Remarks by D. Kenneth Winebrenner
When anyone attempts to evaluate the significance of another person or the relative importance of his work, he becomes for the moment a kind of a god. Your jurors do not relish that kind of assignment. Nor do they set themselves up as dictators of a craft, pointing to the only true way which others must follow. Jurors are human beings and bring their own backgrounds and beliefs to the job before them. It has been said that when a jury is selected, a show is selected. We have approached our task as friends of both the craftsmen involved and the medium used. Our purpose has not been to award honors to some and to withhold them from others, but to suggest some directions of exploration and to challenge everyone to increased effort. If our decisions discourage anyone, we are indeed sorry, for that is not our intent. We do not claim to know all the answers.
We recognize the fact that in many circles leatherwork has been discredited. It is seldom seen in museum shows, but we love leather; its feel, its smell; its potential. We would like to see it become a part of the renaissance in the crafts that is sweeping America today. We are sure that the possibility is there and that you can be the springboard for bringing this about. In our judging for the salon exhibit, and in these comments we are trying
All material published in "Canadian Leathercraft" is the property of The Canadian Society of Creative Leathercraft, and may not be reprinted in any form without written permission of the Society. Editor of "Canadian Leathercraft" is Mrs. Margaret McFarlane, 45 Summerhill Gardens, Toronto 7, Ontario.
Page 2
to interpret directions which will achieve these ends. We have not judged the show and run home. We have stayed with you, talked with you,listened to your comments. And we are here to take our medicine. Both jurors are, I believe, in substantial agreement with what I am about to say.
We have asked ourselves whether each item is practical for its purpose; how it will wear under the conditions imposed upon it; how well the various techniques have been executed. In this respect we have requested and received the advice of competent leather craftsmen whenever we have any doubts. But we have not stopped with the technical evaluations alone. We have looked for esthetic qualities in design, beauty, originality, and ingenuity in concept and execution. There are things in the salon exhibit where we ignored the evaluation of our technical experts just a little because the general plan or ingenuity seemed to be worthy of encouragement, and cases where we felt the designs did not quite come up to the standard of the execution. By the same token, there are articles not in the salon exhibit which are extremely well executed but lacking in originality or weak in design. And vice versa. We have tried to select' for the salon show many varieties of projects and many examples of techniques, because we believe that there are many valid directions that should be encouraged. We have tried to be tolerant of both representational and abstract forms when they seemed to be appropriate to the purpose and in the best traditions of design, past and present.
If we seem to be nudging you in the direction of more contemporary. design, it is in keeping with the universal renaissance in the crafts today, and which draws a great deal of its direction from today's standards and today's living. One of the comments I heard was that the selection was "one-sided" and that the jurors were prejudiced against carving. Our reply to that would be that we are open-minded toward carving even that we believe it could be used in a contemporary way. We saw very little evidence of that, however, most carved designs were of the old Spanish-Cowboy variety, not in keeping with today's design standards; and a great deal of these seemed to be traced from stereotyped commercial patterns. Copied designs were, of course, not eligible for the salon exhibit according to the criteria of originality that was set up in the announcements. Now, please don't resign from the society in protest to our insensibilities. And don't throw your carving tools away! Why not try to see if you can develop designs more typical of today; designs which may be more simple and more flattering to the basic forms, perhaps more abstract, less formal; perhaps with more emphasis on texture as a contrast to plain surfaces, We believe it worth the try. We do have an example of carving in the salon, even if a simple use of the swivel knife on a cigarette holder. This showed a little different kind of thinking even if it was a very simple application.
Page 3
On the whole, we believe that there are many good signs in the show; evidence that many craftsmen are experimenting and trying new ways. Witness the great renaissance in jewelry in recent years, and remember that all of this has come about since the end of World War II. Prior to that time almost all jewelry echoed the Tiffany standard of a hundred years back with leaves, butterflies, and ribbons covered with diamonds; and their five-and-ten-cent store counterparts with glass replacing the stones. All is not lost. Just join up with the rest of the crafts.
We have not knowingly admitted to the salon exhibit any work that is copied, or based on patterns made by other than the craftsman himself,for we look upon the craftsmen as a designer-craftsman. We have no particular objection to the use of commercial frames for purses, but we believe that the worker should not be honoured for using them. In this connection, we believe that the commercial firms which supply the various findings need also to be brought up to date. Craftsmen should explore new ways of making their own catches and findings. Metal and/or wood findings could be made a part of the basic design and riveted with the leather as a sandwich. Perhaps this technique might also be used for fastening leather as a substitute for lacing. A good book on jewellery, such as the well-known "jeweller's bible" might be a guide for those anxious to make their own findings.
We liked the design of the belt in the salon which used enamelled metal parts in related colours. Yet when we tried this belt on for size it came apart. While it has bugs in it we felt that it was worthy of a pat on the back. One purse which combined a woven fabric with leather was not completely successful, but.we believe there should be possibilities in combining both commercially-woven fabrics and (preferably) hand woven panels. We felt that the stamp designs on some otherwise well-designed purses detracted from them because the single design stood out too much. In some cases. this was true of other types of decoration. In general, we hold to the idea that any applied decoration should be less conspicuous than the object decorated. Naturalistic flowers, butterflies, etcetera, which simulate a painting in their forms and colours usually tend to detract. Nature could well be used as a source for design if the design was more conventional, perhaps more abstract and with the tooling and carving more in keeping with the flat plane of the object. In general, pictures belong in frames rather 'than on leather. In a few cases rather naturalistic forms were subtle in colouring and seemed appropriate.
We sometimes hear it said that leather is such a beautiful material that it should never be decorated. The danger in this approach is that the leather object may turn up to look like a commercial box, with little of the personality of the creator expressed
Page 4 — MEMBERSHIP FEES; NEW CONSTITUTIONS
in it. This is one of the dangers of a strictly sanitary contemporary form. Several of the exhibitors have achieved good design in a simple form through the proportions used and often through the sensitivity shown in the application of handles and fasteners,etc., and their placement. We were impressed with the ingenuity and creative thought shown by one of the exhibitors who found ways to eliminate sewing and lacing. However, if everybody adopted his solutions we would be headed for a dead end. There must be other ways. And we are not absolutely sure that lacing and stitching cannot be used in a contemporary way. We question the use of imitation basket weaves on leather purses, and wonder if it is appropriate that one material should imitate another. In this respect we are not really sure that leather should imitate flowers for the lapel, but we did give an exhibitor credit for trying it out.
We are not sure that you believe in us by now. But we believe in you. Why not a period of experimentation in leather? Be flexible and not rigid in your ideas! Be bold, make mistakes, don't be too hasty to judge what you have done; live with your experiments. See if you can't give leatherwork the place it deserves in the crafts renaissance of today.
MEMBERSHIP FEES
MEMBERSHIP FEES WERE DUE AND PAYABLE AT THE ANNUAL MEETING APRIL 9th, 1960. Membership - $3. annually
Members are reminded that only paid-up members will receive bulletins and notices of special meetings etc.
NEW CONSTITUTIONS
The new constitutions are now ready and we are greatly indebted to Mr. Harold Frost for having them mimeographed and bound. A copy can be obtained by writing to the secretary,
Mrs. Nina Wilson, Secretary,
Canadian Society of Creative Leathercraft,
400 Charlton Avenue West,
Hamilton, Ontario.
Page 5 — C.N.E. WINNERS; CANADIAN HANDICRAFTS GUILD COMPETITIONS
C.N.E. WINNERS
CANADIAN HANDICRAFTS GUILD COMPETITIONS
This prize table is printed in four columns — category, winner, donor and award, with two second-place donors given only as a ditto mark under the first-place donor above them. Read straight across instead of column by column, the entries run together. It is set out below in the order the columns are meant to be read, the ditto-marked donors spelled out in full. The picture of the page above is the original, untouched.
LEATHERCRAFT                              WINNER                       DONOR                                    AWARD

Best Leather Entry                        Mrs. Jean Newton, Tor.      F.W. Woolworth Co. Ltd.                  $50

Decorated Leather (Tooled, Carved,        1st Mrs. Anne Hook, Tor.    Tandy-Clarke & Clarke                    $25 CN
  Lino-cut, etc.)                         2nd Nora Huyck, Newmarket   Tandy-Clarke & Clarke                    $15 CN
                                                                      Barrie

Undecorated Leather (Contrasting          1st Endel Ruberg, Montreal  Lewiscraft, Toronto                      $25 CN
  leathers, Lacing, Stitching, etc.)       2nd Clarice Packham, Tor.  Lewiscraft, Toronto                      $15 CN

Hand Crafted Leather with not over        Fred W. Brown, Tor.         Women's Committee, Canadian           $25
  20% decoration.                                                     Handicrafts Guild (Ont.)

Any Leather article of original design,   J. Zalitis, Toronto         President's Prize & Medal,          $25
  but winner must never have won a                                    Canadian Handicrafts Guild (Ont)
  prize in any major Canadian Leather
  competition before

Best use of Colouring Techniques          Gunars Buss, Tor.           Garnett Co., Toronto                     $25
  in Leather

Most original Entry, based upon a         Mrs. Sadie Roebuck, Tor.    Anonymous Donor                          $35
  new approach to Leathercraft.
EXCERPTS from the report of the C. N. E. judge, Mr. H. J. Brennan, Director and Dean of Fine and Applied Arts, Rochester Institute of Technology, Rochester, N. Y.
Canada's crafts, as seen in this 1960 exhibition, reveal an emerging expressive power not yet defined, and superior skills not as frequently directed as one would wish to a search for new form and character.
Two further impressions of a generalized nature should be noted. The first would be that there is a distinctive and national identity finding its expression in the Canadian crafts; the second is the contribution made to Canada's resources in the arts by some of her more recent citizens with roots in the cultures of eastern and central Europe.
The leather work was technically superior but the craftsmen appeared too beguiled by tools and dyes to seek out the means by which this wondrously flexible, colourful and durable material can be more originally and honourably used.
From Canadian Handicrafts Guild (Ont.) Bulletin Sept.,1960
Page 6 — HOW MAKE A MOROCCO WALLET
HOW TO MAKE A MOROCCO WALLET by Jim Cournyea
The leather required for this project is English Morocco-- wallet weight.
In order to have a straight edge from which to start, cut the hide in half lengthwise (i.e., from the neck to the tail). Cutting in this manner will give you the best areas for your wallet back and other panels as this area has the finest grain and a minimum of blemishes.
Wallet Back
The wallet back should be cut from the best section of the hide, namely, along the back - size 9" x 34", This piece may be tooled or left plain, as desired.
Wallet Interior
This piece (8 3/+" x 3 3/+") can be cut from an area that has a coarse grain or minor blemishes since nearly the whole area will be covered by pockets or panels.
Skive the top edge of this piece, the full length, flesh side up. The skiving need not be extensive - 1/16" to 1/8", just enough to take the squareness off the edge.With a ruler draw a line across the flesh side 1" down from the skived edge. A ballpoint pen is most suitable as the mark will still be visible after the cement dries.
Cover this 1" area adequately with Lewiscraft white leather cement. Wait until cement becomes transparent. Fold the skived edge over to the line - starting in the centre. Press down firmly with your fingers (do not rub) until the whole area has been cemented in place. With a bonefolder rub lightly over the whole area, especially along the skived edge.
The advantage of using Lewiscraft cement is that it takes time to set, giving the worker a little leeway, and that the pieces may be taken apart within a reasonable length of time incase refitting is necessary.
Turn this piece over and dampen folded edge lightly with a sponge. With a ruler or straight edge and the tracing end of your modeller, make a line about 1/16" in from the edge. This piece should now be 3 1/+" wide x 8 3/i". When putting this line on do not push in only one direction as the leather will stretch. Make short firm strokes back and forth. Now place this piece under a heavy flat object until it dries thoroughly (overnight or several hours).
Page 7
Window Panel
This piece will be 3¼" x 4". Dampen leather well from flesh side, turn over. With ruler make a line 3/8" in from all four sides. (See Diagram #1).
For added effect, use spoon end of modeller to flatten area outside this line for about 1/16", This tends to outline the window area more distinctly. Do not cut out this window panel until leather is thoroughly dried (under a heavy flat object).
Change Purse
This piece should be 3¼" x 4½", With grain side up, fold left edge back ½", (See Diagram #8). Dampen at fold and press firmly with fingers. Now fold right hand side over to folded edge,keeping both edges even. fold firmly and place on a cutting board. With a sharp knife or razor blade, cut through the 3 layers at the upper left hand corner (See Diagram #9). This cut. should be ¼" in from edge and 3/8" deep, cut at an angle. (See Diagram #9). Spread this panel out flat again leaving the 1/2" folded under on left side. Fold over and cement area between cuts. Change Purse should now look like Diagram #3.
Using spoon end of modelling tool - press down edges of areas A and B (Diagram #3). With tracing end of modeller and ruler, outline along folded edge C (Diagram #3). Set aside to dry (under flat object).
Flap for Change Purse
This piece should be approximately 3 1/8" x 3",the width being determined by the area between the cuts made in the Change Purse (Diagram #3). Contour of flap may be cut to suit the individual
The edges may be tooled to improve the appearance, 1/8" around edge. After drying, this flap should. be lined, using morocco or skiver. It requires extra body as there will be a dome applied here after wallet is assembled,
Take wallet interior panel (3 1/4" x 8 3/4"), Place change purse panel on wallet interior with folded end toward the centre, move panel to the right until edges line up evenly. Place fingers securely on folded end of change purse, lift panel with right hand until fold underneath is visible. Mark along its edge, on the
Page 8
wallet interior, remove change purse panel, scrape along this line enough to roughen surface to assure good bond when cemented. Do not scrape all the way to the top of wallet interior as some of this area will be showing above flap of change purse.
On change purse panel, skive the 1/2" fold from the flesh side. Roughen back of this s" fold for better cementing. Apply cement to both roughened areas, and when cement is clear place change purse on wallet interior, being sure to have all sides even. If change purse should extend below bottom edge of wallet interior, it can be trimmed later-- the essential thing being to have the side and top even.
Place change purse flap in position under change purse so that' when folded over it will fall into place between slanted sides. Hold flap in position and raise change purse panel and outline area of flap on wallet interior. Roughen this area, back of flap, being careful not to scratch area that will show above the flap. Now skive the back of the flap completely across the bottom and 1/2" to 3/4" up each side so that it does not leave a pronounced edge under change purse.
Cement back of flap and corresponding area on wallet interior. When cement is clear put flap in position, press firmly. Now take piece of scrap Morocco 1" or 1½" square, skive all 4 edges. Cement in place on flesh side of change purse panel, the position being determined by position the dome will have on change purse flap. (Diagram #12).
The change purse panel and flap may be sewn in place on a conventional machine - after cement is thoroughly dry.
Spread change purse panel back and start sewing in centre toward top and double stitch in same holes and extend sewing to bottom of 1/2" fold. Now sew flap in position (Diagram #12). Roughen outer edge of wallet interior (right hand side) and bottom edge to be covered by change purse. Cement edges of change purse and corresponding area of wallet interior. Press in place when ready.
Skive top edge of window panel carefully, approximately 1/8". Then cut out window area (Diagram #1). Place window panel in position on wallet interior for fitting. If any adjustment is necessary cut equal amounts off top and bottom.
The area along left side and bottom of wallet interior should be roughened for cementing purposes. The top side is roughened but below the line which was made with modeller. Cement panel on 3 sides being careful not to put any on open edge (centre of wallet). Cement corresponding areas on wallet interior. When ready put panel
Page 9
in position, press firmly. With tracing end of modeller and ruler, put line on top edge of window panel. If skived sufficiently this should push edge of window panel down into the groove created by. traced line previously put on wallet interior. Machine stitch along this line, double stitch at inner edge.
Facing for Inside of Wallet Back
Cut strip 9" x 3/4" or 1", Skive bottom edge of this strip.
Place on wallet back flesh side (See Diagram #6) with skived edge down. Mark off area to be cemented, using ballpoint. Remove strip, cement both pieces. When ready, place strip in position, skived edge down, being sure top edges are even. Rub with bonefolder along skived edge.
Now the interior is ready to cement to wallet back. Using a square, make sure wallet back and interior are square on the corners. Cement flesh side of wallet interior ¼" or less in from edge; do same with wallet back. Do not apply cement on the wallet back above the area occupied by the wallet interior.
When ready take wallet interior, place on wallet back, starting at the left edge press in place, being sure the lower left corner fits exactly. Keeping the remaining cemented areas apart, place the right hand side in position, press firmly in place. Grip left side of wallet with left hand, right side with right hand, bring hands together. Take both lower corners in left hand, squeeze bottom edges together.
If both pieces of leather have been cut properly they will fall into position naturally with little or no bulging. If not and there is a gap at the centre, take wallet apart and cut 1/16" or less off wallet back. Then re-cement - follow same procedure.
Or if wallet interior is too long take apart and cut 1/16" off end, proceed as above. Cut 1/16" diagonally off corners -- just enough to take squareness off corners.
Punch Wallet with 5/64" punch. Lace with 5/64" lacing as this lace is narrower and packs down more neatly than does 3/32", After lacing wallet completely, rub lacing with bonefolder,on both sides. Lignum vitae wheel, used on belt edges, may be used to smooth the edge of lacing.
Place a piece of mica or celluloid 3" x 4" over window panel. Scratch surface to indicate proper size - it must fit inside -- between sewn edge on top and laced edge on bottom. Slide modeller along edge of window inside panel in order to free edges in case of excessive cement.
Page 10
Cut 1/16" off corners of mica - this will help when inserting mica in panel. Push mica in place - extend full length of window panel until it fits snugly at other end. If mica is too long, mark it, remove and cut off excess. Sandpaper the right hand end of mica ¼" and cement. Cement underside of open end of window panel. When ready, insert mica full length of panel, press firmly at cemented end.
DIAGRAMS
Diagram #1 — a bordered rectangle marked "Cut Out This Area", with a 3/8" margin along the top and a 3/8" margin along the right side.
Diagram #2 — a rectangle with a dashed fold line near the left edge, labelled "Fold over & cement — Area between cuts".
Diagram #3 — a flap outline with points A and B at the top corners and C at the top centre, labelled "Width of Flap".
Diagram #4 — a rectangle 3½" wide by 3" deep, with an X marked in each bottom corner.
Diagram #5 — a half-round shape, unlabelled but for its own number.
Diagram #6 — a strip, grain side, 3/4" or 1", flesh side, 3¼" by 9".
Diagram #7 — a panel labelled "Skive along here." and "Cement this area & fold over to this line.", flesh side, finished dimensions 3¼" x 8¾" (marked 3¾" and 8¾" on the drawing).
Diagram #8 — the change-purse panel, grain side, 4½" wide with ½" and 3¼" marks, labelled "Dampen & fold under", with a dashed fold line.
Diagram #9 — a pocket shape marked "3/8" deep, ¼" from edge".
Diagram #10 — a panel with a dashed circle labelled "Fold To here".
Diagram #11, Wallet Interior — the interior panel outline with a notch and a dashed centre line.
Diagram #12 — the dome assembly: a small square patch labelled "Leather for dome", a dashed centre line, and the instruction "Double stitch here. Then fold panel back to here and cement."
Diagram #13 — two panels side by side: the left labelled "Skived edge up." over a rectangle marked "WINDOW PANEL"; the right a domed shape labelled "Double stitch".
This page is the pattern-diagram sheet for a window-panel wallet: thirteen small hand-drawn diagrams, each a shape with a dimension or an instruction lettered around it. Most of that lettering does not read as sentences, so the diagrams are described below by their own labels and dimensions rather than transcribed as running text, since they are drawings, not prose. The opening paragraph of running instructions above is transcribed in full.
Page 11 — SUMMER WORKSHOPS IN HAMILTON; REMINDER
SUMMER WORKSHOPS IN HAMILTON
During the summer a group of Hamilton Leathercraftsmen held nine very successful workshops. The group was composed of a few persons who felt that they had more leisure hours during the summer and, with less activities, more time could be spent finishing projects at home.
Each workshop was held at different member's homes and friendliness and a relaxed atmosphere made them most enjoyable as well as educational.
The programme was carefully planned. At the first workshop inlay was stressed, then skiving and sharpening of knives. These led up to the covering of boxes.
Various book-ends were made. Each person composed their own design and these were cut from sheet zinc. Then variety took over—some book-ends were tooled, padded and laced; others were done in 3D tooling, skived, turned over and lined; still others were made by covering commercial forms of pressed wood. Morocco wallets were another project undertaken by the group.
One highlight was the making and covering of cardboard boxes with fancy paper. These could be made to the desired shape and size of our leathercraft gifts. This was such a successful and unusual venture that the Hamilton Leathercraft Guild are going to have a similar workshop at their November meeting.
The enthusiasm and enjoyment shown at these informal get-to gathers proved the fact that much could be accomplished in the field of leathercraft if it was not confined to the regular monthly meeting of the various guilds. People want to DO leather not TALK it! The general feeling of those who attended the summer workshops was that if Guilds would break into small groups and have workshops as well as the regular meetings, it would increase the membership and also the quality of the work.
REMINDER
The 7th International Assembly will be held on the 6th and 7th of May 1961, at Prudhomme's Motor Hotel, Vineland, Ontario.
Further announcements regarding details will be published in the next issue of the bulletin.
Page 12
We are pleased to have you come in and choose from our wide selection of Quality Leathers and Accessories. If not convenient, phone or write:
284 King Street West
Toronto 2B, Canada
EMpire 3-5206
AN ALL-CANADIAN COMPANY SERVING CANADIANS SINCE 1913
For the Leathercraftsman:
Antiques - Toning Dyes
Polish Coat
Edge Dressing
Inlay-Background Dye
Leather Cleaner & Polish Remover Leather HAM at your holly supply store t and: CANADIAN DISTRIBUTOR:
LEWISCRAFT
284 King St. West, Toronto, EM. 3-5206