
An issue of the Society’s newsletter, transcribed from the original.
(12 pages, 1.8 MB)
the full-resolution scan, 29 MB, for close research
Page 1
| CANADIAN | LEATHERCRAFT |
| Volume XXXI, No.1 | Fall |
| 0045-5121 | October 1982. |
C.N.E. 1982
It would be difficult to call our 1982 sale our most profitable ever, as the severe recession has certainly put a crimp in most people's "impulse" buying. As well as this, we had the added expense of paying a substantial rental fee for our booth this year. However, although there are some final tallies to be made, our sales were approximately
$5687.00 in total, with 20% of this, $1169.00, going to the C.S.C.L. to pay for the booth rental and accompanying expenses.
Appreciation for those who contributed their time in manning the booth is in order, plus thanks to Hope Drysdale for planning workers schedules, to Jack Meharg and Gladys Riddell who shared the responsibility of the sale as chairmen, and, most of all, to Ralph and Mary Whately who undertook the complicated task of tallying all the sales, sorting the work, and seeing that all was returned to owners safely.
In total, 26 persons contributed work for the sale, a figure that might well be improved next year to give the public a wider view of the type of work we produce. A special
All material published in Canadian Leathercraft is the property of the Canadian Society for Creative Leathercraft, and may not be reprinted in any form without the permission of the Society.
President: Jack Meharg, 36 Bailey Cres. Scarborough, Ont.
Vice-Pres.: Ray Potter, 106 Guestville Ave., Toronto.
2nd Vice-Pres.: Fred Patterson, 270 Durie St., Toronto.
Corr. Sect.: Lillian Kay, 195 Exbury Rd., Downsview, Ont. Apt.1703
Editor: Mary Patterson, 270 Durie St., Toronto.
Reporters this issue: Hamilton Branch Members
Membership Chairman: Bea Austin, 167 Emerson St., Hamilton.
Page 2
item should be drawn to the attention of all contributing workers. Following a discussion at the Executive Council meeting, after the show,a motion was made to "no longer allow display boards with pins attached, to be used at the C.N.E. and no articles are to be left on the counter".
These display boards, with a large number of small pins attached, were the chief area where shoplifting occured, resulting in losses of more than $166.00. These losses have never been as large, and, unfortunately, are widespread in commercial sales everywhere these days. For the protection of the Society, who must assume payment for these losses, this rule must apply in the future.
The Society also suffered from some vandalism, the day after the C.N.E. closed, when our panelling was noticed exiting by the back door by ever-alert Ray Potter, in the hands of two strangers. Although the boards were recovered, Jack Meharg reports that they have been damaged, and the particular type of panelling is no longer available. Some repairs and alterations will cut into our already small profit.
To those who have never had the opportunity to be present at the "setting-up" day prior to the show, a little "background" description might be interesting.
Members attending are never sure what supplies we might suddenly need to complete our display, as cases and shelves don't always fit, screws disappear suddenly, items need cleaning, etc. etc. This year we all came prepared to remove the oily accumulation of winter dirt off the display case glass, with a total of 13 bottles of Windex, and many rolls of paper towels. (We needed much of this in 1981.) Needless to say, the cases were already spotless!! However, nobody remembered any Scotch Tape, or masking tape! (Next year we can count on likely having an unending supply of this!) Jean Hunter remembered to bring a few tools, or we would still be pounding in nails with our shoe heels! Nobody remembered large hooks, etc. etc. All in all, between the Fellows judging the work. and the others setting up the display, it is an interesting full day, and a walk along the midway later showed that others were even less prepared, with the sideshow booths just being painted.
Page 3 — DO-IT-YOURSELF SHOW; SPECIAL SALE OF LEATHER and FINDINGS
Associates Workshop - Sept. 18th Those who were able to be in attendance at this workshop were lavish in praise of the help that it gave them, in preparing for their Fellowship pieces. The Society owes a debt of gratitude to Bob and Dorothy Muma, who kindly hosted this workshop at their home, and most particularly, to Bob Muma who conducted the workshop and started everyone thinking along new and interesting lines. We were most pleased to hear that Bob would like this type of increased, and plans are underway to see that this may come about in the future,
DO-IT-YOURSELF SHOW - Oct. 14-16
C.S.C.L. members manned a booth at this show representing leather as a craft-hobby. In other years we have been responsible for part-time participation at the Ont. Craft Council booth, so this was a departure. If this new format is followed in future years, we will announce it in advance in the bulletin, and plan ahead to make it a "special" showcase for our work.
SPECIAL SALE OF LEATHER and FINDINGS
Toronto Branch announces that they will have a display of leather set up for sale at the November "Tool Sharpening" workshop (See last page this issue for details on the workshop).
For a list of what will be available, téléphone Gladys Riddell, in case you cannot attend the workshop personally and would like a friend to pick up some supplies for you.
Some items will be at clearance prices........
Page 4 — SOFT SHOULDER BAG
SOFT SHOULDER BAG by Ruth M. Haiq A.C.S.C.L.
[The page types "Haiq"; this is Ruth M. Haig -- Ruth Haig, Hamilton Branch, Associate since 1966.]
Soft leather Shoulder Bag, with rolled button closing, 3-strand plaiting, and interior pocket.
Choice of Leather: A soft pliable chrome-tanned or garment leather, such as deer skin, suede, cabretta sheep skin, and 4 to 5 oz. cowhide is ideally suited to this project. (Eight square feet is sufficient for two small shoulder bags, and eleven square feet is ample for the large shoulder bags as described in this paper. ) It is advisable to cut the second pattern pieces at the same sitting to eliminate waste.
Tools and Material:
1. skiving and utility knives
2. leather shears
3. medium weight saddle stitching cord and wax 4. scratch awl
5. 2 small harness needles 6. rotary and triple or double "0" punch 7. lace cutter, 1/4"
8. contact and white cements
9. square and ruler
10. chrome-tanned leather, 4-5 oz. 11. rawhide mallet or flat-headed hammer 12. pattern paper
13. cutting board
14. cardboard for final pattern
15. marking pencil
16. saddle stitching wheel, roller and pegs or clips.
PATTERN: There are six main pieces to this pattern, plus three long, 1/4" strips for plaiting, and re-enforcing strips for the pocket. The front and back pieces are equal, cut two.
Cut one each of the following: shoulder strap, inside pocket, front decoration strip, rolled button, and fastener loop.
Design the pattern pieces, transfer to cardboard for template. (The dimensions are given with the illustrations that follow (next page). PATTERN. TO LEATHER AND CUT PIECES: Some chrome tanned leathers have more stretch in one direction than the other. Before placing the pattern on leather for cutting, determine the line of most resistance to stretch, and utilize this in the length of the bag, and in the shoulder strap.
To determine the line of stretch, simply grasp the leather with both hands, 2-3" apart, grain side towards you, and pull the leather over the knuckles from the flesh side. Remember that hides are stretched by several hundred pounds pressure during preparation and splitting, so no damage occurs while testing in this manner. On the grain side, using,a scratch awl, transfer the pattern pieces to the leather and cut with leather shears.
Page 5
SOFT SHOULDER BAG PATTERN PIECES
These pattern pieces are diagrams, each corner lettered rather than described in words. The measurement for each piece is set out below by its lettered points.
Front & back (equal, cut 2): A-B = 12", B-C = 9 1/4", C-D = 3", B-B = 13 1/2", A-A = 16".
Button (cut 1): A-B = 2", B-C = 10-12".
Loop closure (cut 1): A-B = 3/4", B-C = 12".
Pocket (cut 1): A-B = 4 1/2", B-C = 9 1/2".
Plaiting strips (24" will plait 3 strand for 8", cut 3): A-B = 24", B-C = 1/8" to 1/4".
Shoulder strap (cut 1): A-B = 24", B-C = 2 1/2".
Front panel (cut 1): A-B = 12", B-C = 1 1/4".
A drawing of the finished bag follows, showing the plaited front panel and toggle button in place.
TOGGLE BUTTON: Roll button, taper a small strip of leather, wet it and then roll up from widest end.. (Fig. 7)
When it is rolled about 2/3 of the way, cut a slot directly through the roll, pass the pointed end through (fig. 8) and draw it tight (Fig. 9).
This button can be used on pocketbooks, boxes, etc., by leaving a long enough pointed end so that it can be fastened,
References to Button and to Plaiting: "Leather Braiding" by Bruce Grant.
Page 6 — APPLIQUE OF THREE THONGS
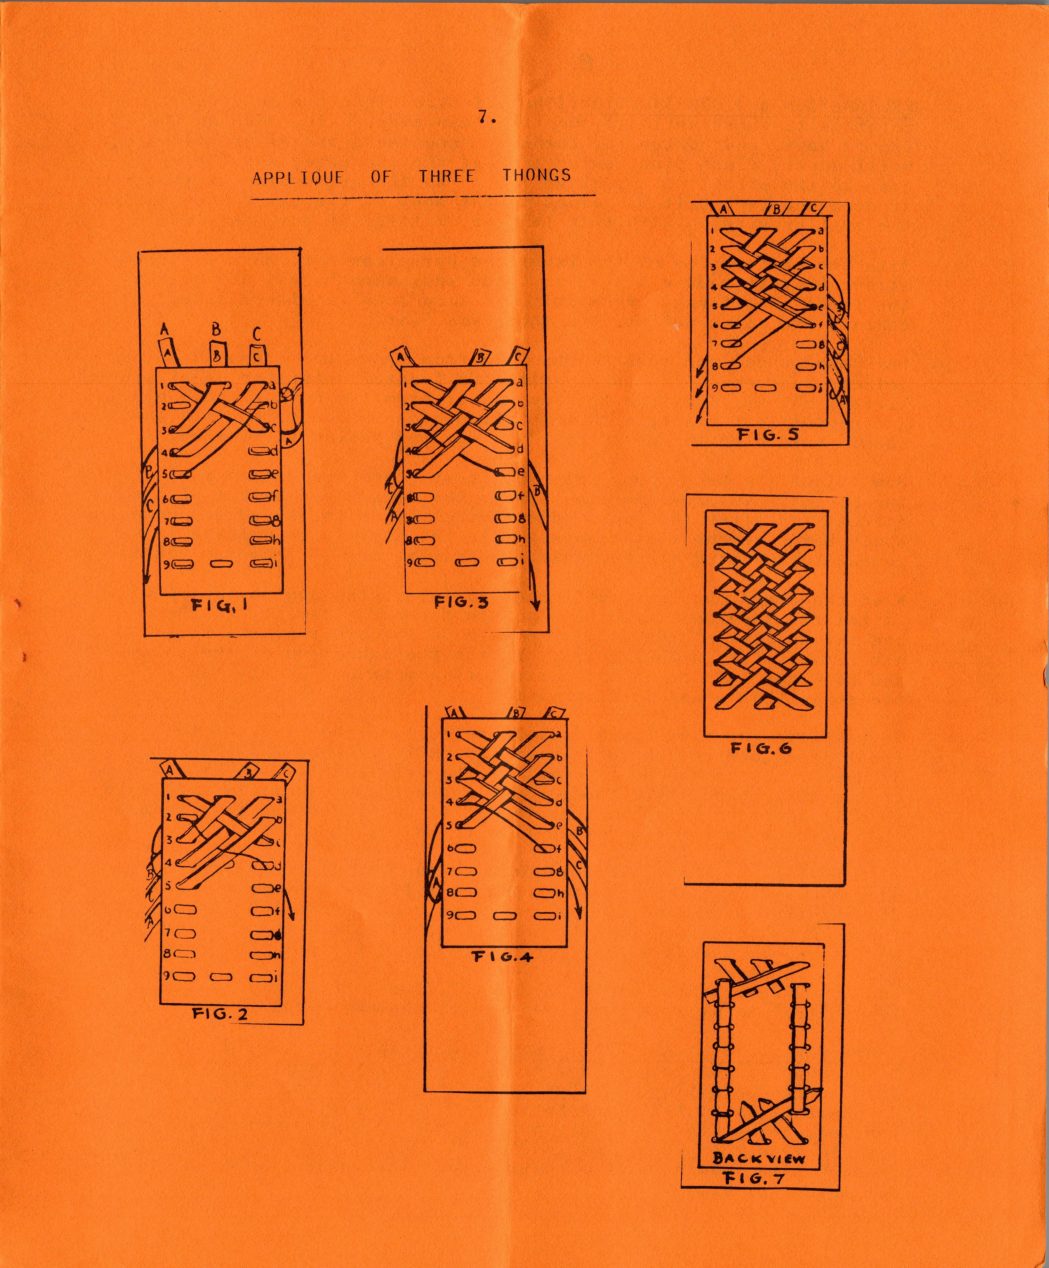
APPLIQUE of THREE THONGS: This beautiful applique of three thongs gives the effect of a five-part braid. The colour of the thongs may be varied. It is, of course, used to fasten together parts of leather as well as for decoration. Space the rows of vertical holes about five times the width of the thong.(In the case of the soft shoulder bag this would be either 1 1/4" or 2 1/2" depending on your choice of either 1/8" or 1/4" thongs.)
Thongs are designated from left to right as A,B, and C. Pass thong A from the rear to front through the upper left hand hole and down through the third right-hand hole. (Fig. 1.) Pass thong B through the middle upper hole from rear to front and down to the left, over thong A and through hole 3 on the left, (Fig. 1.) Thong C is passed through the upper right-hand hole from rear to front, under thong A and down through hole 4 on the left-hand side. (Fig. 1).
Now bring thong A (on the right) up through the the second hole on the right (b) from rear to front, incline down the left, over its own part, and through hole 5 on the left-hand side, as indicated by the arrow-line in Fig. l.
Bring thong B (on the left) up through hole 2 on that side, incline down to the right, and over its own part, under thong C, over thong A and down through the fourth hole (d) on the right-hand side (indicated by the arrow-line in Fig. 2.) Next, bring thong C up through hole 3 on the left, incline down on the right, over its own part, under thong A and down through the fifth hole (e) as indicated by the arrow-line in Fig. 3. Bring thong A up through hole 4 on the left, incline down to the right and over its own part and through hole "f", the sixth hole on the right. (Fig. 4.)
The three thongs are now on the right-hand side(Fig. 5). Pass thong B up through the third hole (c) on the right, incline down towards the left, pass it over its own part, under thong C, over thong A and down through hole 6 on the left. Bring thong C up through the hole "d", the fourth one on the right, incline down toward the left, over its own part, under thong A and down through hole 7 on the left. Pass thong A up through the fifth hole on the right (e), incline down to the left, over its own part and down through the left-hand hole, 8. These moves are all indicated by arrow-lines in Fig. 5. Fig. 6 shows the finished braid, and Fig. 7 shows the back of the braid and the method of securing the ends.
"THree Thong Applique" from Leather Braiding, by Bruce Grant.
Page 7
APPLIQUE OF THREE THONGS
Seven step diagrams (Fig. 1-7) showing three lettered thongs (A, B, C) laced through two rows of nine numbered punch holes (1-9 at left, a-i at right) to build a crossed lattice pattern, Fig. 6 showing the completed weave and Fig. 7 the back view of the finished lacing.
The page itself is a diagram, not prose: seven step drawings with lettered thongs and numbered punch holes. What is set out above is a plain description of what the diagram shows, not a hole-by-hole transcription of every figure label. No names appear on this page.
Page 8
PREPARATION and CONSTRUCTION: (These instructions are in order relative to construction.) On the flesh side, skive 5/8" on the front, back, and bottom for turnover cemented seams after stitching. Still on the flesh side, skive 1/2" at the top edge, and the arm area to the strap. Also, skive 1 1/2" to the grain side of the strap at each end,(where it is joined to the body of the bag). When making the smaller version with thin leather, little, if any, skiving is used. With the grain sides of the front and back together, mark the seam allowance with saddle stitching holes and punch holes, and stitch the front seam first. When stitches turn seam to either side, cement, and using mallet, tap the seams flat.
Next turn under arm edge to about 2" from where the strap is to be joined, and cement in place. With the frontal decorated panel piece already skived, (2" from the top and 1" from the bottom end,) plait and cement into place, with the bottom edge incorporated into the seam. Fold over top edge, roll the plaited design to flatten. Now stitch the back seam, (same as front), and prepare to install the pocket. Cut re-enforcing strips the length and height of the pocket, and after the upper edge of the pocket is skived and cemented, apply Barge cement to the pocket with the strips, then install the pocket to the back of the inside, approximately 1" from the bottom. When the cement has set sufficiently, invert the bag and proceed to fasten the shoulder strap, again with the Barge cement, to the pre-skived part of the body, and fold in the sides of the strap until they meet in the centre. Attach the other end of the strap, and continue folding in until strap is complete. Gently tap the strap flat while it is drying.
To complete the bag, punch 2 small holes to either side of the front panel centre, and attach rolled button. Make 2-1/4"slots, 3" down from the top of the back of the bag, each 1/2" to the side of the back seam. When these slots are cut so that it is difficult to pull the loop fastener through, it is not necessary to cement the inside tabs, as the entire closure is friction held.
TO MAKE ROLLED TOGGLE BUTTON: Cut a triangular piece 2"X 10"-1l2". With the wide end as a Starting place, roll the leather to approx. 2" from the tapered end. Use an awl or punch to make a large enough hole in the centre of the button, to insert the tapered end, pull through, making a loop for stitching on button, then cement tab end in-place.
LOOP CLOSURE: Cut i strip 3/4" X 12", skive the edges lightly, fold over, cement with Barge, and gently hammer until flat.
FRONT PANEL & 3 STRAND PLAITING: Cut 1 strip of leather l 3/4" X the length of the front seam, + 2". Cut three strips 1/4" X 24" for 3-strand plaiting. (24" will plait to an 8" length in 3-strand. ) On panel strip, 1 1/2" from bottom end, and approx. 3 1/2" from the top end, using largest rotary punch, make 3 holes across the area 1/4" in from the sides, and 1/4" apart, then a row down the length on each side, ending with 3 holes across the bottom. (See nextpage for actual plaiting.)
Page 9 — Book Review: "The Make-It-Yourself Shoe Book" Book Review: Shoes for Free People
Book Review: "The Make-It-Yourself Shoe Book" by Christine L. Clark
Published by Alfred A. Knopf Inc., New York, 1977 and Random House of Canada Ltd. Toronto. 100 pages. Photographs and Drawings. Soft cover- $6.25.
The first chapter deals with various kinds of leather, how to select and work it, and stresses the necessity of making a good pattern. The next chapter does the same for soling, then padding, and tools used. Then there is a chapter stressing the seriousness of making properly fitting footwear and this is well illustrated with photographs on how to measure and draw feet. The basic principles apply to whichever kind of footwear one makes and are referred back to throughout the book.
There is a Lengthy chapter on moccasins including sheepskin and workbooks, very well illustrated with photographs and drawings and step-by-step instructions, and a post mortem on "what went wrong", and how to rectify it. (I made a pair using foam padding and a midsole. The cushion padding is extremely comfortable and the midsole allows greater flexibility.)
The chapter on shoes without a last is again very well illustrated and has very explicit instructions and a post mortem on errors. In this method, the leather is actually molded over the foot and a very snug fit can be achieved. The snag here is that it is not possible to do this fitting on one's own feet. Another pair of hands is required. (My shoes by this method are of 4/5 oz. chrometan, with an inner lining and a side lacing. I used 12-iron foam soling. There are also variations on this basic shoe.
The next chapter is boots- making boots from moccasins, from sheepskin moccasins, from shoes, and the stovepipe boot. The illustrations show these to also have that forward tilt- (I passed on to the chapter on sandals).
There are variations on continuous strap design sandals, and thongs, and an arch strap design. Again the illustrations and directions are clear. (I have found the continuous strap design to be the most satisfactory as they are readily adjustable and very comfortable.) This book has an index and a list of suppliers, as does the other book reviewed here. I combine the information from the two books, and haven't had a "flop" yet. The only problem I have is with linen thread wearing out. I have found that one must use nylon thread for footwear. Linen thread just doesn't last.
Book Review: Shoes for Free People by David and Inger Runk.
Unity Press, Box 1037, Santa Cruz, California, U.S.A. 95061
Published 1976. 79 pages. Line drawings.
Soft cover- $5.95,
This is a step-by-step guide for "those who care about their feet", and want to make their own customized footwear. Each step is clearly illustrated and the instructions are generally simple and easy to follow.
Page 10 — IN MEMORIAM
The first three sections of the book tell how to make the basic shoe, without a last, and includes a list of the materials and tools required. (I followed the instructions and made myself my first pair of shoes. They are very comfortable, but are a bit wide. The sole pattern could have been trimmed down a shade on the outside from the heel to the base of the small toe and on the inside under the arch to get a more snug fit. I would also suggest shaping the toe area of the sole to give a more pleasing appearance, should one deem this necessary. I used a rubber sole and heel so did not follow the cobbling instructions.)
Chapter 9 is titled "The Finish", and shows a variety of shoes and boots which are possible to make from this basic shoe pattern. (I opted for the boot- with a singular lack of success. This was partly due, I think, to the fact that the only hide I had available was a bit heavy, but I also had four thicknesses of leather right on the Achilles tendon, and the boot uppers leaned forward at about a 70° angle.) I also found the illustrations confusing, as the same basic shoe is shown up to page 56, but then vanishes. The other shoes included in this chapter are a variety of tie shoes, a walking shoe- like a low boot- and a canvas shoe.
Chapter 5 deals with colouring, "apply evenly all over", and care and repair of shoes and boots. The final chapter is on sandals to make from your scrap leather.
For anyone who wants to make a pair of shoes, this book is an excellent starting point.
It is not aimed at leathercrafters, so use your own leather "know-how" where applicable.
Editor's Note: We are indebted to Member-at-Large, Ann Morrison, of P.E.I., who forwarded these interesting reviews to Ruth Haig. Ann also mentions that she amazed to find two books on footwear in one year! I got so fascinated by these reviews that I'm going to order the books for myself and set to work also!
IN MEMORIAM
We all extend our sympathy to long time member, Nora Huyck, on the death of her husband, Henry, who passed away suddenly on Sept. 28th, at their home in Magnetawan. Funeral services in Newmarket were attended by a number of the Toronto and Barrie Branch members, who have had the pleasure of knowing this fine couple for many years.
Page 11 — ANNUAL 1983; HOLLY BROOCH
ANNUAL 1983,
Headquarters for the 1983 Annual will be the Royal Motel, near Coboconk. Prices range from approximately $110.00 (single occupancy) down to $74.50, (four in a room) all inclusive from Friday evening to Sunday noon, meals included, (tax extra.)
More details will follow in the next issue.
During a recent executive meeting, some discussion came up and we were asked to define, in this bulletin, the difference between Design and Decoration. These two words are often used interchangeably, unfortunately, by some of the leathercrafters.
Design (in our parlance) applies to the "pattern-making" process, as you would "design" a shoulder bag, for example, and use a certain shape, length of strap, etc. etc. Decoration relates to the surface treatment of the article..... for example, a carved maple leaf applied TO the aforementioned shoulder bag would be called "decoration".
When you are asked, for a competition, to DESIGN an article, it must be a pattern shape that you have created from scratch! Not merely an object-made identically to a previously made pattern, with your own DECORATION applied to it!
HOLLY BROOCH by Mary Patterson.
Here is a simple holly-leaf shape that I have found sells well at this season of the year. The only two tricks to this brooch are to model it very thoroughly, to make it VERY three dimensional, (as most holly is quite deeply fluted), and to make a wide variation of green tones to make the leaf interesting. The red berries are two small circles (a 1/4" punch would make good one!), glued on the side/bottom of the leaf or stem. Veins are carved and tooled. I dye the whole leaf, after modelling it well, and moistening it thoroughly, with a strong yellow wash (Garnett dye... new yellow, preferably, rather than the golden yellow toning dye.)
Each of the five dye steps below is followed on the page by a small hand-drawn sample of that shade, not reproduced here.
While it is still wet, I define different area with the following:
(1) a chartreuse yellow-green dye,
(2) a medium deep yellowish green dye,
(3) a deep, true green colour,
(4) highlights of Garnett Green Toning Dye (blue/green),
(5) highlights of either a touch of orange over green, or tan over.
Dip the whole leaf in a yellow wash after to "smooth" the colours, and then dip in clear water to remove excess dye. Apply polish coat, lacquer back, apply small pin and pin back cover as usual, after glueing on two berries. Keep your colours light & bright!!
A drawing of the finished, shaded leaf follows.
Page 12 — "SHARPENING TOOLS"
This flyer is hand-lettered. The presenter’s name reads clearly as "Lautenschlauger".
SPECIAL WORKSHOP · SAT. NOV. 27TH · 9:00–4:00
"SHARPENING TOOLS" with Ed Lautenschlauger of Norton Abrasives.
This is a special for everyone! Bring along tools for personal advice on special sharpening — these do not have to be just leather tools!!
We hope to see you there. A nominal charge will be made of $5.00 p.p. Tea & coffee provided — bring your lunch.
Place: St. Martin-in-the-Fields Anglican Church, Toronto (corner of Glenlake & Keele)