
An issue of the Society’s newsletter, transcribed from the original.
(8 pages, 1.7 MB)
the full-resolution scan, 23 MB, for close research
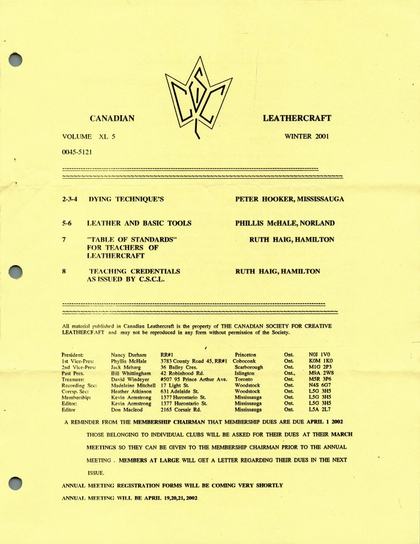
Page 1
Issued about December 2001: it sends holiday greetings and announces the Annual Meeting of April 19–21, 2002.
CANADIAN LEATHERCRAFT
VOLUME XL 5 — WINTER 2001
0045-5121
2-3-4       DYEING TECHNIQUES                     PETER HOOKER, MISSISSAUGA
5-6         LEATHER AND BASIC TOOLS               PHILLIS McHALE, NORLAND
7           "TABLE OF STANDARDS"                 RUTH HAIG, HAMILTON
            FOR TEACHERS OF LEATHERCRAFT
8           TEACHING CREDENTIALS                  RUTH HAIG, HAMILTON
            AS ISSUED BY C.S.C.L.
All material published in Canadian Leathercraft is the property of THE CANADIAN SOCIETY FOR CREATIVE LEATHERCRAFT and may not be reproduced in any form without permission of the Society.
President:      Nancy Durham        RR#1                        Princeton     Ont. N0J 1V0
1st Vice-Pres:  Phyllis McHale      3783 County Road 45, RR#1   Coboconk      Ont. K0M 1K0
2nd Vice-Pres:  Jack Meharg         36 Bailey Cres.             Scarborough   Ont. M1G 2P3
Past Pres.:     Bill Whittingham    42 Robinhood Rd.            Islington     Ont. M9A 2W8
Treasurer:      David Windeyer      #507, 95 Prince Arthur Ave. Toronto       Ont. M5R 3P6
Recording Sec:  Madeleine Mitchell  17 Light St.                Woodstock     Ont. N4S 6G7
Corrsp. Sec:    Heather Atkinson    631 Adelaide St.            Woodstock     Ont. L5G 3H5
Membership:     Kevin Armstrong     1377 Hurontario St.         Mississauga   Ont. L5G 3H5
Editor:         Kevin Armstrong     1377 Hurontario St.         Mississauga   Ont. L5G 3H5
Editor:         Don Macleod         2165 Corsair Rd.            Mississauga   Ont. L5A 2L7
A REMINDER FROM THE MEMBERSHIP CHAIRMAN THAT MEMBERSHIP DUES ARE DUE APRIL 1, 2002. THOSE BELONGING TO INDIVIDUAL CLUBS WILL BE ASKED FOR THEIR DUES AT THEIR MARCH MEETINGS SO THEY CAN BE GIVEN TO THE MEMBERSHIP CHAIRMAN PRIOR TO THE ANNUAL MEETING. MEMBERS AT LARGE WILL GET A LETTER REGARDING THEIR DUES IN THE NEXT ISSUE.
ANNUAL MEETING REGISTRATION FORMS WILL BE COMING VERY SHORTLY. ANNUAL MEETING WILL BE APRIL 19, 20, 21, 2002.
Page 2 — Some Dying Techniques
Some Dying Techniques
[The heading is printed “SOME DYING TECHNIQUES”; kept as printed. The article itself writes only of the dye and the dyes, and does not spell the craft either way.]
By Peter Hooker, Mississauga
"Splatter" Technique
This is an artistic method of applying colour when a stippled effect, or a two-or-more-tone effect is desired, or when it is desired to decorate for enrichment only. This art method was popular in mid-Victorian days, and is very suitable for use on leather.
The equipment required is as follows: a piece of wire screening (an old wire flyswatter will do); a stencil brush, or better still, an old toothbrush; Garnett leather dyes; a dish for each colour used; plenty of newspapers; soap and water.
Before attempting to splatter colour on leather, experiment on light brown paper (this is reasonably similar to the colour of natural cowhide) cut to the shape of the article.
Pour a quantity of dye into a dish, hold the wire horizontally 3 or 4 inches above the brown paper, dip the brush sparingly in the dye, and draw it lightly over the wire. A fine spray will go through onto the paper — if the brush is overloaded, blobs will go through. Try spraying lightly at one side of the paper and heavily at the other, giving a halfway tone in the middle. Experiment with holding the wire at a slight angle, to direct a heavier spray toward outer edges.
Then wash the wire and brush with soap and water until no dye is left in them (or use a separate wire and brush for each colour). For clean colour, it is important to use clean equipment.
Now take another colour of dye and reverse the procedure, spraying heavily where it is already lightly sprayed, and vice-versa. Have fun trying colour combinations until you have acquired a facility in the use of the wire and brush.
This technique is very successful alone, but when it is combined with design, it is more effective to splatter the background only. The colour is applied to the design in the usual way, and then the design is masked out. This can be done by using masking tape, or by using tracing paper cut to the required shape and held down by paper weights, coins, or any small weights or pinned with FINE needlepoints into cuts — NEVER use thumb tacks or pins — these would be too coarse and would damage the leather.
ON NO ACCOUNT — EVER TOUCH THE LEATHER WITH ANYTHING WHATSOEVER after spraying has been done, until it has dried overnight. It would be quite in order to dry the first colour overnight before applying second or subsequent colours, but the same thing holds true — the last colour on should be dried overnight before the leather is handled.
The following day, give all parts a good coat of Garnett Antique Golden Tan — this gives a unity to colours and enriches them. Then polish in the usual way and assemble.
Page 3
Leather Spray Colouring
1. Atomizers
Some shoemaker's atomizers are good enough for covering larger areas in full tones and they might be adjusted for finer spray, using smaller tubes or adding a special nozzle. The main thing is to find an atomizer with a very fine spray.
2. Dyes
Different colours thinned with water or Methyl Hydrate alcohol could be used, only it is much handier with alcohol dyes which penetrate and dry more quickly.
Garnett Leather Craftsmen's Dyes, antiques and colour toning may be used alone or mixed to form new colours. Omega Leather Dyes (alcohol), mostly mixed and thinned colours would be better to start with and always with light ones building up to darker ones. On many occasions the light tones leave much to see of the beautiful leather material itself.
There is a wide field for each craftsman doing fine leather colouring and most of the skill necessary can be developed with practice. Amazing effects could be achieved using only brown colour in different strengths.
Artistic sense is helpful in mixing and matching colours, but each person has some degree of artistic sense.
3. Preparing Project for Dyeing
The leather must be dry and clean. The special designs coloured with a brush could be covered first with a polish coat, lacquer, or better still with special cut out covers of blotting paper or some absorbent thicker paper which easily takes in colours and doesn't leave lines along the edges.
It is easy to cut out covering parts with the help of the pattern put over the paper and trace the necessary parts. Very handy to hold the covers in place are heavy coins, nuts or other small metal things, but be careful with iron which leaves dark marks when wet.
4. Spraying
To get even colouring and cover larger areas, it is better to keep the atomizer in movement, sideways or on circular motion, and to hold it about 8-12 inches from the project.
Always try the spray on a piece of paper (newspaper), before going over your project, even if you have stopped spraying for only a short time.
It takes about 2 hours with alcohol dyes and more with water dyes before you can start finishing. It would be quite safe to leave the projects for drying overnight.
There are many different commercial liquids for finishing leather, such as liquid waxes, leather lacquers, etc. The best results are achieved with Garnett Polish Coat. Apply with soaked cotton swab, at first touching slightly the design and special coloured parts. Let them dry for a while and then go over the whole project.
Page 4
Swab Dyeing
The Leathercraftsman eventually comes to the place where he has mastered tooling, embossing and carving and is looking for new fields to conquer.
Colour correctly applied enhances the finished product and makes the article one of rich beauty. Since leather is a natural product, no two leathers will produce the same uniform result. It is a good idea to cut sample strips from the hide from which your project was cut. By test dyeing on these pieces you will have some idea of the final colour.
The following is an outline of a colour project which may get you started in a new field.
Choose a wallet back and check to make sure there are no flaws. A small pit in the leather absorbs more dye and may form a dark spot. Clean the wallet back with a leather cleaner or deglazer. Trace the desired initial on the wallet blank.
This project will be done in warm colours, working from light to dark.
Materials: cotton swabs, one for each colour (cotton quilt batts are very good); one sable brush #3; modeling tool; blotting paper or paper towels; surgical gloves; dyes (water soluble) — yellow, orange, red, brown and dark brown.
Points to remember: work from light to dark colours; use a minimum amount of dye on the swab (if the swab is too wet, get rid of the excess on the blotting paper or a piece of paper toweling); use a circular motion when applying the dye.
Method:
- Dampen the leather.
- Trace the initial on the wallet blank.
- Swab, using a circular motion clockwise and counter clockwise all over the leather with yellow dye.
- Swab all over with orange dye.
- Using a red swab, work from outside to within about an inch of the initial.
- Mix red and brown and again work from the outside in, but do not come quite as far as you did with the red.
- Using a brown swab, repeat the same procedure but again do not come in quite as far as you did with the red brown.
- Mix a very small amount of black with the brown and again swab from the outside, but again do not come in as far as the brown. Make sure the outside of the blank is quite dark.
- At this point your project may have uneven areas. If for example, the area from orange to red is uneven use a mixture of orange-red and swab until there is an even progression.
- Emboss the initial — colour the initial a dark brown using the brush.
- When dry, wax and polish. (Leave overnight before waxing.)
Page 5 — Leather, Buying and Some of Your Basic Tools
Leather, Buying and Some of Your Basic Tools
By Phyllis McHale, Norland
I hope that the experienced Leather Crafter's will not find the following pages boring, but we do have a few new members who are not sure how and when to use certain tools. I know over the past few months I have had my eyes opened after reading some books on leather work and how it is done. I hope you will find the following helpful, we will start with some general information, also about tools and the order they are used.
How Leather Is Sold
The most economical way to buy leather is to purchase it exactly like it comes from the tannery. In this form, leather is usually priced by the square foot and sold as a complete hide. The size is measured on measuring devices at the tannery. Leather comes from the tanneries in various shapes and sizes depending on its intended use and the animal from which it comes.
For ease of handling during tanning, large animal hides are usually cut into smaller sections (sides, shoulders, bellies, etc.) at the tannery. Skins of smaller animals such as calf, goat, pig and reptiles are tanned and sold in their original shape.
Tools
Always protect your tool's cutting edges by using a Poly Cutting Board. These boards can be picked up at the local hardware store. This type of board is ideal when you're using thonging chisels, punches, utility knives and swivel knives.
Swivel Knife
The Swivel Knife is the most important of all the tools used in leather carving. This knife is made in many different styles. Each person would pick the style best suited to their hands. Many styles of blades are available, including a "quick change" blade that is disposable when dulled.
You must practice holding your swivel knife properly. The index finger in the yoke, the thumb, 2nd & 3rd fingers on the barrel. The little finger rests on the leather to steady the blade.
Mallets
NEVER ever use a metal hammer for striking the stamping tools. The steel hammer will chip and crack off the protective chrome plating as well as burr the top of the tool, ruining it. ALWAYS use rawhide or hard wood for the striking tool, and when this plating touches the damp leather, it will leave black spots. The metal hammer can also glance off of the tool and you will not get a nice sharp impression. You will have to practice using your mallet too. You need a pivot action of the fingers and wrist to get the most force you will need when using the mallet or striking stick. For deep beveling, shading, geometric stamping etc. you will need to strike with greater force, to accomplish this you would lock the wrists pivot and strike the blow with the arm movement.
Page 6
Camouflage Tool
When doing an article that is carved you use tools in a certain order to get the best effect. After you have cut the leather you will start with the Camouflage tool if it is required in the pattern. This tool is made in more sizes than any other tool. There are the large ones used by the saddle makers, also to encircle one half of a flower center with one or two impressions. When using Camouflage tools on petals and stems; lean tool slightly forward so that NEITHER corner digs in when struck with mallet. When using the Camouflage tool on acanthus leaf, around scrolls, etc., lean the tool so that only one corner digs in (usually the corner next to the cut line). Strike the tool with uniform force and space impressions evenly. As the contour of the design changes, turn the tool so that the radius of the Camouflage print always conforms to the swing of the pattern, for the most pleasing effect and appearance.
Pear Shader
The name "Pear Shader" is derived from the shape of the tool, as it is actually pear-shaped. The purpose of these tools is to "shade" or "contour" the design. This further adds to the third dimension and brings the pattern into more life-like being. For deep impressions, strike the tool forcefully. Lessen the force for lighter depressions. Use the proper sized shader for the best results. The shading should conform to the general contour and shape of the pattern. Do not strike the tool then move it over to make another impression, but "walk" it over the area to be shaded with the stronger and lesser blows of the mallet to create the desired shaded and contouring effect. Select the tool of proper shape and textured surface to fill your shading requirements. There are smooth, ribbed, lined, and checked shaders.
Veiners
The Veiner, as the name implies, veins the leaves. These tools come in so many shapes, sizes and stamping pattern surfaces that they have many, many versatile uses. In the decoration of scrolls, follow the suggestions present with your pattern. You should strive to maintain the proper arc, or curve of the tool, so that it follows a unified course toward the common center of the scroll tip. The Veiner is usually used along one edge of the cut line of a design. Try to have a uniform spacing between the impressions. This is important for pleasing effect and professional appearance of your work. Follow the contour and flow of the pattern. The length of the impression is governed by the angle the tool is leaned, for full or partial imprints.
Next time we will talk about bevelers, and there is a number of sizes and uses. Until then keep smiling, it makes others wonder what you are up to. Hope everyone has a happy and safe holiday season, and all the best in the new year.
Page 7 — Teaching Standards
Teaching Standards
By Ruth Haig, C.S.C.L. Fellow, Hamilton, in charge of Teaching Standards
Table of Standards for Teachers of Leathercraft
Knowledge & Craftsmanship
Grade "C" (Elementary) — One who is proficient in basic construction and finishing methods and has some knowledge of tooling or carving.
Grade "B" (Intermediate) — One with (1) a certain minimum knowledge of leathers, tools and handling of such; (2) a certain minimum knowledge of, and ability in, construction and finishing; and either tooling or carving; (3) a minimum of 3 years experience in leathercraft techniques. Associate and Fellow membership in the CSCL will automatically establish applicant in this category. Credentials should specify "Teacher of Leathercraft, Grade B" (or specify Tooling or Carving).
Grade "A" (Professional Status) — One with (1) a wide general knowledge of leathers, tools, and handling of such; (2) a wide general knowledge and skill in tooling, carving, colour and construction techniques; (3) a minimum of 5 years experience in leathercraft techniques; (4) a minimum of 3 years experience in teaching leathercraft. Credentials should read "Teacher of Leathercraft Grade A".
Outstanding skills may be indicated for Specialist's rating in either "A" or "B".
Teaching Ability
The CSCL shall not be responsible for guaranteeing any individual's teaching ability. This shall be vouched for by the record of experience listed on credentials with references which can be investigated by any interested party.
Grade A or B applicant's rating will be established by the Board of Selection of the CSCL from representative samples of work submitted by the applicant to demonstrate the degree of excellence and range of leathercraft skills. Associate and Fellow members whose work has already been appraised by this committee need only submit the completed application form for their rating and credentials as above. A Grade C certificate will be issued to all qualified applicants until they have sent in work for appraisal.
This rating is subject to review and change at request of the applicant on the basis of new experience or training, or information not supplied on the original application form, or demonstrated in the submitted work.
Page 8 — Teaching Credentials
The Canadian Society for Creative Leathercraft
Teaching Credentials
A blank credentials certificate, reproduced from the original print, reading in substance: "This is to certify that [blank] is a member in good standing of the Canadian Society for Creative Leathercraft, with a background of training as follows: [blank], and is recorded in our files as a Teacher of Leather..., Grade [blank], according to the accompanying Table of Standards. [Blank] is further qualified for this work by virtue of the following teaching experience: [blank]." The form carries three signature lines: President, CSCL; Chairman, Council of Fellows; and Chairman, Committee of Teaching Standards.
[This page is a blank, unfilled certificate template — a reproduction of the Society's standard teaching credential, not a completed certificate for any individual member — so it carries no one's personal information; summarized here rather than transcribed line-by-line, since most of the original is ruled blanks for names, dates and details to be filled in.]