An issue of the Society’s newsletter, transcribed from the original.
(7 pages, 1.6 MB)
the full-resolution scan, 2.6 MB, for close research
Page 1
The Canadian Society for Creative Leathercraft CANADIAN LEATHERCRAFT
Volume LXV No. 2
Winter 2016/2017 0045-5121
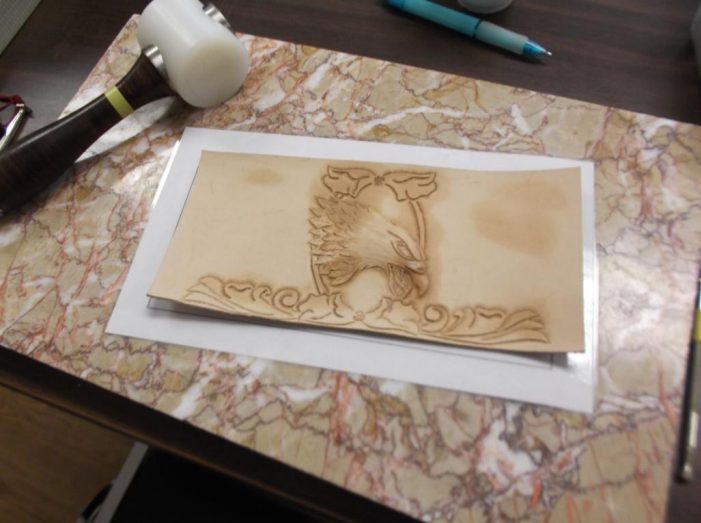
Embossed Eagle Head being created
In this Edition…
Page 2 Notes from the Editor, Highlights of the past Executive Mtgs, Membership Info, CSCL Larmour Library
Page 3 Workshops
Page 4 The Annual is coming – Awards to compete for.
Page 5 Embossed Eagle Head
Page 6 CSCL Library Review,
Page 6 Tips for use of CS) #84 Splitter/Skiver
©2016 Canadian Society for Creative Leathercraft All rights reserved. Reproduction in whole or in part without permission of the copyright holder is prohibited.
To contact any of our Executive please refer to the CONTACT section of our Website.
Website: www.canadianleathercraft.org
Facebook [Facebook page removed]
President: Jim Wilkes
1st Vice-Pres.: Lauch Harrison
Past President: Rob Regan
Treasurer: Della Chynoweth
Secretary: Tracey Howard
Membership: Sheena Burger
Editor: Barbara Chynoweth
Website: Kristi Cino and Eugene Pik
Privacy Officer: Lauch Harrison
Page 2 — Notes from the Editor, Highlights of the past Executive Mtgs, Membership Info, CSCL Larmour Library
Note from the Editor….
Please check out our new website.
The Annual is coming up the first weekend in May, have you got your registration sent in.
Membership renewals are due by March 31st.
The Quarterly Newsletter “Canadian Leathercraft” is your source of information about CSCL and its members. Also check out the CSCL website at www.canadianleathercraft.org and CSCL’s Facebook page.
Highlights from the Past Executive Council Meetings….
This winter the Executive tried their hand at Skyping for the meetings that they did not want the executive to drive in. After some trial and errors people were getting the hang of it and we are looking at doing it again when weather makes travelling difficult. More workshops are being planned and if you have any suggestions please let use know.
CSCL Membership
Have you paid your membership? It’s a new Membership Year (April 1 to March 31).
Send your membership along with your cheque made out to “The Canadian Society for Creative Leathercraft” to our Membership Chair:
Sheena Burger, [address removed] [postal code removed]
T: [telephone number removed] - [email address removed]
| General Member | General Member – Student* | Member-at-Large | Sustaining Member |
|---|---|---|---|
| Individuals interested in leathercraft who belong to one of the CSCL Branches. (Need not be a leathercraft person.) $40.00 | A registered full-time student shall pay $5.00 | Individual interested in leathercraft who does not belong to one of the CSCL Branches. (Need not be a leathercraft person.) $40.00 | Commercial Organizations interested in supporting the Society. $100.00 or material equivalent to $100.00. |
CSCL Larmour Lending Library
The CSCL lending Library of Books and Patterns can be referenced on our web site www.canadianleathercraft.org. Head to Gallery and click on CSCL Library of Books and Patterns. Under the Patter option there is 80 pages of patterns that may give you ideas of things to make. Under the Book section there is 13 pages of titles of Books and DVD’s about Leather crafting, design and colour. Remember these patterns and books are there for you to borrow from the library. Select item(s) you would like to borrow and send your list to Paul Kitchener at [email address removed]
Branch Presidents will assist in pickup and delivery of the orders from branch members.
Members-at-large may order directly from Paul and arrange shipping or printing options, fees may apply.
Memberships are due by March 31st.
Page 3 — Workshops
Workshops
CSCL Workshops presents Leather Waxcoated Mug
Blackjacks & Leather Bottells
Saturday, April 8, 2017 10:00 am to 4:00 pm
Norland School Hall Community Centre, 3448 Monck Road, Norland, Ontario
Registration - $30 members $50 non-members Materials - $30
Registration deadline April 1, 2017 To Register: Contact Lauch Harrison [email address removed] [telephone number removed] or Barbara Chynoweth [email address removed]
Potluck Lunch
Bring something for the Pot Luck Lunch Beverages and water will be provided.
Outline
The workshop will introduce the participants to leather drinking vessels, with a look into the history of the Blackjack and Leather Bottells. Particpants use 10 oz or heavier veg leather to make a handled mug or a cylinder.
Cutting Patterns in heavy leather, Carving decoration, Harness Stitching using a diamond awl and linen thread, Using a large sewing machine, and Half Round Punching in heavy leather.
The mugs will then be coated in beeswax to make a waterproof drinking vessel.
There is an opportunity to decorate the Blackjack, please bring a simple carving less than 3” tall and 2” wide. The carving must be finished in one hour or your mug may not be completed during the workshop.
Tools
Please bring your tools, there will be loaners and some tools to purchase.
Head Knife, Diamond Awls. Carving tools.
Supplied material - Needles, Thread, Contact Cement, Bees Wax and Leather.
Supplied loaner tools - head knife, diamond awls, stitch clamps, round and half round punches, spoke shaves, french edgers, rawhide mauls.
Participants will be able to use a harness stitching sewing machine, The mugs bottom seam has to be hand sewn.
The Hamilton Leather Guild invites you to the 67th Annual Convention Weekend for The Canadian Society for Creative Leathercraft May 5th, 6th & 7th 2017
The weekend Theme is Trucks, Truckers and CB Radio Talk 10-4.
Page 4 — The Annual is coming – Awards to compete for
CSCL Annual Awards (PART 2)
[This table's three columns (a short category tag, the award name and sponsor, and the full rule) run together if read straight across each line instead of down each column. Rebuilt below in the order the columns are meant to be read.]
| Category | Award | Rule |
|---|---|---|
| pleasing in appearance (this will be awarded 5 times and then is finished) | London Jewellery Award, sponsored by London Members-at-large | Piece must be pleasing in appearance. If colour is added it must be well applied (not clumpy. Appropriate to the article.) Findings (metal fasteners) must have no, or almost no, glue visible around the finding. A piece of leather (circular disc or neatly-cut square) should be glued over the back of the finding. Edges must be neatly finished in a manner appropriate to the piece. It must present a pleasing finish coat or be properly buffed. The piece may be temporarily affixed to a piece of cloth or leather for display purposes. This will be judged by representatives from London and/or former winners. Award is $20.00 |
| unusual or non-traditional techniques (this will be awarded 5 times and then is finished) | Best Non-Traditional Piece, sponsored by the late Hilda Chynoweth | Pieces considered for this award must be accompanied by an ARTIST STATEMENT. The ARTIST STATEMENT must state what unusual and non-traditional approach was used to achieve what result and also state how successful the attempt was. This award recognizes unusual or non-traditional techniques. This award may, but not always, exhibit an unusual or non-traditional use of leather. Award is $20.00 |
| an item of apparel (this will be awarded 5 times and then is finished) | Best Wearable Item, sponsored by the former Toronto Branch | Must be an item of apparel such as gloves, vest, hat, scarf, mitts, footwear, excludes jewellery. Award is $20.00 |
| attractive, handmade article that is rigid, non-pliable (this will be awarded 5 times and then is finished) | Best Hard Sculpture Item, sponsored by the Mississauga Branch | Hard sculpture is an attractive, handmade article that is rigid, non-pliable. Examples of hard sculpture: Artistic adaptation of person, animal or thing such as the human figure (adult, ornamental, often displayed on a base and assembled freehand, signed and dated, and usually one-of-a-kind about 2-36 inches tall ornamental, not a cute, cuddly toy.) Adaptations are often realistic looking. — Mask — Container (Box, CD case etc.) — May be either fully functional or ornamental. — May be realistic, whimsical or abstract. Piece must be pleasing in appearance. If colour is added it must be well applied (not clumpy) and appropriate to the article. Must be well finished and traditional leather techniques must have been followed in its creation. This will be judged by representatives from Mississauga Branch and/or former winners. Award is $20.00 |
| “Article that stress' the beauty of leather, less is more, using Traditional leather crafting techniques, is eye catching” | Woodstock Heritage Award, from funds of the former Woodstock Branch | This award is given for the “Article that stress' the beauty of leather, less is more, using Traditional leather crafting techniques, is eye catching” at the Annual if there is not a Biennial that year. The amount given for this award is $50.00 at the Annual or $100.00 at the Biennial. Woodstock representatives will compile some examples, i.e. Robert Muma's work. This will be judged by representatives from Woodstock and/or former winners. |
| with the highest overall percentage | New Associate Zalitis Pin | This award is given to the New Associate with the highest overall percentage on their successful Associate Status Exam. This consists of four pieces judged by the Fellows and having an average of 79% or higher. |
Best Buckle Miscellaneous Award. In Memory of Don MacLeod, sponsored by the Mississauga Leather Guild. No monetary award, just your name on the trophy and you can show the trophy until the following year. This will be judged by Mississauga Branch representatives selected by the Mississauga Branch.
Page 5 — Embossed Eagle Head
Embossed Eagle Head Flask Carving
By Paul Kitchener
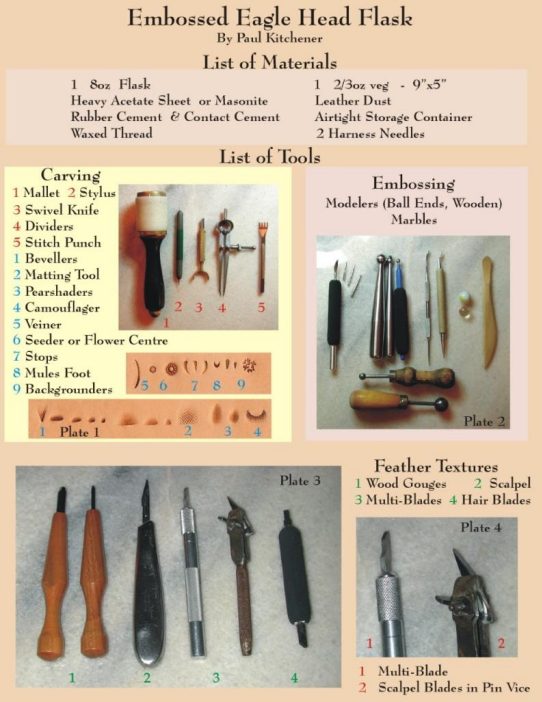
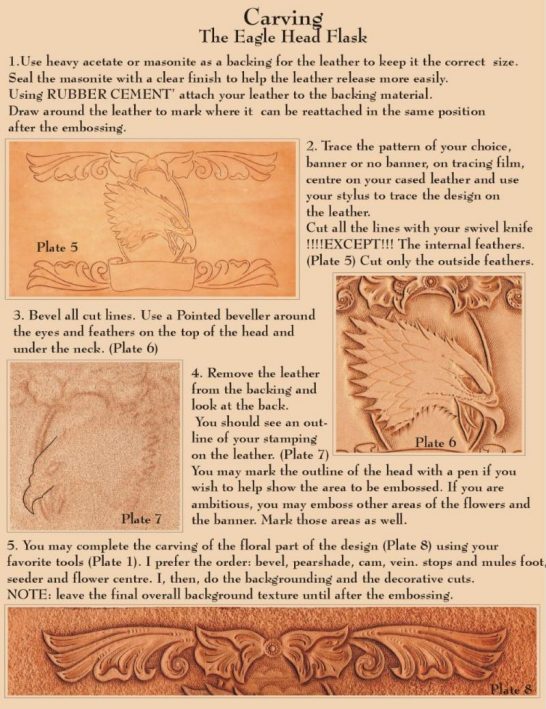
This page is mostly photo plates, with a two-column list of materials and tools beside them: a flask, veg-tan leather, an acetate or masonite backing board, rubber and contact cement, and waxed thread and harness needles for materials; a mallet, swivel knife, dividers, stitch punch, bevellers, a matting tool, pearshaders, camouflager, veiner, seeder/flower centre, stops, mule's foot, ball and wooden embossing modelers, and marbles for tools. The two columns are not set out item by item above, since which tool or material belongs in which column is not certain from the page; nine numbered photo plates illustrate the steps below and are likewise not reproduced. The instructional prose, which is clear, is given in full.
The Eagle Head Flask — carving
1. Use heavy acetate or masonite as a backing for the leather to keep it the correct size. Seal the masonite with a clear finish to help the leather release more easily. Using rubber cement, attach your leather to the backing material. Draw around the leather to mark where it can be reattached in the same position after the embossing.
2. Trace the pattern of your choice, banner or no banner, on tracing film, centre on your cased leather and use your stylus to trace the design on the leather. Cut all the lines with your swivel knife EXCEPT!!! The internal feathers. (Plate 5) Cut only the outside feathers.
3. Bevel all cut lines. Use a pointed beveller around the eyes and feathers on the top of the head and under the neck. (Plate 6)
4. Remove the leather from the backing and look at the back. You should see an outline of your stamping on the leather. (Plate 7) You may mark the outline of the head with a pen if you wish to help show the area to be embossed. If you are ambitious, you may emboss other areas of the flowers and the banner. Mark those areas as well.
5. You may complete the carving of the floral part of the design (Plate 8) using your favorite tools (Plate 1). I prefer the order: bevel, pearshade, camouflager, veiner, stops and mule's foot, seeder and flower centre. I then do the backgrounding and the decorative cuts.
NOTE: leave the final overall background texture until after the embossing.
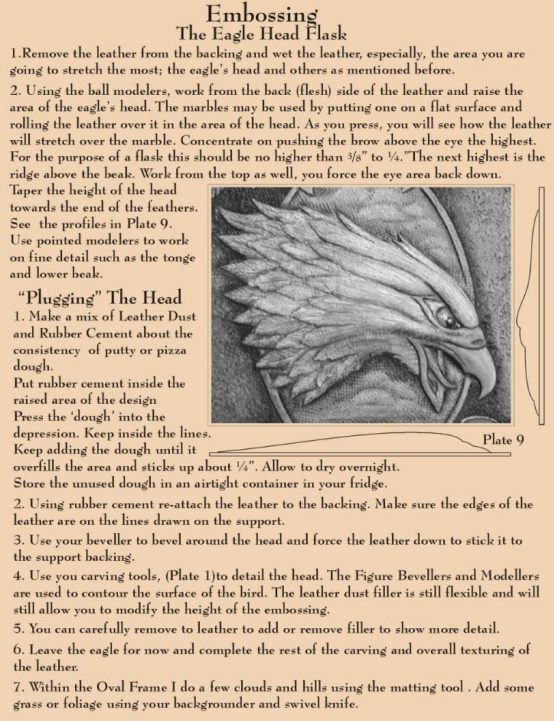
Embossing — the eagle head flask
1. Remove the leather from the backing and wet the leather, especially the area you are going to stretch the most: the eagle's head and others as mentioned before.
2. Using the ball modelers, work from the back (flesh) side of the leather and raise the area of the eagle's head. The marbles may be used by putting one on a flat surface and rolling the leather over it in the area of the head. As you press, you will see how the leather will stretch over the marble. Concentrate on pushing the brow above the eye the highest. For the purpose of a flask this should be no higher than 3/8" to 1/2". The next highest is the ridge above the beak. Work from the top as well; you force the eye area back down. Taper the height of the head towards the end of the feathers. See the profiles in Plate 9. Use pointed modelers to work on fine detail such as the tongue and lower beak.
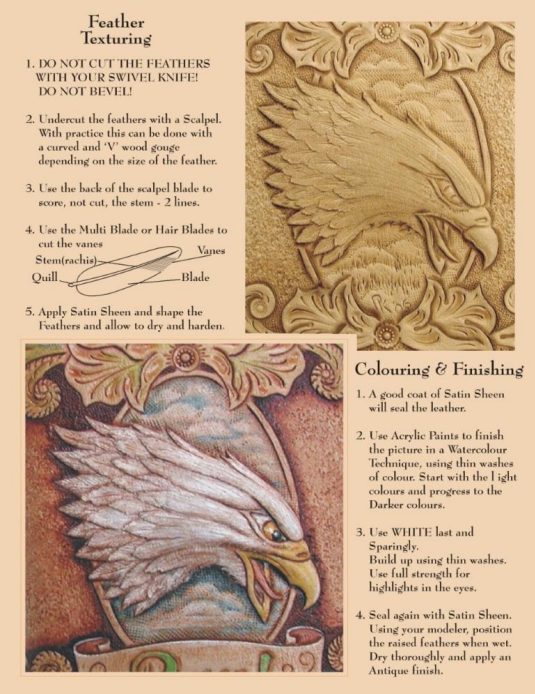
Feather texturing
1. DO NOT CUT THE FEATHERS WITH YOUR SWIVEL KNIFE! DO NOT BEVEL!
2. Undercut the feathers with a scalpel, with a curved and 'V' wood gouge, depending on the size of the feather.
3. Use the back of the scalpel blade to score, not cut, the stem — 2 lines.
4. Use the multi-blade or hair blades to cut the vanes.
5. Apply Satin Sheen and shape the feathers and allow to dry and harden.
"Plugging" the head
1. Make a mix of leather dust and rubber cement about the consistency of putty or pizza dough. Put rubber cement inside the raised area of the design. Press the "dough" into the depression. Keep inside the lines. Keep adding the dough until it overfills the area and sticks up about 1/8". Allow to dry overnight. Store the unused dough in an airtight container in your fridge.
2. Using rubber cement, re-attach the leather to the backing. Make sure the edges of the leather are on the lines drawn on the support.
3. Use your beveller to bevel around the head and force the leather down to stick it to the support backing.
4. Use your carving tools (Plate 1) to detail the head. The figure bevellers and modelers are used to contour the surface of the bird. The leather dust filler is still flexible and will still allow you to modify the height of the embossing.
5. You can carefully remove the leather to add or remove filler to show more detail.
6. Leave the eagle for now and complete the rest of the carving and overall texturing of the leather.
7. Within the oval frame I do a few clouds and hills using the matting tool. Add some grass or foliage using your backgrounder and swivel knife.
Colouring & finishing
1. A good coat of Satin Sheen will seal the leather.
2. Use acrylic paints to finish the picture in a watercolour technique, using thin washes of colour. Start with the light colours and progress to the darker colours.
3. Use white last and sparingly. Build up using thin washes. Use full strength for highlights in the eyes.
4. Seal again with Satin Sheen. Using your modeler, position the raised feathers when wet. Dry thoroughly and apply an antique finish.
Page 6 — CSCL Library Review; Tips for use of CS) #84 Splitter/Skiver
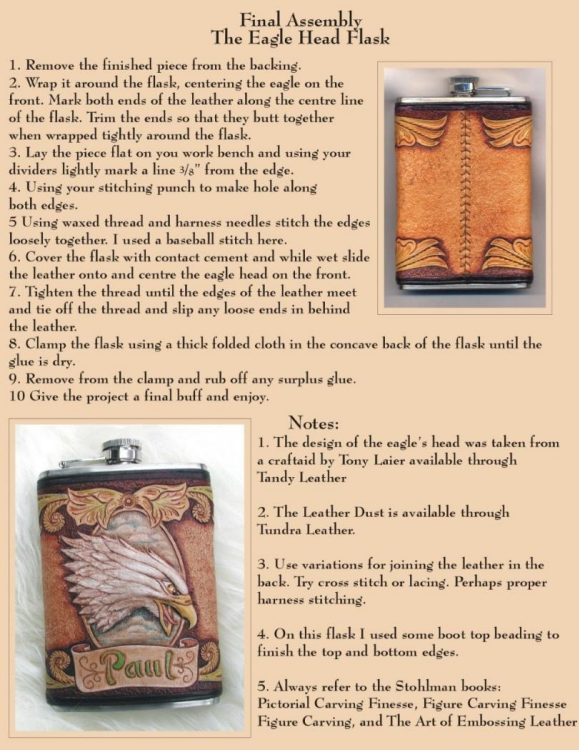
Final Assembly
The Eagle Head Flask
- Remove the finished piece from the backing.
- Wrap it around the flask, centering the eagle on the front. Mark both ends of the leather along the centre line of the flask. Trim the ends so that they butt together when wrapped tightly around the flask.
- Lay the piece flat on you work bench and using your dividers lightly mark a line 3/8” from the edge.
- Using your stitching punch to make hole along both edges.
- Using waxed thread and harness needles stitch the edges loosely together. I used a baseball stitch here.
- Cover the flask with contact cement and while wet slide the leather onto and centre the eagle head on the front.
- Tighten the thread until the edges of the leather meet and tie off the thread and slip any loose ends in behind the leather.
- Clamp the flask using a thick folded cloth in the concave back of the flask until the glue is dry.
- Remove from the clamp and rub off any surplus glue.
- Give the project a final buff and enjoy.
Notes:
- The design of the eagle’s head was taken from a craftaid by Tony Laier available through Tandy Leather
- The Leather Dust is available through Tundra Leather.
- Use variations for joining the leather in the back. Try cross stitch or lacing. Perhaps proper harness stitching.
- On this flask I used some boot top beading to finish the top and bottom edges.
- Always refer to the Stohlman books: Pictorial Carving Finesse, Figure Carving Finesse Figure Carving, and The Art of Embossing Leather
CSCL Library Review By Lauren
#8 – Snaps and Fasteners, Karla Van Horne, 15 pages, duotang
An authentic leathercrafter’s bright yellow covered report moderately describes scenarios to set knobbies, split rivets, tube rivets, burr or washer rivets, eyelets, the Chicago screw, conchos, zippers, buckles, grommets, clasps,
Velcro, the Sam Browne, and ring assemblies.
Snaps come in a number of different cap sizes which are determined by a system of 40 lines to the inch. Photos and illustrations are not included; the author’s empirical view of fastener selection and installation succinctly compares and offers advice for each application. With only a few faintly reproduced paragraphs the electric typewriter font is a nicety for this genuine discourse from a home-grown button to a lock clasp to the author’s favourite: tuck locks as they offer a great deal of security for cases, which, due to their function, may be put under stresses which make snaps open too easily and which make buckles too clumsy or inefficient to use.
Tips for Use of CSO #84 Splitter/Skiver
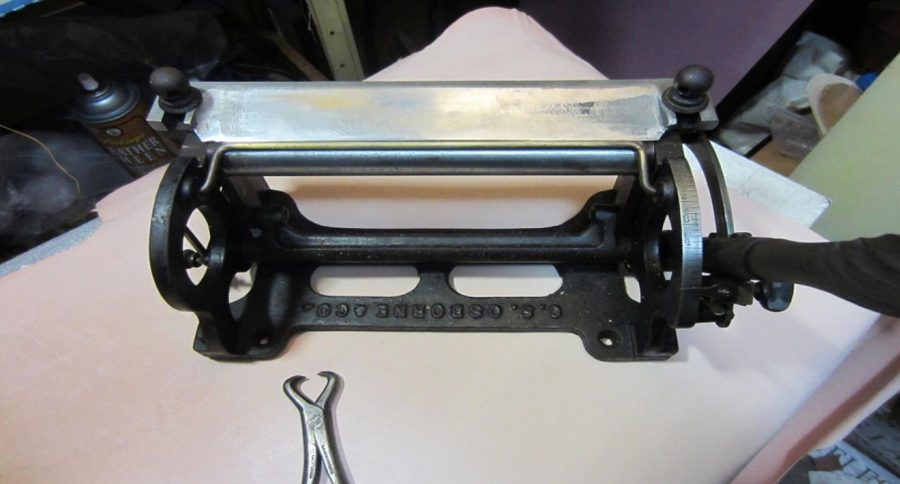
Page 7
Blade set up
To make the blade cut well the bottom of the blade must be flat, no micro bevel, this includes beveling due to excess stropping. The blade has a set angle so when you sharpen the blade sharpen only the top side.
The blade should be hollow ground as it wears and get sharpened it gets flatter as the hollow is reduced.
This makes the blade harder to sharpen due to the increased contact of the steel and the stone. A quick fix is to elevate the stone on a penny, this will create a micro bevel and allow you to sharpen the edge and not grind down the whole blade. The micro bevel increases the strength of the edge with a very slight sacrifice in cutting ease.
The blade should be set just back from top dead centre above the roller. You can move the blade by loosening the screws and sliding the blade back and forth. Experiment on some scrap before you use the splitter on your good projects.
I use diamond hones for sharping the blades, depending on how much grinding I have to do, I'll use 400 grit then 600 grit then 15 micron then 1200 grit then finishing film or the strop. The diamond stones remain very flat and are a good investment.
Starting a cut
You place your leather Grain side to the roller in the splitter by pushing the handle forward, as the roller closes, wiggle the leather and pull it slightly to set the split then pull. First put about 10” into the splitter from the back of the splitter, wiggle it then pull it thru. Check the weight and adjust as needed. By using the thumbscrew and the setting the handle stop the same weight can be reproduced many times over. Reverse the strap and put the 10” split end in the front, use it as the handle to pull the entire strap thru the blade. It is best not to take off too much if it is very stiff leather, go at it bit by bit.
The skiving feature is used by pushing the handle forward as the leather is being pulled thru the blade, this makes a skive, The slower the handle is pushed forward the longer the skive will be.
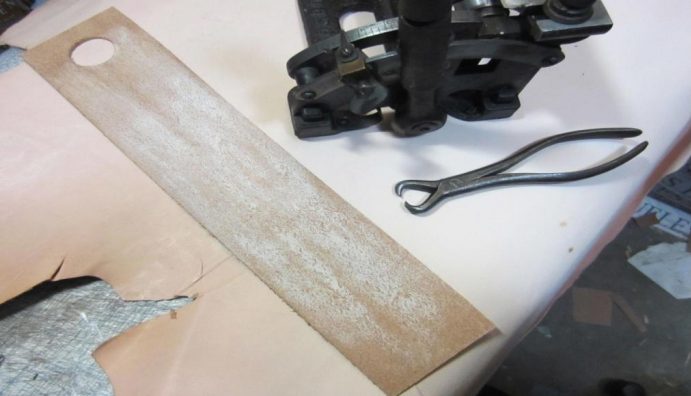
Make a strop
Take some 8 oz leather 3” x 18” and pull it thru the splitter, to about 6 oz. punch a hole in one end as a thumb notch. Put some polishing compound on the flesh side and use it as a strop to polish the bottom of the blade. I use green aluminum oxide and white paste that comes in small bars or blocks.
Expect to pay $450 - $600 for a used splitter so make sure you have lots of heavy leather to pull dow to make it worth while, that being said they last for hundreds of years and they retain their value very well so it can be a good investment in your tool chest.
Good luck
Lauch Harrison, ACSCL