
An issue of the Society’s newsletter, transcribed from the original.
(12 pages, 1.8 MB)
the full-resolution scan, 30 MB, for close research
Page 1 — Book Review: "Japanese Optical and Geometric Art" by Hajime Ouchi
Canadian Leathercraft
Volume XXXI No.3
0045-5121
Spring 1983
Book Review: "Japanese Optical and Geometric Art" by Hajime Ouchi
Dover Publications, New York.
submitted by Carol McLean F.C.S.C.L.
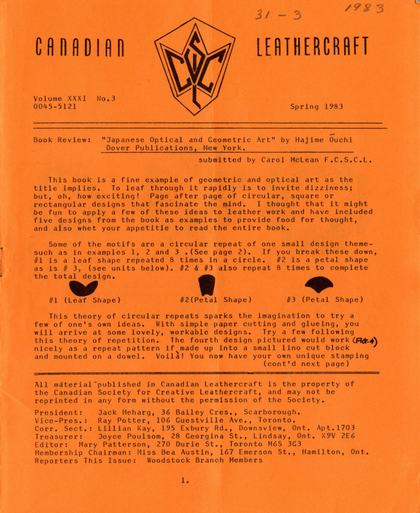
This book is a fine example of geometric and optical art as the title implies. To leaf through it rapidly is to invite dizziness; but, oh, how exciting! Page after page of circular, square or rectangular designs that fascinate the mind. I thought that it might be fun to apply a few of these ideas to leather work and have included five designs from the book as examples to provide food for thought, and also whet your appetite to read the entire book.
Some of the motifs are a circular repeat of one small design theme such as in examples 1, 2 and 3.(See page 2). If you break these down, #1 is a leaf shape repeated 8 times in a circle. #2 is a petal shape as is # 3, (see units below). #2 & #3 also repeat 8 times to complete the total design.
#1 (Leaf Shape) #2(Petal Shape) #3 (Petal Shape)
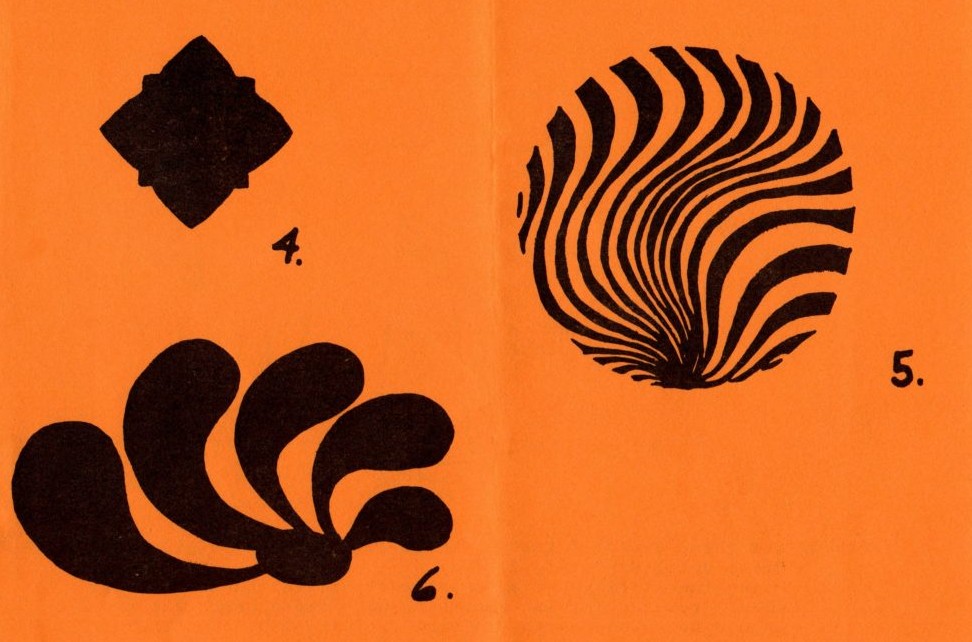
This theory of circular repeats sparks the imagination to try a few of one's own ideas. With simple paper cutting and glueing, you will arrive at some lovely, workable designs. Try a few following this theory of repetition. The fourth design pictured would work (FIG. 4) nicely as a repeat pattern if made up into a small lino cut block and mounted on a dowel. Voilà! You now have your own unique stamping
[“(FIG. 4)” is lettered by hand into the typed line above, between “work” and “nicely”.]
(cont'd next page)
All material published in Canadian Leathercraft is the property of the Canadian Society for Creative Leathercraft, and may not be reprinted in any form without the permission of the Society.
President: Jack Meharg, 36 Bailey Cres., Scarborough.
Vice-Pres.: Ray Potter, 106 Guestville Ave., Toronto.
Corr. Sect.: Lillian Kay, 195 Exbury Rd., Downsview, Ont. Apt.1703
Treasurer: Joyce Poulsom, 28 Georgina St., Lindsay, Ont. K9V 2E6
Editor: Mary Patterson, 270 Durie St., Toronto M6S 3G3
Membership Chairman: Miss Bea Austin, 167 Emerson St., Hamilton, Ont.
Reporters This Issue: Woodstock Branch Members
Page 2
tool to be used as you would normally use such a tool, by striking with a mallet and depressing the design into your leather. It could be repeated around the border of a tray, or wallet or belt, and then the depressions could be dyed dark brown and the raised surface left natural or vice versa. (This would be done using the block dyeing technique which dyes the surface and leaves the depressed areas in a natural state, untouched by the dye. This opens ideas for many new and creative repeat designs to the leather craftsman. Design # 5 is a fun example of optical art. Your eye has no choice but to follow the patterns to the focal point at the bottom of the design. Take your eyes to the top or side, and next thing you know-- bang! --- the lines have pulled your eyes to the bottom again. Lots of pages of this type of design to excite the imagination are included in this book.
With this "tool" at your disposal, you can also make the observer's eye follow lines on your leatherwork. Drawing # 6 is a quick sketch that I made using this theory. Your eyes are always led to the central oval dot. One possible use for this would be to leave the central dot undyed, just outlined, and the petal shapes "leading" to it dyed a dark brown. Then place a monogram in the central oval and dye it dark brown like the petal-shapes. The eye could not miss it! You could also think of it as a flower with petals radiating out from a central point. Again, the eye would be carried into the centre of the flower every time.
I believe that this book is in our C.S.C.L. library. (If not, our Librarian, Jean Hunter would likely be glad to get one on your request for members' use.)
Leaf through it and enjoy the paths that your eye takes, and then apply these principles to your own design. Paper, pencil and scissors are very inexpensive design tools, and one doesn't have to worry if every pattern doesn't turn out to be a masterpiece, as 1 out of 10 is a very good average, with 1 in 50 being a more normal figure! Have confidence in yourself and put your feelings on paper, and eventually onto leather. You will enjoy a "heady" feeling from creating something very unique from within yourself.
Japanese Optical and Geometric Art will lift your spirit with the razzle-dazzle of the optical pages, and perhaps you will be spurred on to create many striking new designs.
Page 3 — Millboard Users
Japanese Optical and Geometric Designs (cont'd)
[Two more geometric pattern figures, numbered 4 and 5, and a third floral swirl figure numbered 6, continuing the design series begun on the previous page.]
Millboard Users
Toronto Branch now has.070 millboard on hand for those who are finding it is difficult to obtain this material easily, for box or 3-D or other construction purposes. Sheet size is 32" x 38".
Prices are as follows: 1-9 sheets @ $1.60 per sheet; 10-18 sheets @ $1.55 per sheet; 19-26 sheets @ $1.50 per sheet.
Present supply is limited, but more can be bought if requested. (Normal store price is approx. $2.75 per sheet). Branch rep's will likely be able to see that the branches get these sheets to their own meetings, if ordered in advance.
We hope that the above will help C.S.C.L. members. Remember! Use the way of the grain, (i.e. the way it is hard to bend), for the longest dimensions of your project to prevent warping. (See Fred Brown's article on box making, Winter, 1983, Vol. XXXI, No. 2).
This page carries no advertisement: the top half continues three numbered figures from the "Japanese Optical and Geometric Designs" series (mostly drawing, with little text on the page), and the bottom half is a Toronto Branch "Millboard Users" notice, printed here in full. No names on this page beyond the citation to Fred Brown's Winter 1983 article.
Page 4 — MINIATURE STANDING PLAQUES
MINIATURE. STANDING PLAQUES by Madeleine Mitchell.
A few years ago I was asked to demonstrate at a C.S.C.L. Annual.
For help and guidance, I went to see Edith Melchior, F.C.S.C.L. With the suggestions and ideas that she provided I was able to develop the following project. Thank you, Edith.
Materials: 4 to 6 oz. leather (about 4" x 6"), pattern pieces
Cardboard
utility knife
exacto knife
skiver (6" square)
skiving knife
white glue
sandpaper
dyes as desired
scissors and pencil
dried flowers
Cut 3 from leather
Cut 1 from skiver
"Easel" Cut one from cardboard
Method: Cut three ovals of leather (Fig. 1), apply white glue, stack.CB_)
Press until dry, (Fig.2)
Using the utility knife, shape and whittle the stack until nicely rounded. Finish smoothing with sandpaper. The top should be rounded with the back flat (Fig.3). Cut the one easel piece from pattern "A". Only 1 thickness of leather is required for the easel.
Colour the skiver as desired. (I usually use light colours like orange or yellow.) A sponge dye technique could be used if desired. A piece of skiver is cut that is 5/8" larger than the base. Similarly a skiver piece is cut from pattern "A" for the easel, but cut this only 1/4" larger than the pattern.
Two more pieces of skiver are cut that are exactly the same size as the flat back of the base and the easel. These pieces should be skived about 1/8" from the edges.
Now you are ready to start covering the plaque base and easel. First lightly moisten the skiver piece for the plaque. Apply white glue to the front and edges of the base. Smooth the skiver over the base and pull over the edges and smooth on to the back of the base. (Fig. 4).
The excess can be cut away with the Exacto knife, Fig. 5.
The easel piece is now covered in the same manner and the back piece is applied. Note: The top edges are not glued together. This will allow the easel to be more securely attached to the base. (Figs. 6 & 7).
Page 5
De
Next, using the skiver cut to fit the back of the base as a pattern, cut a piece of lightweight cardboard just a shade smaller than this piece.
Glue the cardboard to the wrong side of the piece of skiver. Using the Exacto knife, cut a slit through both thicknesses. The easel piece will slip through this opening. (Fig. 8).
Slip the easel piece through the slit and open the unglued edges and glue, trim excess. (Fig. 9)
The easel and back piece are now glued to the back of the base. The cardboard will cover any differences in thickness of the back of the plaque. (Fig. 10).
Assemble a tiny bouquet of dried flowers or make small leather trilliums and attach with glue to the front of the plaque. (Fig. 11).
This small plaque can be an interesting addition to a miniature collection or it can be displayed in a shadow box,
Shop Tips from ALL readers are always welcome!! Please send along your time-saving ideas, etc. to Mrs. Mary Patterson, 270 Durie St., TorontoM6S3G3 To save time dyeing small items, keep dyes in margarine tubs, and dunk the pieces in with tweezers - dip in marg. tub water to rinse excess dye, dry.
Page 6 — WHO'S WHO IN LEATHERCRAFT: CAROL McLEAN
Oe
WHO'S WHO IN LEATHERCRAFT CAROL McLEAN,FCSCL.
Carol McLean started taking leathercraft in night school in 1964,
She was one of the Woodstock group that joined London Branch of CSCL. When the Woodstock Branch was formed, Carol was one of the hardest working members when Woodstock Branch was formed, and has continued in that capacity ever since.
She has attended numerous courses on leather and design, and colour, and has had private instruction in the craft as well. Carol began entering competitions in 1965, and has won numerous awards- the Chatelaine award for Best in Show at the C.N.E. three times, the O.C.C. award for original design on a handbag, the Irva Ford Memorial Award for molded, sculptured leather, as well as Salon and Craftsman ribbons with C.S.C.L.
After gaining her Associate standing in 1970, she went on to win her Fellow standing in 1975. Service on the C.S.C.L.
Executive Council has included work as Publicity Chairman, Recording Secretary, a member of the Exhibition Committee, and at present Carol has taken on the position of Archivist for the C.S.C.L.
Carol enjoys the teaching aspect of her craft immensely, and has taught night school leathercraft for 14 years, at Fanshawe College in Aylmer, Ont., as well as helping with volunteer leathercraft in both public and high schools in Woodstock during student elective programmes. She enjoys conducting workshops with C.S.C.L. (Editor's Note: See back page of this issue for upcoming workshop with Carol in June ), and puts in hours of preparation to make sure that her programme is in order. She is a very thorough, patient, and efficient teacher. As well as teaching, Carol is a firm believer in studying at workshops whenever possible even if the article being created is one with which she is quite familiar, as she is of the opinion that you can always learn something new. Her chief aim with our Society is to try to promote creativity, something that she also stresses in other crafts in which she is involved.
Carol McLean was the charter president of the Oxford: Quilters Guild in Ingersoll, and is currently teaching quilting at the Canadian Embroiderers Guild in London. She has also taught Japanese embroidery, crocheting, crewel embroidery, assorted arts and crafts for the Oxford Board of Education, and for the Creative Arts Centre in Ingersoll, as well as conducting quilting workshops at quilting supply stores, and at the Quilters Guild.
She was a participant at the World Craft Conference in Toronto in 1974, and at Oaxtepec, Mexico in 1976. Last year Carol attended the Pacific Friendship Fibre Arts Conference in Hawaii, coming home with 450 slides, which, since she is truly a design artist, have been a source of design material; she can point out how to take a design from a picture of a flower, a rock, or even tracks in the sand. (She tells of her friends at the Hawaii conference pretending that they didn't know who she was when she suddenly lay down on her back on a grassy lawn in order to capture the shapes created by palm fronds towering overhead. )
During this conference, all participants were asked to design a
Page 7 — SHOP TIPS FROM CAROL McLEAN
"theme" pattern to commemorate the event. Carol's pattern was chosen as a "memory" pattern to be given to all delegates at the farewell banquet and so has now been taken throughout the world. As Carol had received a Wintario grant in order to be a participant at this special event, she is already following the Wintario rules for recipients, that is, to share knowledge gained with others, and has shown her slides to a number of groups, with information given on design creation from these visual "records". She has been unstinting with her time, tailoring the presentation to meet the criteria and interests of the groups involved. For example, the quilters were shown work in their craft, travel groups were Shown the slides of points of interest of Hawaii, while those in the design fields received a showing of the special close-ups of flower shapes etc., suitable for their media experiments.
All this craft activity is made possible by the support and active co-operation of her family. Angus, a very supportive husband, is manager of an automotive parts store. A few years ago Carol and her husband built a lovely cottage on their lot at Toad Lake, after learning how to construct cottages and homes at a night school course. Carol's two daughters, Janet in London, who is working with young people with problems, and Bonnie, a grade 12 student who is busy with her music studies, as well as taking time to teach her pet guinea pig to solve simple math questions, are a source of pride to Carol and Gus. The last member of the family is Mac, their big, black Newfoundland dog. Mac, a Canadian Champion, takes part in a programme for children with cerebral palsy that is held every February in Toronto, at Sunnyview School. Mac, along with other well-trained dogs, pulls carts or sleds to give the children rides, then stands patiently to be hugged and patted by the children, many of whom have never even touched a dog, let alone a 150 lb. giant one! Mac also takes part in the Christmas tree "drag" at Caledonia, with funds raised during this event going to a special charity, "The Sleeping Children of the World".
The mark after "World" is a period, not a comma.
Carol claims that to have all the energy for this she needs time at the cottage - it's a revitalizing experience, and she can indulge in her pet hobbies of canoeing or cross-country skiing.
Submitted by Beula Reynolds, Woodstock Barnch CSCL
SHOP TIPS FROM CAROL McLEAN
(1) Moisten leather prior to dyeing with a fine mist spray bottle, rather than a sponge to get a light, uniform moistness.
(2) Use a brush with antique dyes (preferably squirrel or sable hair), rather than a cotton dauber, as the cotton swab will retain the bulk of the important dark antique material from the dye solution.
(3) To slow down the drying of a piece you are dyeing, enabling you to work the colours slower, place your work on a piece of plastic.
(4) To speed up the drying of a piece when dyeing, using newspaper under the piece being worked on, as it pulls the moisture out.
(5) When you cut through your leather when Skiving, stop immediately, before slicing out the piece, extract blade carefully, and touch up edges of cut piece with glue. Reskive later.
Page 8 — SPECIAL NOTES
SPECIAL NOTES
The page sets this heading between two typed rules — a row of dots on either side of it, and a row of asterisks beneath
All members of the C.S.C.L. are invited to attend the June 11th Workshop - Leather Covered Bottles, by Carol McLean - See full page ad in this issue! Plan to attend.
Due to higher incidence of "shop-lifting", AND extremely high insurance rates, the C.S.C.L. Executive would like to point out to all members "That the Society will NO LONGER be responsible for any lost or stolen articles submitted for craft SALES." (Craft Shows, such as Leather'84, will still be covered by insurance.) "No coverage of insurance can be provided at Craft Sales."
We regret that we must take this step, but we assure members that every effort will be made to try and prevent any losses by mishap or theft, and all members are cautioned to try to make their submissions either in boxes or cards that are not easily misplaced, or easy to "shop-lift" from if displayed near public. Fasten all pins shut on their cards securely! We will do our best and we trust that those supplying pieces will do likewise!
We hope that all members received their "Notice of Motion" re dues increase in the mail this past month. In case your copy didn't reach you, we repeat the motion.
"That, effective as of April 1, 1984, the Annual Membership Fee will be raised to $10.00 per annum."
The motion, as presented above, was discussed at the Annual Meeting, and was passed by the general membership by a vote of 57 for, 3 against. We regret the raise in dues was made necessary by increased expenses, particularly due to printing and mailing costs of notices, newsletter, etc. plus booth rental at C.N.E. This is the first increase in 12 years.
*** Note to all members: Annual dues are now due (as of April 1.) Branch members can pay your treasurers, while Members-at-Large can submit $5.00 directly to Treasurer, C.S.C.L., Joyce Poulsom. (For correct address, see front page this issue.)
Page 9 — TO COVER A MILLBOARD BOX WITH LEATHER - WORKSHOP by FRED BROWN
'0 COVER A MILLBOARD BOX WITH LEATHER - WORKSHOP by FRED BROWN article contributed by Olivia Smith, Toronto Branch.
To cover a box with a hinge, cover the back area first.
Cut a strip of leather deep enough to go under the box 1/4", and then over the top edge by 1/2" - except in the area of the hinge. Your leather piece will look like this. (Fig. A)
(Fig. A)
Skive the ends, top, and bottom edges of the strip. Put glue on box only, not on the leather.
Place carefully in line with the hinge area and bring around the corners. With the box upside down, cut each corner straight down and lift excess pieces out.
Cut strip for sides and front. Skive both top and bottom edges as well as one end. Bring leather around carefully, making sure each corner is quite straight. Leave about 1/2" extra which will be skived very thin and brought around the side. Use bone folder to make smooth finish. The edge of the box is also pressed down carefully.
Now the corners have to be mitered. This is done in the same fashion as the bottom edge, but the knife cut is made INSIDE the box.
HINGE: Cut a piece of leather the same size as the hinge already on box. Start glueing from the bottom. Make sure that you use the bone folder to press down securely on edge of box, then glue the two pieces together.
HRERKKEREEREEX* Olivia Smith F.C.S.C.L.
Editor's note: We appreciate Olivia contributing the second half of this two part lecture, which we could not attend. This box was planned to be made in morocco leather. Fred has also demonstrated using very fine calf. Lining should be of suitable thinness to match exterior leather, and, from personal experience, be careful that it is not too stretchy, as this presents even more difficulty!!
Page 10
BOX COVERING (CONT'D).. Editor's note continued.
We notice that lid covering was not covered in the above report, likely due to lack of.time at this Toronto meeting to cover this area. For those who have not made a box before, we ask that you bear with your editor's memory, and I will continue this article, using one of Fred Brown's box designs that we used in school many years ago.
The lid is composed of the lid and an inner lid to fit down inside the box. This inner lid can rest on an inner gallery lining piece composed of four pieces of millboard, one cut to fit each side of the inner measurement of the box, with enough removed from each piece so that they will fit at the corners inside neatly. (We will illustrate this in Fig. "E").
The piece of leather to cover the lid is cut about 3/4" larger than the box lid,(or enough to reach under the inner lid piece by about 1/4"). After placing the lid down on this piece of leather, mark the wrong side of the leather for place, and glue lid in place, BUT ONLY THE TOP AREA. Leave the edges and turned in area unglued. After the lid glue is set enough to work, turn leather to interior and mitre corners, then glue these edges of lid, and smooth in place with bone folder as in description of working outside of bottom of box. The piece of leather that will result from this mitering is as shown in FIG. "B". We are marking the critical fitting points on the box lid with an "X". These must be cut PRECISELY to meet exactly, with no overlap AND no gap!! This is why it is wise to glue the lid top area first, and cut and fit the corners after!!
Fig "C" shows the lid inner lining which is covered in the same fashion, with the mitre joints disappearing behind the inner lid when the box is completed. This inner lid also covers the top edge of the hinge insert. ALL EDGES OF ALL PIECES MUST BE SKIVED! A build-up of thicknesses in this area results in a sloppy fit.
Fig. "D" shows the lid in place with the mitered inner lid corners and hinge edge marked in in dotted lines indicating where they lie hidden behind the inner lid.
The "Gallery Strip" which we mentioned is shown in Fif. "E" is covered in a like manner, all edges skived, and the aforementioned gaps left for corner clearance. The thickness of the millboard
Page 11
will determine the gaps between these pieces, as you will see when you try them for size in your box. These "gallery pieces" are helpful in covering a "multitude of sins" that may occur in fitting in the Lining of the bottom of the box, (although Fred Brown would prefer to see them used ONLY for useful or decorative purposes, we know!) They also may occur in playing card boxes as an inner divider as well, of Similar height to the outer gallery, but usually of double thickness, I believe, for rigidity.
Boxes may also have a separate lid, with its own gallery, but these are even more intricate!! So start at the easiest, and enjoy this item.... they are one of the most useful of leather items we make!
Mary Patterson, Editor.
[Below the text, a set of hand-drawn box-making diagrams: Fig. "B", box lid covering, with dotted lines showing lid size, skived shaded areas, and four "X" spots marked as points of critical fit; Fig. "C", box inner lid covering, with skived shaded areas; Fig. "D", a lid assembly showing the outer lid, inner lid and hinge; Fig. "E", clearance allowances along a strip; and a finished box with its hinge (notched for clearance in the box bottom) and gallery insert piece, with "X" again marking the critical fit points.]
* * * * * * * * * * * * * * * * * * * * * * * * * * * * * * * * * * * * * * * * * * * * * * * * * * * * * * * * * * * * * * * * * *
SPECIAL NOTE
[The heading is flanked by a pair of decorative printed scroll ornaments.]
A number of members and executive have written and asked us to include this item in this issue...
A large vote of thanks to NORLAND BRANCH for the magnificent job of planning that they did for the 1983 Annual Meeting. It was their first attempt, and those following them, from all accounts, will be more than hard-pressed to match a marvellous week-end! Details will follow in the next issue of Canadian Leathercraft.
Page 12 — WORKSHOP NOTICE
We apologize for the delay in publication of this issue but we were waiting for further information and decisions on the C.N.E. (This to help our ever-increasing postal costs!!) We particularly point out the workshop notice below, which will be of interest to all members, we are sure! List of materials in this "WORK-ALONG WORKSHOP" are listed on a separate enclosure sheet... some can be shared with a friend, if you plan ahead for this most interesting workshop. List is separate as out-of-province members won't need this.
This notice is hand-lettered.
Saturday, June 11th — Workshop: "Leather Covered Bottles" with Carol McLean, F.C.S.C.L.
Time: 9:00 a.m. — 4:00 (approx.)
Place: St. Martin-in-the-Field Church, Glenlake & Keele St. — one block north of Bloor/Keele subway station.
Please bring along a lunch. Tea & coffee will be provided — members & leatherworkers welcome.
Price: T.B.A. (see Branch rep.)
List of materials on separate enclosure, or ask your Branch rep. for a copy.
This workshop should be a real "special!"
WE MAY BE ENCLOSING YOUR "C.N.E." 1983 Entry Forms with this issue IF decision is reached through arrangements with C.N.E. to hold our sale booth once again.... check your envelope for enclosures!!
NEXT ISSUE: Barrie Branch will be Reporters.