
An issue of the Society’s newsletter, transcribed from the original.
(8 pages, 1.4 MB)
the full-resolution scan, 20 MB, for close research
Page 1
Canadian Leathercraft
VOLUME XXXIX NO. 2 WINTER 1991
0045-5121
TABLE OF CONTENTS
Index 1.
Richard in Wonderland or So Much to Learn, So Little Time, By Rick Fielding, Toronto Branch 2.
41ST Annual Weekend 3.
Cutting Pattern for Pocket Saver 4.
Pocket Saver, By John Pfaff, Mississauga Branch 6.
Of Interest to Guild Members 8.
This contents list is printed one item to a line with its page number at the right. It is set out above in that form, matching the page's own order and numbers.
All material published in Canadian Leathercraft is the property of THE CANADIAN SOCIETY FOR CREATIVE LEATHERCRAFT and may not be reproduced in any form without the permission of the Society.
| President: Don MacLeod 2165 Corsair Road | Mississauga Ont. L5A 2L7 |
| 1st Vice-Pres: Jack Meharg 36 Bailey Cresent | Scarboro Ont. M1G 2P3 |
| 2nd Vice-Pres: Bill Whittingham 42 Robin Hood Road | Islington Ont. M9A 2W8 |
| Treasurer: George McPhail 3 Lambton Avenue | Toronto Ont. M6N 2S2 |
| Record. Sec: Kevin Armstrong 1377 Hurontario Street | Mississauga Ont. L5G 3H5 |
| Corrsp. Sec: Betsy Rennie 1357 Baldwin St. | Burlington Ont. L7S 1K1 |
| Membership: Joyce Scruton 212 Southview Road | Oakville Ont. L6K 2P4 |
| Editor: Lois MacPherson 1407-350 Lynnwood Dr. | Oakville Ont. L6H 1M8 |
| Editor: Betsy Rennie 1357 Baldwin St. | Burlington Ont. L7S 1K1 |
[This issue (Volume XXXIX No. 2) is dated "WINTER 1991" on its own masthead. The following year's Winter issue (Volume XXXX No. 2) is dated "WINTER 1991" as well, rather than 1992 — the printed year does not advance between the two issues, even though the volume number does. Both dates are given exactly as printed.]
Page 2 — Richard in Wonderland or So Much to Learn, So Little Time, By Rick Fielding, Toronto Branch
"RICHARD IN WONDERLAND"
OR "SO MUCH TO LEARN, SO LITTLE TIME" by Rick Fielding
Toronto Branch
Ever since I started playing music professionally, over twenty years ago, I have wanted to have beautiful, elaborately hand carved leather cases for my guitar, banjo and violin. There were, of course, commercially made cases, but they were quite plain, with none of the original decorations that I had in mind. At the odd sandalmaker's shop that I passed, I would ask casually if they could make such cases - and inevitably the undertaking was beyond them, or just too much trouble. Occasionally, I would see someone with a case similar to the one of my dreams and, invariably they had made it themselves.
Now, I knew that this was beyond me! I could draw, write, and play music. I could fix stringed instruments and I had my share of model planes when I was a kid, but I knew I couldn't do this. This was great art! Only those with some mysterious, god-given gift could create something like this! And this is how things stayed, until September 1989 — and then a lot of things changed.
At a flea market in Scarborough, I met. leatherworker Bruce White. Once again, but with little hope, I asked about the cases. To my astonishment, Bruce said,"Sure, no problem. I can make that for you". Then I asked about the price, and I was amazed! Like most of the uninitiated, I thought it was extremely expensive. However, continuing in his friendly manner, Bruce suggested I take a course that he was teaching at Danforth Tech. and learn to make my own. Resisting the temptation to say, "Yeah! Sure!" and then forget about it —- I mean how could I make my own case? — I signed up, purchased the prerequisite Tandy Beginner's Kit, and a World opened up to me, such as I had never imagined!
Do you remember when you first heard words like veiners, camouflagers, pear shaders, and swivel knives? I didn't even know what a gusset was! Since then, my interest has become nothing short of an obsession — a good one I might add. My wife of one year was just getting used to the constant sound of banjo or guitar around our home when the slightly less musical sound of mallet on leather took over, and I just hope it won't drive her to murder or the divorce court. I'm attempting to avoid either of these fates by bribing her with purses, wallets, belts and key cases. Maybe I can devise a pair of leather ear-muffs!
Incidentally, I no longer have any need of a wallet, I've spent all my money on tools, hides, dyes, and countless books by Stohlman, Baird, Shelton, Muma, and Griffen, in fact, any book that has the word leather in it's title. I've spent hours at the library, poring through old volumes of design; Spanish, French, Italian, Oriental, etc. I search through antique stores for anything that says Osborne on it; I look under friends' coffee tables to check the bases for acanthus leaf patterns. And, how I wish I'd discovered this fascinating world twenty years ago! I guess the next twenty will be spent making up for lost time.
Joining the C.S.C.L. has been a real treat for me. The members have been gracious, friendly and patient in answering my many questions. Their willingness to share information has been of immeasurable help to me, and I'll remember this generosity in the future, when some young novice comes to me for help.
Page 3 — 41ST Annual Weekend
In 1990, I sold almost $900.00 worth of leather projects (instrument straps, book covers, etc.) mostly to friends and musical acquaintances - but the word is getting around. I guess you know how exciting this is to me. You see, I want to support myself through my leather work. Now, I know this will not be easy, especially since the area I have chosen to work in is original leather art, but the satisfaction I get from creating my own designs is worth it. Changing careers in mid-stream wasn't what I had in mind a year ago, but with hard work and some creative thinking, why not? I look forward to never having to play music in another smokey night club again. Oh, I'll still play, I could never give up my music, but now, with an income from leatherworking, I can play the much more rewarding folk festivals (that's emotionally rewarding, by the way, not financially rewarding).
So, thanks to the folks at the C.S.C.L., and all those nameless artists and craftsmen who have created such beauty in leather through the ages. And a special thank you to Bruce White who opened the door for me. I'm in debt to all of you but, maybe in a few years I'll be able to repay it - hopefully with interest.
Well, got to go now - I still have another two hundred back issues of "The Craftsman" to look through!
41ST ANNUAL WEEKEND
MAY 3, 4, 5, 1991
The Hamilton Branch is hosting the 41st Annual at the Beacon Motor Inn. We are having a hands on demonstration on Friday evening in the hospitality room. There is a pool for those that want to relax a bit or get an early morning swim. The Inn is located at Jordan Station off the QEW at EXIT 55.
*There will be a prize of one free registration if Dave McPherson has received your registration by April 12, 1991.
N.B. C.S.C.L. Annual Dues of $20.00 are due in March and also any dues to the branches. Members-at-Large and branch Treasures please send the 1991-1992 dues to: Joyce Scruton 212 Southview Rd. Oakville, Ontario L6K 2P4
JUDGING: The Weston Trophy pieces will be judged at Dorothy and Bob Muma's residence on March 23, 1991. We encourage any to try for their Associate or Fellowship standing. All leather articles to be judged need to be at the Muma's residence by 10:00 AM Saturday March 23, 1991.
The Muma's live at: 625 Rushton Rd. Toronto, Ontario M6C 2Y3
Telephone. 416-654-5635
So if you have two extra minutes—-get tapping! You have approximately a month left!
N.B. All Library Books are to be returned to your branch guilds at the March meeting.
N.B. For people serving on the executive council, please bring all reports to the March executive meeting or if unable to attend the meeting mail them to:
Betsy Rennie 1357 Baldwin St. Burlington, Ontario L7S 1K1
Page 4 — Cutting Pattern for Pocket Saver
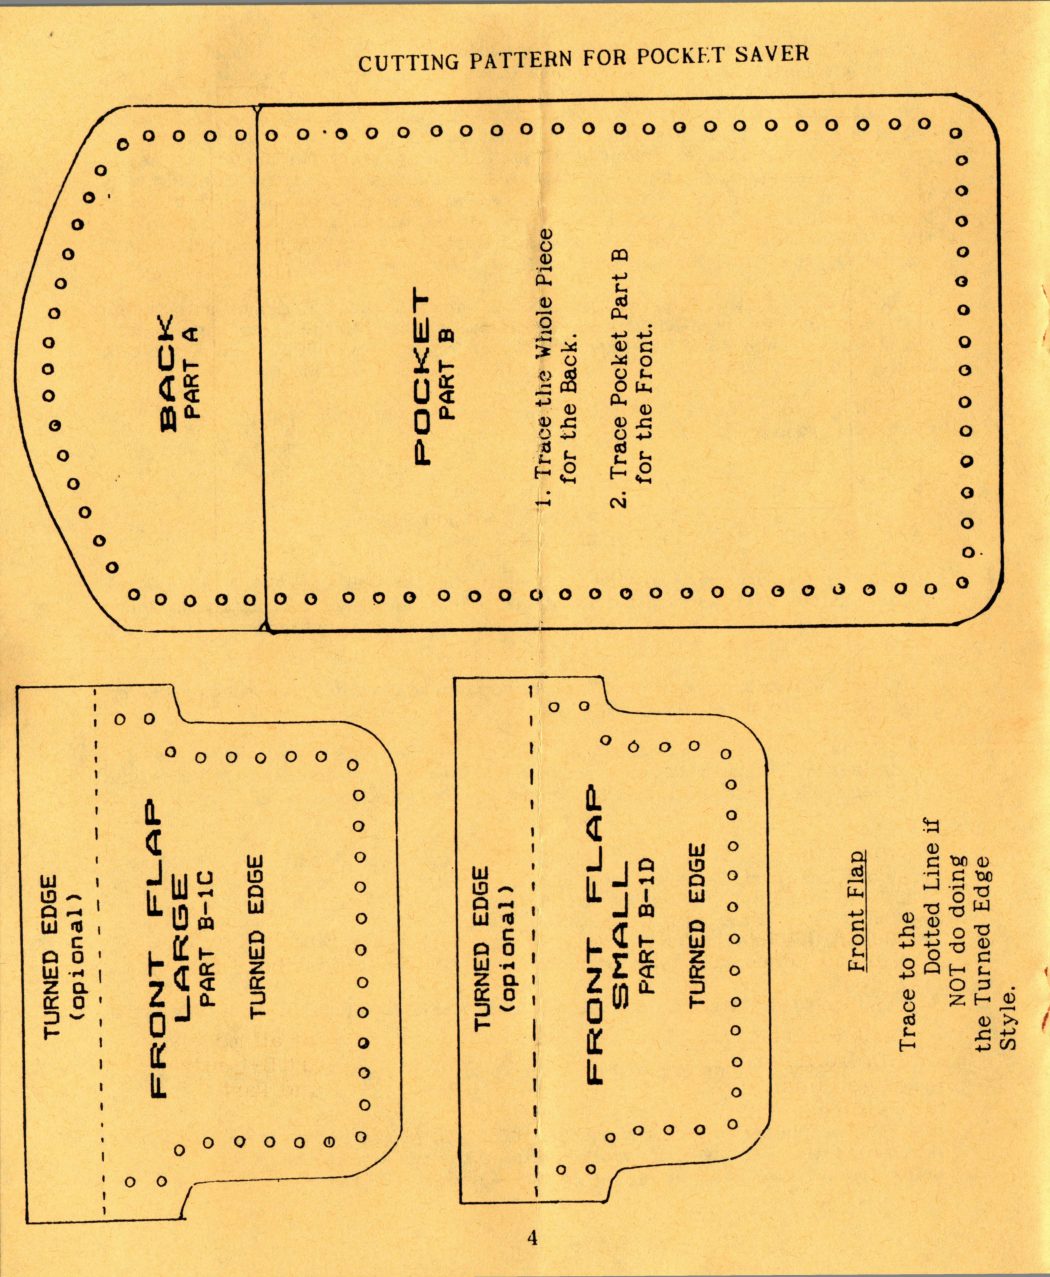
CUTTING PATTERN FOR POCKET SAVER
1. Trace the Whole Piece for the Back.
2. Trace Pocket Part B for the Front.
Front Flap
Trace to the Dotted Line if NOT do doing the Turned Edge Style.
[This page is the cutting pattern for a "Pocket Saver": four pieces with stitch-hole rows marked around their edges — Back (Part A), Pocket (Part B), Front Flap Large (Part B-1C) and Front Flap Small (Part B-1D), the two front flaps each labelled "TURNED EDGE (opional)", as printed, with the tracing instructions set out above. No names appear.]
Page 5
This page opens with a pattern-piece diagram for the front flap, its outline a solid line with rows of small stitch holes set inside it. Four labels are lettered sideways on the drawing: "Front Flap Window" inside the window panel, "PART C" on its right edge, "FRONT FLAP PART B-1" across the flap, and "Turned Edge (optional)" down the far strip.
1.Trace the Whole Piece for the Front.
2.Trace Part C for the Front Flap Window.
Pattern Piece Requirements:
Part A, Part B, Part C, and Part B-1 either Edge Finished or Turned Edge. OR Part A, Part B and one of the possible 4 Front Flaps.
Back - Part A and Pocket - Part B are the same for all models. I.D. Badge Front Flap Window - Part C goes with Part B-1 either Edge Finished or Turned Edge. Only 1 Part B-1 and Part C is required. There is also a choice of 4 Front Flaps.
Page 6 — Pocket Saver, By John Pfaff, Mississauga Branch
SHIRT POCKET SAVER
by John Pfaff
Mississauga Branch
1. Choose one of four possible shirt pocket saver patterns. You have to make a choice the type of pen clip edge you want. The choices are stitched and edge finished or just have a turned edge. If you choose the stitched and edge finished pocket saver you don't have to modify the front flap Part B-1. If you choose the turned edge for pen clips, you will have to increase the length at the top of front flap Part B-1 by a 1/2". See step-3 diagram for location of turned edge leather. This increase in length is for all models of pocket saver front flap Part B-1. Trace out the pattern on a piece of 3/4 oz. leather, then cut it out. Also cut a skiver lining for Part A, this should be larger than the back.
2. On flesh side of pocket Part B and front flap Part B-1, skive the area where pen clip is used, approximately 1" for the edge finished and 1 1/2" for the turned edge. Skive to about half the thickness and the extra 1/2" very thin. Carve and dye the leather to your liking.
3. For I.D. Pocket Saver: Cut out center of front flap window Part C, Edge finish the inside frame. Glue plastic window with contact cement to the back of Part C. Plastic window should be larger than leather window, lying it as flat as possible. Trim off excess plastic. Take dividers, scribe a line 1/8" across the top edge and about 1/4" from side edges. With #6 stitching wheel go along scribed edges. Make holes with your awl and then saddle stitch the top. Edge finish the top. Punch holes for lacing. Remember, the two holes at the top on the sides will be used to hold this assembly to the pocket Part B and back Part A. Do not lace. *If you are making a turned edge style don't punch holes now, this will be done later.
4. STITCHED AND EDGE FINISH METHOD
Put contact cement on skived areas on Part B and front flap Part B-1 and cement both pieces together. Use dividers scribe a line 1/8" from edge and 1/4" from each side. Mark scribed line with your stitching wheel and using the awl to make holes, then saddle stitch both pieces together. Edge finish the top of this assembly.
5. TURNED EDGE METHOD
Take pocket Part B and front flap Part B-1. Apply contact cement to top edge of Part B from edge to about 1/8" in. Locate the fold line (from Step 3) on Part B-1 - 1/2" from top edge. Glue Part B to this line, making sure that Part B-1 is centered over pocket. Use bone folder to assist you in folding the turned edge. Apply contact cement to the 1/2" as well as the 1/2" on the back of Part B. Let dry and then press down using the bone folder. With your mallot, tap down cemented edge.
6. TO MAKE THE PEN POCKET
The front assembly consists of pocket Part B, front flap Part B-1 and front flap window Part C. If you need a stiffner for the back, cut it 1/4" smaller around the top carved area and 3/8" - 1/2" smaller for sides and bottom. That is if lacing holes are to be punched using a thonging chisel. See Step 6A diagram. Glue stiffner in place.
To improve the edge finish you may wish to edge bevel the flesh side on the back. Glue lining to the back piece and press it in place. Cut off the excess lining using pattern piece as a guide.
[The instructions are set out one step to a paragraph, with the three method headings on their own lines, as the page prints them. Restored against the printed page: "You have to make a choice", "on Part B and front flap Part B-1", and "With your mallot" — the page spells it so.]
Page 7
Step 3
TURNED EDGE (optional). AREA TO SKIVE. FRONT FLAP PART B-1. POCKET PART B.
Step 4A
¼" — STITCH LINE — ⅛", ¼". EDGE FINISH. FRONT FLAP WINDOW PART C. PLASTIC WINDOW.
Step 4B
TURNED EDGE. FRONT FLAP PART B-1, with the lacing holes marked around the window.
Lacing and Stitching Diagram
Step 5A — Front Assembly
¼" — STITCH LINE — ⅛", ¼". EDGE FINISH. FRONT FLAP PART B-1. POCKET PART B.
Step 5B
TURNED EDGE. FRONT FLAP PART B-1. POCKET PART B.
Step 6
Front view and side view: BACK "A", POCKET "B", FRONT FLAP "B-1", WINDOW "C", START LACE HERE.
< Lace goes through holes twice
. Holes used for lacing
F Edge Finish
S Thread Stitching lines
A person lacing goes through all three pieces of leather.
[This page is a pattern-and-lacing diagram, continuing the pocket pattern from the previous page, with the part labels (FRONT FLAP, PART B-1, POCKET, PART B, WINDOW "C") and step captions printed inside and around the line drawings. The part labels and step captions are given above; the dimension figures and the lacing key are unchanged.]
Page 8 — Of Interest to Guild Members
Take the front assembly and cement it to the back creating a pocket for your pens. Using dividers set at 1/8", mark the stitching or lacing lines. If you don't use the cutting pattern holes as a guideline, then Step 6C will show where to lace and where to stitch the pocket saver. Stitch back Part A to pocket Part B together. Now lace around top of back and I.D. card pocket assembly starting at the bottom middle of pocket.
TIPS
STITCHING AND LACING
You can combine the stitching and lacing. The leather part that goes into the shirt pocket may be saddle-stitched to decrease the thickness of the pocket saver. The parts that are exposed outside of the shirt pocket can be laced to enhance or improve the esthetic value of the project.
EDGE FINISHING
Moisten edges of leather to be edge finished. Edge bevel both sides of leather, then using either a bone folder or edge slicker or both slick down the edges. Let edges dry. Make sure there are no feathers on the edge. Remove the feathers by sanding lightly with water proof emory cloth, about 400 to 600 grit should do. Apply edge dye to the edges and slick edges until no more feathers remain. Repeat process if necessary.
Put a finish on your project. One suggestion is using carnauba cream and then buff.
OF INTEREST TO GUILD MEMBERS
Last fall Mr. Bill Reis purchased "The Leather Craftsman" and has renamed it "The Leather Crafters Journal". The January/February issue is now out. It is the same quality as the previous magazine. If anyone is interested in subscribing to the magazine, the address is: 4307 Oak Drive, Rhinelander, Wisconsin 54501 USA
The cost is $25.00 in US funds for Canadians; $22.00 for US citizens; and $28.00 for Foreign.
Lea Love of the Mississauga Branch has ordered some, if interested call Lea Love at 416-276-7340.
LEATHERCRAFT MAGAZINE CUMULATIVE INDEX
Frank Zigon and son Robert Zigon have published a cross-reference directory of leathercraft articles published in Make it With Leather and The Leather Craftsman. You'll find listings for over 1,100 articles from 59 issues for the period January 1980 through April 1990.
The Index is an 8 1/2" x 11" book, spiral!-bound so it lies flat for easy reference. Anyone interested in getting a copy can do so by mailing $20.00 in US funds to: Zigon Press Suite 500, 2647 Bethel Crest Drive Bethel Park, PA 15102 USA