
An issue of the Society’s newsletter, transcribed from the original.
(8 pages, 1.2 MB)
the full-resolution scan, 21 MB, for close research
Page 1 — MITT AND GLOVE BOOK CLIP
CANADIAN LEATHERCRAFT
Volume XXVII, No. 4
0045-5121
Summer, 1979
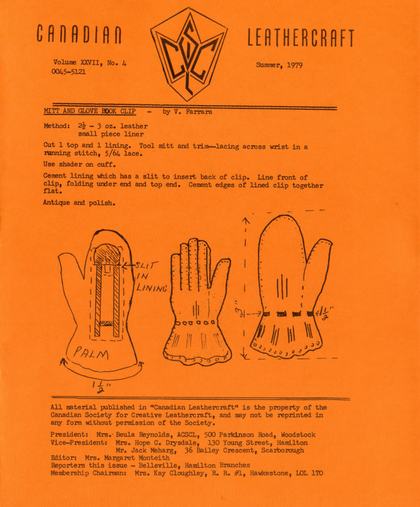
MITT AND GLOVE BOOK CLIP -— by V. Farrara Method: 2\u00bd - 3 oz. leather, small piece liner
Cut 1 top and 1 lining. Tool mitt and trim—lacing across wrist in a running stitch, 5/64 lace.
Use shader on cuff.
Cement lining which has a slit to insert back of clip. Line front of clip, folding under end and top end. Cement edges of lined clip together flat.
Antique and polish.
All material published in "Canadian Leathercraft" is the property of the Canadian Society for Creative Leathercraft, and may not be reprinted in any form without permission of the Society.
President: Mrs. Beula Reynolds, ACSCL, 500 Parkinson Road, Woodstock Vice-President: Mrs. Hope C. Drysdale, 130 Young Street, Hamilton
Mr. Jack Meharg, 36 Bailey Crescent, Scarborough
Editor: Mrs. Margaret Monteith
Reporters this issue - Belleville, Hamilton Branches
Membership
Chairman: Mrs. Kay Cloughley, R. R. #1, Hawkestone, L0L 1T0
The mitt/glove diagram (three views, labelled "PALM" and "SLIT IN LINING") is fully explained by the surrounding instructions; not separately captioned.
Page 2 — Meeting of the Council of Fellows: April 19th, 1979
Meeting of the Council of Fellows: April 19th, 1979
Barrie, Ontario
Under the Chairman of the Fellows, Helen Wheaton, the judging of articles began at 9:30 in the evening.
Judges for the Salon: Mrs. Sadie Roebuck and Mrs. Jessie Little (Viola Harris being i11), Helen Wheaton being the third judge if needed. The remaining Fellows present: Carol McLean, Nora Huyck, Olivia Smith, Gladys Riddell, Clara Cavanagh, Fred Brown.
The above acted as the board of selection with Nora Huyck as Chairman.
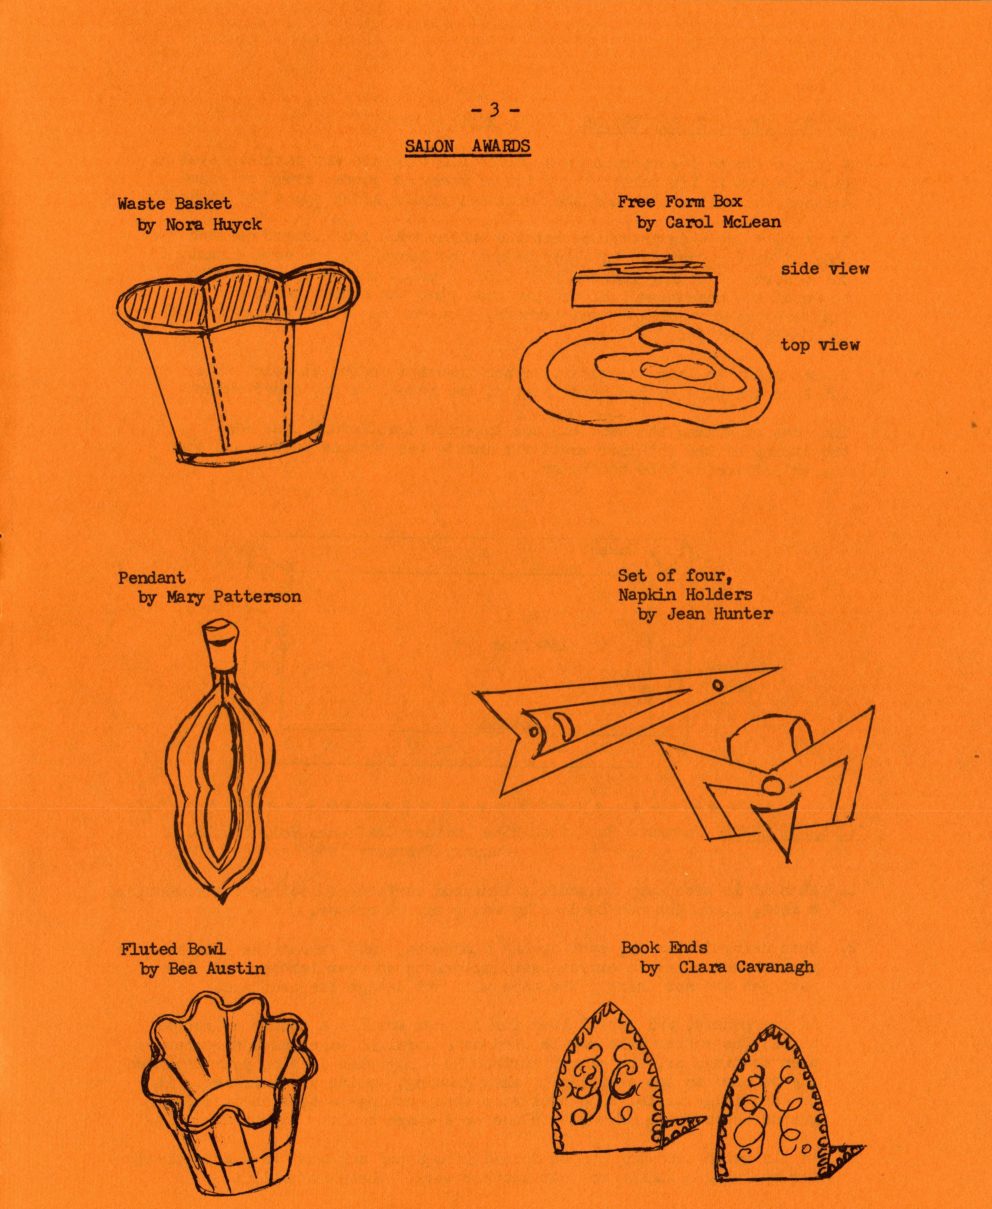
There were six Salon Awards given, as follows:
1. Waste Basket - Mrs. Nora Huyck
2. Free Form Box - Mrs. Carol McLean
3. Pendant - Mrs. Mary Patterson
4. Napkin Holders - Mrs. Jean Hunter
5. Fluted Bowl - Miss Bea Austin
6. Book Ends - Clara Cavanagh
There were 30 Craftsman Awards given, as follows:
| Bea Austin | Fluted Bowl, molded, laminated |
| Basket — perforated, laminated | |
| Fred Brown | 3D Box — dyed red |
| Laura Bush | large plain brown handbag |
| large multiple picture frame | |
| Clara Cavanagh | Book ends - carved, florentine lace |
| Gold box | |
| Camera case | |
| Hope Drysdale | Red flower book |
| Blue Book | |
| Ruth Haig | Red Dice Box Backgammon |
| Joy Hutcheson | Mobile- monarch butterflies |
| Jean Hunter | Napkin Holders |
| Nora Huyck— | Waste Basket |
| Green and red note book | |
| Muriel McKnight | Coaster Box and coasters |
| Carol McLean | Contoured molded box |
| Book, geometric design | |
| Jack Meharg | Gun Holster, small black |
| Edith Melchior | White Gloves |
| Madeliene Mitchell | Book, dark red |
| Dan Ouellette | "Juan Valdez" |
| Mary Patterson | Pendant |
| Jean Rachnor | Large Scrap Book |
| Gladys Riddell | Blue Bag |
| Beula Reynolds | Bird Book Cover |
| Olivia Smith | Cuir Boullie, square jug |
| Margaret Weldon | Oblong Tray, stippled bottom inside |
| Helen Wheaton | Covered hinged box, floreated |
| Banner, C.N.E. and Leather '78 |
Ribbons were presented at the Dinner, Saturday night.
Helen Wheaton.
[Helen Wheaton’s second Craftsman Award item, "Banner, C.N.E. and Leather ’78", is printed on its own indented line under her first, and the closing sentence about the ribbon presentation stands flush left below the list; both are set out here as the page has them.]
Page 3 — SALON AWARDS
SALON AWARDS
Waste Basket by Nora Huyck
Free Form Box by Carol McLean
side view
top view
Pendant by Mary Patterson
Set of four, Napkin Holders by Jean Hunter
Fluted Bowl by Bea Austin
Book Ends by Clara Cavanagh
[Six pen sketches illustrate the Salon Awards named in the list on p. 2 (Huyck, McLean, Patterson, Hunter, Austin, Cavanagh). One of the six is captioned "Waste Basket by Nora Huyck".]
Page 4 — WALLET INTERIOR SUGGESTION; TIPS AND HINTS
WALLET INTERIOR SUGGESTION - by Marilyn Hany
A suggestion to incorporate in a wallet for a person who carries a lot of loose papers in his wallet (or a lot of money) a gusset could be added between the wallet back and the interior, giving added space for expansion. If using ready-made interior, cut the wallet back 1/8" longer on each end; if making your own interior adjust the length by the same amount. Cut a strip of lining leather 1/2" wide to match interior, the length to equal the measurement of the two ends plus the bottom leaving a little extra for going around corners. You can cut off the last bit if you don't need it.
Starting at "A" lace the gusset to the interior ending at point "B". Now lace the back to the other edge of the gusset as any other wallet. The idea of making the back and the interior a different size was: the lacing of the interior would fit inside the outside lacing and then the wallet wouldn't:be too bulky.
[Diagram: a wallet-back pattern piece labelled "Wallet Back", "Interior", "Gusset" and "Bottom", with points "A" and "B" marking where the gusset laces to the interior, matching the instructions above. The diagram’s rotated corner labels, read straight rather than as a diagram, give only disconnected fragments ("SR Interior", "Back ~ di", "a) SNS ms S 6 es x a Re Bess"); these are not text and are left out of the description above.]
TIPS AND HINTS
Margaret Hunt from "The Leather Craftsman Vol. II, No. 2
January-February 1958
1. When it is necessary to scuff a finished surface of leather for cementing, a fast, clean job can be done by using an ink eraser.
2. When using Craftaids, such as the alphabets, mask around the letters you are not using to prevent getting prints on your leather from the part you are not using. The tape will not damage the craftaid.
3. An inexpensive and useful item for leather work is a square of rubber tile. The rubber tile may be used as a straight edge, as a silencer when tooling; or, the smooth surface is handy when drawing your diagrams, may be used to set articles on when glueing, dyeing or finishing. It is especially useful as a back stop when cutting leather as it safe— guards the cutting edge of a blade or a sharp tool.
4. An old nylon stocking can be folded into a pad and used very effectively for applying a finish to your leather work. There is no lint.
[Byline is set out here as "Marilyn Hany", not "Marilyn Many"; "Jamary—February 1958" as "January-February 1958"; "It Ls especially useful" as "It is especially useful".]
Page 5 — 1979-1980 PROGRAMME WOODSTOCK BRANCH C.S.C.L.
1979-1980 PROGRAMME WOODSTOCK BRANCH C.S.C.L. - Springbank Public School
Sprucedale Avenue, Woodstock, Ontario
All meetings unless otherwise noted, Time 7:30 p.m. - 10:30 p.m.
| (Saturday) Sept. 15 | 1 Piece wallet Workshop |
| Ruth Haig A.C.S.C.L. 9 a.m. - 4 p.m. | |
| Sept. 27 | Mystery Lesson |
| Carol McLean F.C.S.C.L. | |
| (Saturday) Oct. 20 | Cuir Bouille Workshop |
| Clara Cavanagh F.C.S.C.L. 9 a.m. - 4 p.m. | |
| Oct. 25 | Leather Carving |
| Jean Racknor | |
| Nov. 22 | What The Judges Look For |
| Helen Wheaton F.C.S.C.L. | |
| Chairman of the Council of Fellows of C.S.C.L. | |
| Dec. 6 | Christmas Party |
| Folden's Hall 6 p.m. | |
| 1980 - Jan. 24 | Pendants With Gemstones |
| Sydney Taylor | |
| Feb. 28 | Miniatures in Leather |
| Madeleine Mitchell | |
| Mar. 27 | Splatter Dyeing |
Olivia Smith F.C.S.C.L.
Apr. 18, 19, 20 ANNUAL MEETING
Sun Valley Hotel
Belleville Branch Hosts
Apr. 24 Laminating and Finishing Trays and Bowls
Bea Austin A.C.S.C.L.
(Saturday and possibly evening of the 16th and/or part of Sunday the 18th. )
| May 17 | (Tentative) 3—D Millboard Box Construction |
| and Covering With Leather Workshop | |
| Fred Brown F.C.S.C.L. | |
| May 22 | Belts (inch. Canvas Burnishing Technique) |
| Jessie Little F.C.S.C.L. | |
| June 20 | Picnic — Location to be announced. |
NOTE: All Workshops include a "pot luck" luncheon. If you plan to attend, please bring something for the "pot luck".
Please notify President Madeleine Mitchell of your intentions in attending Meetings or Workshops well in advance, so that adequate preparations can be arranged. Thank you.
Page 6 — Tanner's art helps fashion moccasin
Tanner's art helps fashion moccasin
By MARY OGNIBENE, Gazette Staff Writer
Julie Ferguson says, "I live on Linwood Avenue and I tan my hides on Linwood Avenue."
Mrs. Ferguson, an Algonquin Indian, this summer is demonstrating the strenuous art of tanning and curing deerskin at the International Indian Village at Artpark.
There's a lot of interest in the work because many non-Indians also like working with the skins.
She learned the skill from her mother, Teresa Meness, of Maniwaki, Que., who learned it from her mother in the days when moccasins were fulltime Indian footwear.
Two of Mrs. Meness' other daughters, Dorothy Baggos of Maniwaki, which means "Mary's land," and Ann Printup of Niagara Falls, also know how to do it. Mrs. Meness and Mrs. Baggos helped Mrs. Ferguson at the Indian Village for a short time this summer.
It takes three or four weeks to treat a hide. Flesh and hair must be stripped from the hides. Mrs. Ferguson does it by scraping, usually with a long bone. The hair can be put into a bag and the whole bag washed. It's then taken out of the bag to dry and care must be taken that the hair doesn't blow away. It can be used for stuffing pillows.
Mrs. Ferguson uses no chemicals in any part of the process. After scraping, a long, arduous soaking and rubbing procedure begins. The hide, which is naturally white, is soaked all night or for a day, and rubbed until dry. She rubs the hide over a piece of wood to dry it. This takes hours, perhaps all day, and longer in damp weather. It is then oiled with vegetable oil, though the Indians used to apply the brains of the animal.
The hide lays until saturated with the oil. Then it's soaked in soap and water (Mrs. Ferguson uses Fels-Naptha).
She wrings it out and rubs it again until it's dry. This process is repeated five or six times and can take two to three weeks.
When the hide is white enough and soft enough, Mrs. Ferguson dyes it by smoking it. This only takes about 15 minutes but is an extremely touchy step.
The hide is folded and sewed closed. Any holes are stitched shut. A piece of cloth is sewn around the bottom to turn it into a sort of tent. Then it's hung over a "smudge fire" made by burning a piece of old, dry, rotted wood.
"You watch it all the time," Mrs. Ferguson said. The smoke turns the hide a golden tan.
"Then you're ready to use it," Mrs. Ferguson said.
Mrs. Meness said she used to be able to make five pairs of moccasins a day, but is "down to three pairs a day now." She uses a three-cornered needle and the patterns come from experience. The thread is fine nylon from Ireland. She said she has also used linen thread.
The women make jackets and other deerskin items. Mrs. Ferguson is finishing a special pair of boots for a horsewoman in Florida.
Mrs. Meness said a fresh hide is best. "When I wanted a hide, my husband used to shoot a deer for me. He got it in the neck so the hide wasn't spoiled by holes."
Mrs. Ferguson said the Pueblo Indians use the natural white hides, without dyeing them. She said a hide that isn't to be used right away can be preserved in salt.
It's possible to obtain hides in Niagara County during the fall hunting season. Shops that process deer will sometimes sell them for $2 or $3 and hunters often give them away.
Julie Ferguson with hides
[This whole page is printed as three newspaper columns (plus a sideways-printed editor’s credit in the margin); read word by word across them instead of column by column, it opens "By MARY OGNIBENE Mrs. Ferguson uses no chemicals in Gazette Staff Writer’ any part of the process…" Set out below whole, column by column. It is a Niagara Gazette clipping (Sunday, 5 August 1979), reprinted here with a note from editor Margaret Monteith: "The following article taken from the Niagara Gazette, Sunday, August 5, 1979, I thought you might find of interest. - Margaret Monteith." A photo of Julie Ferguson with hanging hides carries the caption "Julie Ferguson with hides." None of the people named (Julie Ferguson, Teresa Meness, Dorothy Baggos, Ann Printup, reporter Mary Ognibene) are CSCL members; nothing to file.]
Page 7 — EARLY HIDE CURING PRACTICES
EARLY HIDE CURING PRACTICES
Early settlers in the geographic area from the Cascade Mountains on the West and Rocky Mountains on the East and from the Frazer River of B.C. in the North, to Oregon in the South, were predominantly loosely affiliated bands of Indians. Eventually, the more powerful political and military forces united as a tribe in these areas, and the Nez Perce Indian culture identity, language and territory was formed.
The Nez Perce women were highly skilled in the art of curing animal skins, also versatile in the construction of warm clothing and utilitarian commodities.
The environment determined which of natives' materials and animals would be available for desired warmth, food and clothing. Traditional clothing were of animal skins, usually mountain sheep, deer, elk, antelope and bison. They were also of mountain goat, wolf, coyote, fox, racoon, badger, otter, beaver, bear, moose, rabbit and wild cat to name a few, all indicating different Nomadic zones. To the North Caribou was most common. Most of the large animal skins were cured with the hair off, (except for robes) and because of thickness and size these were used for clothing in the west. In any area where game and skins were scarce, grass and bark were woven into clothing.
To the East, mountain sheep hides were preferred as they were light weight, durable and easier to cure than the less plentiful elk deer and bison in this area. The large animal population about A.D. 1820 was abounding. However, with hides used for clothing, the use of horses for hunting and European firearms of the 1800's the animal populace declined drastically.
Skins and hides are synonymous terms describing animal pelts. Thin elk hide was used for dresses, shirts, leggings, moccasins, on occasion, however, Mountain sheep and deer skins were preferred. Elk, moose, bison were used also for shelters, parfleches, etc. The term Buckskin was misleading as it included deer hides of both sexes. Fawn and Doe hides were more pliable and used for childrens clothing.
The Nez Perce were technically skilled and adept in understanding animals and clever in the use of their skins. A general hide preparation was as follows; The hides were skinned from the animal by a slit down the abdomen, and down the inside of each leg cut free to the knee and from behind the ears. Layers of fat and meat were readily removed from fresh hides, leaving the inner side a smooth surface to allow for hair to be scraped off efficiently. If all this could not be done while the skin was fresh, the skins were placed in streams, weighted down with stones for up to 4 days before dehairing. When either method was not possible, hides were dried in the shade and rolled up for future use.
Animal fat or bear grease was applied on the hair side to keep skin pliable in storage. Dried hides had to be soaked twice as long, but were otherwise treated the same as fresh hides when curing.
[A stray colon after "was formed." is left out here; "weighted dow with stones" is set out as "weighted down with stones". No CSCL names or awards on this page.]
Page 8
Women were primarily associated with scraping, graining, stretching, curing, construction and manufacture of hides. Stone scrapers, bones and antlers were used as trainers and fleshers. Hides became the property of women who prepared them and were recognized as items of wealth. Men entered the role of preparing and curing hides about 1900.
The animal brain was dried or kept in a pouch to rot and become oily for later utilization in softening the hide. Some added bone marrow with the brain solution and a few used bone marrow and liver or brains and liver. The rotting brains turned to grey oil used in curing process.
Aboriginal dehairing technique was done by throwing the hide over a smooth wooden pole and the long ribs of elk, bison and horse were used as scrapers, beginning at the head area. As the arduous task progressed the pole was moved or rolled until the hide was clear of hair and the first layer of pigmented skin (the later was not customary for rawhide).
This procedure was necessary to allow penetration of curing solution. When more than first layer removed the skin would stretch too far and cause holes. Uniformity of hides meant more attention to thicker neck and back bone regions. The inner side of the hide was scraped with a flint scraper to remove fat and flesh.
With both sides of the hide prepared, the pelt is soaked over night, in a fashioned vat, filled with the brain solution. This is know as curing the hide, a process leaving the cured hide an off white colour (not to be confused with tanning as no tanning acids, producing "tan" colour were used.) The hides were stretched during the curing to allow adequate penetration of solution.
Brains of deer and elk could be used interchangeably with other species. Bone marrow was boiled in water to form a broth. Time and individual taste decided which method of curing was used and how pliable the hide would be. — Hides were nailed to wooden frames, stretched and rubbed with animal fat to dry uniform, yet pliable. Depending on final use, hides were rolled up for storage, then rewet and wrung out for effect, then restretched.
Slits were cut into outer hide edges and thonged to 2 upright poles to insure maximum stretching in all directions. A beveled stick was then rubbed in stretch directions giving grain effect, in about 4 hours time. A correctly cured hide was as soft as cloth and easy to cut.
The process of curing with the hair intact, meant only the flesh Side was cured with brain or bone marrow solution and rubbed with bear grease then dried in the shade.
Often thick hides, e.g. rawhide, were smoked instead of dying. A hole 1\u00bd feet deep was dug in the ground, rocks placed in the bottom and when a deep layer of embers formed oily woods from coniferous trees (eege pine, spruce, hemlock) were put in to produce dense smoke to the overhanging skins. Either side of the smoked hide could be used, as one side remained yellow in colour. Smoking did not necessarily follow curing.
A variety of colours for dying were produced from Juniper, bark, minerals, fungus, pulverized roots, pine cones, alder weeds and moss.
Bone awls and needles and chipped flint knives were used to cut and sew hides for desired effect to the finished utilitarian and ceremonial dress.
Ruth M. Haig, A.C.S.C.L.
Hamilton Branch