
An issue of the Society’s newsletter, transcribed from the original.
(12 pages, 1.8 MB)
the full-resolution scan, 33 MB, for close research
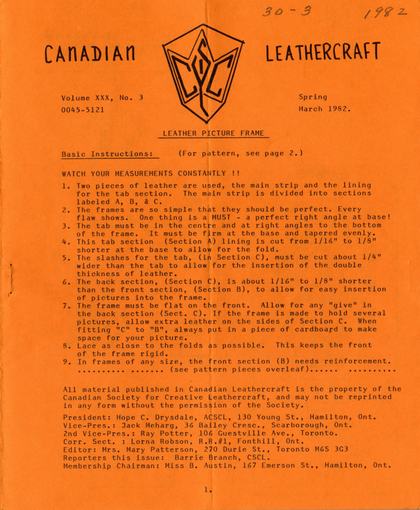
Page 1 — LEATHER PICTURE FRAME
| CANADIAN | LEATHERCRAFT |
| Volume XXX, No. 3 | Spring |
| 0045-5121 | March 1982. |
LEATHER PICTURE FRAME
Basic Instructions: (For pattern, see page 2.)
WATCH YOUR MEASUREMENTS CONSTANTLY !!
1. Two pieces of leather are used, the main strip and the lining for the tab section. The main strip is divided into sections labeled A, B, & C.
2. The frames are so simple that they should be perfect. Every flaw shows. One thing is a MUST - a perfect right angle at base!
3. The tab must be in the centre and at right angles to the bottom of the frame. It must be firm at the base and tapered evenly.
4. This tab section (Section A) lining is cut from 1/16" to 1/8" shorter at the base to allow for the fold.
5. The slashes for the tab, (in Section C), must be cut about 1/4" wider than the tab to allow for the insertion of the double thickness of leather.
6. The back section, (Section C), is about 1/16" to 1/8" shorter than the front section, (Section B), to allow for easy insertion of pictures into the frame.
7. The frame must be flat on the front. Allow for any "give" in the back section (Sect. C). If the frame is made to hold several pictures, allow extra leather on the sides of Section C. When fitting "C" to "B", always put in a piece of cardboard to make space for your picture.
8. Lace as close to the folds as possible. This keeps the front of the frame rigid.
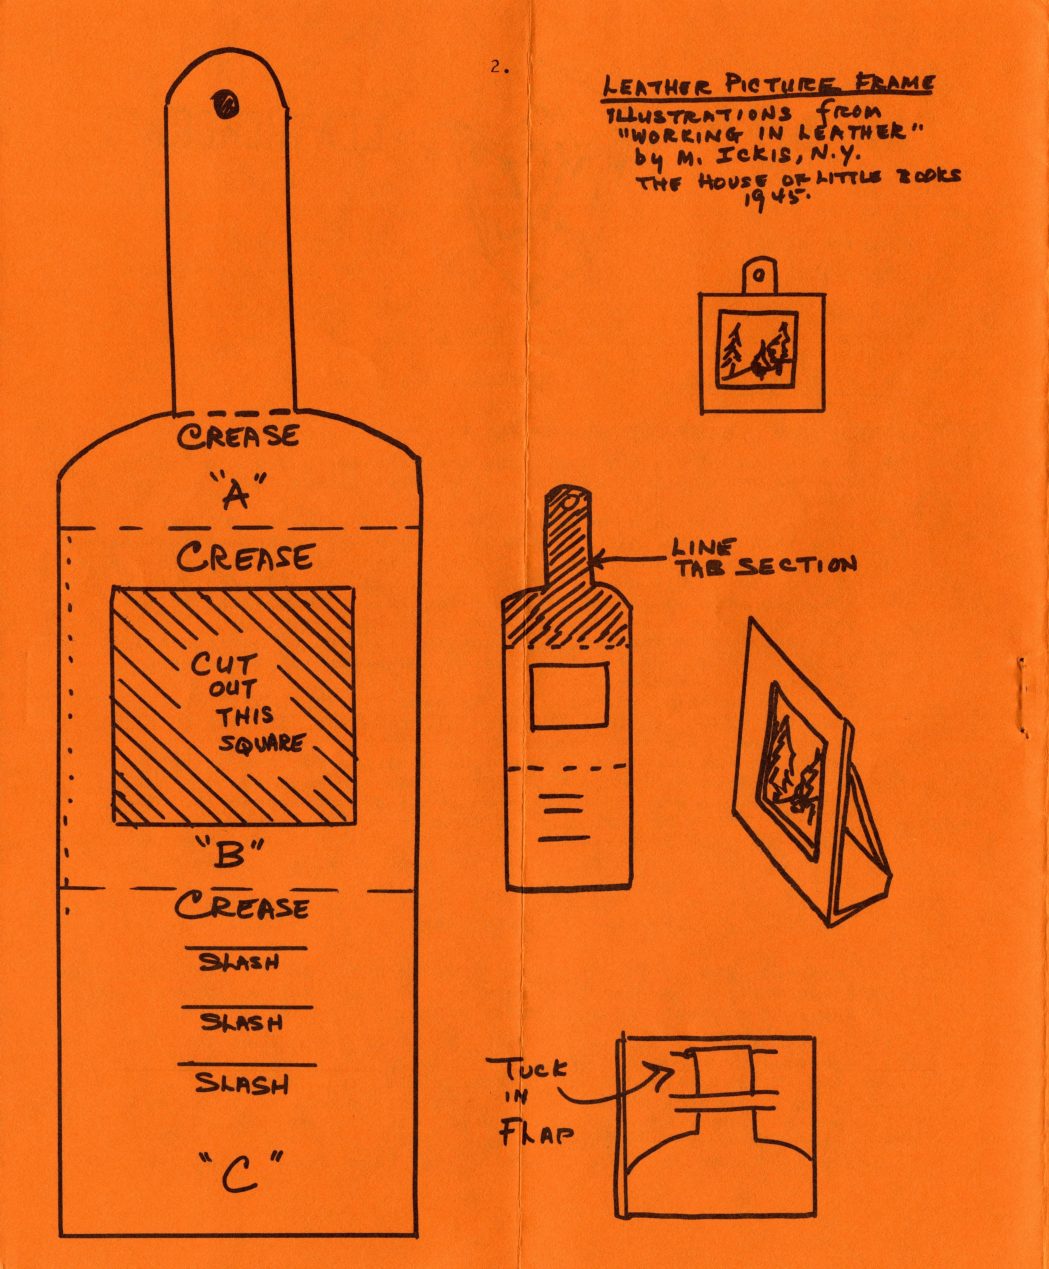
9. In frames of any size, the front section (B) needs reinforcement. .......... ....... (see pattern pieces overleaf)...... ..........
All material published in Canadian Leathercraft is the property of the Canadian Society for Creative Leathercraft, and may not be reprinted in any form without the permission of the Society.
President: Hope C. Drysdale, ACSCL, 130 Young St., Hamilton, Ont.
Vice-Pres.: Jack Meharg, 36 Bailey Cresc., Scarborough, Ont.
2nd Vice-Pres.: Ray Potter, 106 Guestville Ave., Toronto.
Corr. Sect.: Lorna Robson, R.R.#1, Fonthill, Ont. Editor: Mrs. Mary Patterson, 270 Durie St., Toronto M6S 3G3 Reporters this issue: Barrie Branch, CSCL.
Membership Chairman: Miss B. Austin, 167 Emerson St., Hamilton, Ont.
Page 2
LEATHER PICTURE FRAME
Illustrations from "Working in Leather" by M. Ickis, N.Y. The House of Little Books, 1945.
[This page is a set of hand-drawn pattern diagrams for a leather picture frame, credited to M. Ickis's 1945 book "Working in Leather" (The House of Little Books, N.Y.) rather than an original CSCL pattern. Labels read: on the large pattern piece, "Crease 'A'", a second "Crease" above a hatched square marked "Cut Out This Square", "'B'", a third "Crease", three "Slash" lines, and "'C'" at the foot; a side-view sketch is labelled "Line Tab Section"; a finished standing frame is shown at right holding a landscape print; and a small assembly detail is labelled "Tuck in Flap". No names appear. Set out here in full.]
Page 3 — LEATHER DECORATION - WITHOUT TOOLS
LEATHER DECORATION - WITHOUT TOOLS
At the International Assembly of Leathercraft held in 1964
I was greatly impressed by a demonstration given by Huldy
Gutekunst. It may have been her enthusiastic and entertaining manner, or just the fact that the method shown was purely for fun. In any case I have been using her ideas fairly regularly ever since.
They require a minimum of tools or expensive equipment and therefore are ideal for use with beginning groups of children or seniors. Since dyes are the principal medium of decoration be prepared for the mess by protecting the work area, your clothes and hands.
Any of the three methods are ideal for small items such as key cases, wallets, change purses, small note pads or book covers etc. They are comparatively quick to do and I find that they provide a colourfull alternative to the conventional carved items usually found on the display counter of a craft sale.
FREE FORM STRING DESIGN -
This method, when correctly done, produces a delightful free form line design which is best used for wallet backs, or card case cover and could also produce an interesting wall plaque. Since it takes a little practice, I suggest you try it out using sheets of typing paper until you master the trick of pulling out the string.
You will need - 3 or & ft. of cotton string or butcher cord black or dk. brown alcohol based dyes dry wallet back or other leather shape paper towels, sheets of paper
2 OLD lightweight magazines (such as Womans Day) rubber gloves if desired, tongs or tweezers
(1) Pour a little dye into a little dish and immerse your length of string in it.
(2) While this is absorbing dye, place one magazine on the table (protected by old newspapers) and place on it your practice sheet of paper or the wallet back. Do not wet your leather.
(3) Remove the string from the dye with tongs and hold it up to drain the excess. Drop on the paper towelling and pat LIGHTLY with more towels. The best results are obtained when the string is only moist, neither soaking or too dry.
(4) Drop the string onto the leather in a random pattern overlapping where necessary to obtain reasonable coverage. Leave a tag end hanging over the edge of the leather.
Page 4
NoTEPlace Pins AT ANGLE
(5) Cover with another piece of paper and a light magazine. Hold down the bo book with one hand. Cont ee press too firmly if you are using leather as the —CAkpteany ——" outline of the string will be pressed into the surface of the leather
(6) Now for the tricky part.
To remove the string and obtain your pattern. Tug lightly at the string as a you swing it back and forth, at the same time working your way around all four sides of the magazine. When all the cord is removed, take off the top covering and hope. ¢ er for the best!
(7) Antique can be flooded on after the design is thoroughly dry to lightly colour the background. Finish with polish coat.
PULL STRING
OUT WHILE WORKING
BACK + FORTH AROUND
MAGAZINES
SPRAY DYE AND STRING DESIGN -
This is an excellent system to combine string and/or other items and dye to create simple designs on leather.
You will need - All the leather pieces required to complete the project, as it is difficult to reproduce the same effect twice.
Apiece of corrugated cardboard larger than your leather
-a few straight pins
-string or cord, two thicknesses if possible -a variety of alcohol dyes (such as Fiebings ) Apiece of screening and FIRM toothbrush
-a small dish to hold dye
- optional - small dry leaves or other items such as keys to create patterns.
(1) Take the wallet back that has been coated with the lightest colour of dye or left natural and place it on the corrugated cardboard. Place a few straight pins at an angle away from the leather and INTO the BOARD ONLY.
State
< Pate
Page 5
(2) Use the finest string that hou have and fasten it to a pin at some point around the edge of the leather and from there criss-cross back and forth several times around the pins and ending by tying around another pin. Don't try to cover all the pins as you will have a second string layer and you won't want to make the design too busy.
(3) Now for the first dye spray. Choose your colour carefully remembering the basic colour chart and that subsequent colours will be changed by the base coat. Use the next darker colour (ie- base coat of golden tan, next spray orange and finish with dark brown) and with toothbrush and screen create a fine spray of colour over all parts of the leather and string. A motorized spray pen is ideal for this method or you may find a fine atomizer effective. I have not had much luck with atomizers as I find they will drip, causing unsightly drops of dye on my work. So I stick to the old fashioned piece of screening and brush dipping the dye up on the brush and rubbing it in a circular motion over the screen. Keep moving the screen back and forth over your work to obtain even coverage.
(4) After a very few minutes to dry you are ready to take another thicker piece of the string and cover the first layer. Fasten to pins that have not previously been used. Add more pins as needed, or move them to obtain the desired effect.
(Beside this step is a drawing of the leather pinned out on a board, with the strings criss-crossed between the pins and two leaves tucked under them, lettered by hand.)
Lettered on the drawing:
2ND STRING AND LEAVES OVERLAYS FIRST LAYER
LEAVES ARE OPTIONAL
If you elect to place some small dry leaves at random on your design, this is the time to do it. Tuck them under the upper layer of string and hold down with small stones or metal nuts.
(5) Using the contrasting and darkest dye, coat the leather again with screen and brush. Remember to keep the screen in motion while scrubbing vigorously with the brush to throw a fine spray of dye over all. The distance that you hold the screen above the leather will control the size of the spray drops.
(6) After it is dry remove the pins and take off the string and leaves.
(7) When applying polish coat remember that all the decoration is on the surface. Therefore, carefully pat on the first coat of polish and let it dry before attempting to draw your swab across the dyed surface. Give several coats of polish to seal well.
Page 6
BATIK ON LEATHER - i 1. Prepare your wax by melting it over boiling water in a double boiler on a hot, plate or stove close to the work table. If you have a deep cooker that would hold a can of wax set in water, or an old electric fry pan, the thermostat will maintain the desired heat and prove to be invaluable. Caution: remember that wax dropped on a heated element will' burst into flame BE CAREFULL. Always use a candy or candle thermometer to monitor wax temperature. Never let the wax temperature exceed 180°F as it is subject to spontaneous combustion at temperatures in excess of 200°F.
Use Parafin Wax with some Beeswax added to increase the softness and pliability of the wax. The degree of softness will affect the sharpness of the cracks in the wax through which some of the dye will reach the leather. Experiment to find the proportion you like best. Huldy recommended Half and half, but I preferr less beeswax, perhaps 2 tablespoons to ½ lb. parafin. I melt mine in a clean 48 oz. juice can for which I have found a plastic lid. Only half fill whatever container you choose to use. When cooled it can be covered and stored away for future use. i 2. Prepare the work area by covering the table and floor with plenty of old newspapers for protection.
You will also need: -Fiebings or other alcohol base dyes
-dye swabs and rubber gloves
-a dull kitchen knife to use with wax, or a wooden popsicle stick.
-an old soft cloth to polish leather
-Polish Coat
- wallet, key case or belt length. 3. Liberally apply a coat of golden tan or other light shade of dye to your leather. Don't forget to prepare and dye the leather strip to hide bills in a wallet, the piece to hold the key plate or sufficient leather for the keepers for your belt at. the same time. If natural is to be the lightest colour of the finished product, dampen the leather with water.
While still damp lay it out on a flat smooth surface such as a cutting board protected by waxed paper. Apply some melted wax by dropping or drizzling it from the blade of your kitchen knife (or wooden stick). The final pattern will resemble varied colour paint spatters.. A
Page 7
Test the wax on a scrap of leather.
Wax is too cold when the wax turns a frosty white immediately when it touches the leather. Increase the heat under the wax and retest.
Wax is too hot when the wax rapidly and deeply penetrates the surface of the leather scrap and leaves a darkened stain. Cool the wax by lowering temperature of the water or adding more wax to the pot.
The correct wax heat is reached when wax is clear when it is applied to leather and begins to turn to turn opaque as it cools on leather surface.
(4) Allow the wax to cool on leather while still flat on the board. This should not take long if the wax is only applied in drops, but if larger areas are involved, cooling could be hastened by placing in the refrigerator for a few minutes The more brittle the wax, the more sharply defined the cracks will be and the dye in the next coat will seep to the leather through these cracks.
Only the larger droplets are suitable for cracking as you will find that small dots of wax will fall off the leather and will need to be waxed again if not handled carefully. If working on a wallet back and you wish to crack the wax, grip the leather in both hands, thumbs on top and fingers underneath. Rotate your fists down and out, exerting slight pressure on the wax dot between your thumbs. A crack, or series of cracks should appear in this area. Repeat this process in other areas.
(5) Using a leather dye swab or cotton ball, generously coat the entire leather surface with the next dye colour. Be sure to test your colours one over the other on a scrap to make sure that the finished colour will be one you will be happy with. Secondary applications of dye will be changed by the colour that has proceeded it.The dye should seep down through the cracks and around the wax dots which will protect the original leather colour. Let this coat of dye dry 15 to 20 minutes then apply more wax dots to preserve the colour of the second dye coat. Follow with the final and darkest coat of dye (black or dark brown). Let dry for at least 20 to 30 minutes and be sure the wax is cold so that it will easier to remove.
(6) CAREFULLY bend the leather to encourage the drops to fall off and repeat untill all the wax is removed. The back of the kitchen knife may be used to assist at this stage. A soft polishing cloth rubbed vigorously over the surface will give a fine polish to the finished article.
(7) Let dry overnight if possible before applying polish coat.
HAVE FUN! Kay Cloughley
Page 8 — CORNER BOOKMARK; A KEY FOB TO HOLD METER MONEY
[This is a pattern-diagram page (two small projects with cutting lines and instructions around the drawings). Leading "8 \!"/"Ah" and mid-sentence "bh"/"ek eiee" are noise from the illustration lines, not text; left out here. No names on this page.]
A CORNER BOOKMARK
Use any lightweight leather. A good way to use up scraps. Overlap the shaded areas, skive if necessary.
Fold back on the dotted line. Tool a border line and decorate as desired.
A KEY FOB TO HOLD METER MONEY
Use any lightweight leather and do your carving or decoration before you stitch it together.
Insert a dome in the spots indicated.
Dampen the leather at the crease line and fold over a split key ring. Saddle stitch up each side and you will have a handy key fob which will hold your meter money.
Page 9 — (MONARCH) BUTTERFLY PINS
(MONARCH) BUTTERFLY PINS Clara Cavanagh
Use 5 or 6 oz. natural cowhide leather.
(1) Trace Butterfly onto tracing paper:
(2) Dampen leather slightly
(3) Trace butterfly onto leather.
(4) Cut butterfly out with a sharp knife (Exact # 11 blade).
(5) Skive butterfly on flesh side.
(6) Gouge a small line on the underside down the length of the body.
(7) Dampen leather and carve in the body outline and wing division lines. These are the only carved lines.
(8) Use modeller or bone folder to smooth down skiving and emboss up the body shape from the underside.
(9) Bevel around body and wing cuts.
(10) Mould butterfly into shape.
(11) Repeat 8,9,10 until you have your butterfly will shaped.
(12) Let dry thoroughly.
(13) Dye (a) Back and front Orange, let dry overnight.
(b) Dye markings with brown dye or use felt pen.
(c) Put on the white spots.
(14) Polish with several coats of polish.
(15) Antennae - make with fine wire coated with leather.
(roll thin leather strip cut on bias onto a short length of wire.)
-cut off about 34", fold in half and cement into the gouge in the body of the butterfly.
(16) Cement a pin onto the back of the butterfly. Cover the centre of the pin with a circle of fine leather to give a finished appearance.
(17) Repolish your pin.
Page 10 — BRANCH REPORTS
BRANCH REPORTS
Belleville: by Margaret Hunt
Belleville holds its meetings in the Belleville Recreation Centre, Pinnacle Street, on the 1st and 3rd Monday of each month, with meetings starting at 7:30 p.m,
Some "specials" during the past: season were Jack Layton's demonstration of construction of a leather and wood wall memo holder, Laura Bush and Marilyn Harry demonstrating "flowers made with velvet ribbon", Irene Girling on "How to make a Poinsettia pin", Margaret Hunt demonstrating "Clutch Purse", and Jack Meharg conducting a workshop on "Belts" in Oct.
Belleville was pleased to have the "Leather '80" exhibition on display at the Hastings County Museum, and the Annual meeting of the Ont. Municipal Recreation Assoc. at the Four Seasons Hotel for 4 days this past season.
Vera Farrara and assistant Margaret Hunt had classes for adults for 10 weeks at -the Rec. Centre, and plan a further series this spring, as interest was very high.
Belleville Branch is very sorry to report the death of a very faithful member, Gladys Cooper, on Feb. 19, 1982. As one of the first Belleville members, she had remained active in the Branch until confined to a nursing home this past year.
Woodstock: by Madeleine Mitchell.
Planned activities for Belleville Branch for the spring season include the following:
April 22nd- Carol McLean- "Spatter Dyeing"
May 15th - Helen Wheaton- "Glove Workshop" 9:00a.m.- 4:30 p.m.
(Please bring along something for the Pot Luck Lunch). May 27th - Fred Brown- "Slim-style Wallet"
Hamilton: by Lorna Robson
On Oct. 3 a workshop was held on "Filagree" by Bea Austin in Smithville, and on Nov. 7th Jean Hunter conducted a workshop on "Lace Cutting" at the John Howard Society building in Hamilton. Both workshops featured a Pot Luck Luncheon.
Many members have also taken part in various week-end workshops at Mohawk College.
Our regular meetings have been well attended, but weather condtions caused the January meeting to be cancelled. We are now looking forward to our Annual Meeting and election of officers in March.
Since the Terryberry Library where our meetings are held is now closed on Fridays, we will meet there for the last time in March, and then will be looking for a new "home",
Toronto
Regular monthly meetings are being held on the 2nd Friday of each month in St. Martins in the Field Anglican Church (7:30 p.m.)
Our April meeting saw the members busy on items for the "Annual"
Page 11
(Branch reports cont'd)
Toronto Branch is planning an evening of Air-brush spray dyeing on May 14th, with Jack Meharg demonstrating, and will hold its final meeting of the season on June 11 with the annual Hobby Night
April 16th was a special evening for long-time President Gladys Riddell, with a presentation and cake and social gathering in recognition of her years as President of Toronto Branch. Gladys is being succeeded by Ray Potter as President of Toronto Branch.
Norland Branch: by Hilda Chynoweth
We enjoyed a workshop in November with Jean Hunter as visiting demonstrator, teaching us how to make a lace cutter and how to cut leather lacing.
The January meeting was devoted to making a one-piece wallet. In February we had a meeting to prepare for a sandal workshop to be held on Feb. 27th.
We are all busy working on our projects for the Annual Meeting.
Barrie Branch: by Kay Cloughley
In spite of illness among our membership and severe winter weather, Barrie Branch held eight meetings during the fall and winter season.
This year, the emphasis has been placed on "Back to Basics" and we are trying to improve our carving and tooling skills. Early Sept. meeting was Part 2 of the series as we worked on a carved wallet. Sept. 26th we were fortunate to have Carol McLean as our demonstrator as we created Lino Blocks for use on leather. This proved so interesting that we continued at our Oct. meeting.
September was a busy month as several of our members are also involved with Simcoe County Arts and Craft$ Society and the Quilt and Rug Fair offered us a chance to sell leather articles for three days. Simcoe County also hosted the International Ploughing Match this year.
Nov. /7 was a busy day as members completed articles for our local branch sale at a shopping mall on Nov. 14th. Later in Nov., Clara Cavanagh helped us to start bookends.
The Christmas Pot Luck dinner for members and friends was held this year at the home of May and Clarence Corbett. As usual, we enjoyed making a Christmas craft article, and joined in fellowship over a delicious meal. We were very sorry that Clarence was in hospital and unable to join with us.
In January, those who were able participated in a workshop to make a Ring Binder. We were pleased to welcome CSCL President, Hope Drysdale to our midst for that day.
We are looking forward with anticipation and eagerness to the coming Annual and are finishing articles to be displayed there.
Please send all changes in address to both the Membership Sect. and your Can. Leathercraft Editor so that your name remains active on our mailing list. We are constantly updating our lists!
Page 12
UPCOMING EVENTS
LEATHER '82: The seventh biennial exhibition will be held at The Gallery, City of Brampton, Public Library and Art Gallery, 150 Central Park Drive, Bramalea. OPENING: July 1, 1982, at 8:00 p.m.
Public Viewing: July 1- Aug. 1.
All entries for Leather '82 must be sent to Dorothy & Bob Muma,
625 Rushton Road, Toronto, prior to 10:00 a.m., May 28, 1982. Entry fee- $ 3.00. ONLY members of the CSCL in good standing as of April 1, 1982 may enter this competition. **************
[The rest of this page is a hand-lettered flyer on orange paper, boxed off from the typed notice above; read straight through, it reduces to noise. Set out below as it is lettered, capitals and all; the telephone number is printed here exactly as the flyer letters it.]
WORKSHOP ON - COST - T.B. ANNOUNCED.
"PHOTOGRAPHING CRAFTS"
WITH
RANDY BRINKMAN
DATE: SATURDAY MAY 29TH - 9:00 A.M. - 4:00 P.M.
*** BRING YOUR LUNCH - TEA/COFFEE PROVIDED
PLAN TO ATTEND - PLEASE LET YOUR BRANCH PRESIDENT KNOW IF YOU PLAN TO JOIN IN THIS SPECIAL EVENT BY MAY 20TH (MEMBERS AT LARGE PLEASE CONTACT GLADYS RIDDELL AT 762-7466 (EVENINGS))
PLACE: ST. MARTINS-IN-THE-FIELD CHURCH (see map)
[A hand-drawn map fills the lower third of the page, showing the church's location at Keele St. and Bloor St. N., between South Kingsway/Windermere (with the Seaway Motel marked) and Glenlake/Indian Grove/Dundas St., with the Bloor/Keele subway station and the route from Lakeshore Blvd./the Q.E.W. marked; a note reads "Keele St. & Parkside Dr. are the same st., with Keele the part north of Bloor." No further names.]