
An issue of the Society’s newsletter, transcribed from the original.
(8 pages, 1.3 MB)
the full-resolution scan, 19 MB, for close research
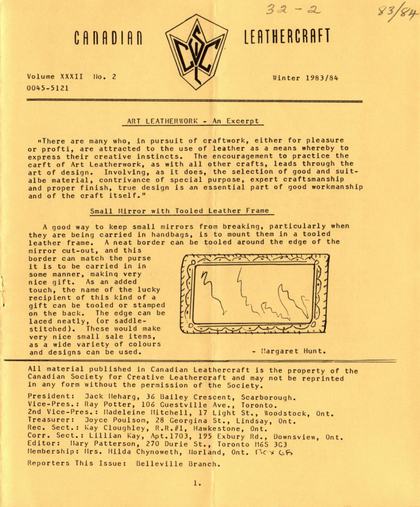
Page 1 — ART LEATHERWORK - An Excerpt
Canadian Leathercraft
Volume XXXII No. 2 Winter 1983/84
0045-5121
ART LEATHERWORK - An Excerpt
"There are many who, in pursuit of craftwork, either for pleasure or profti, are attracted to the use of leather as a means whereby to express their creative instincts. The encouragement to practice the carft of Art Leatherwork, as with all other crafts, leads through the art of design. Involving, as it does, the selection of good and suitalbe material, contrivance of special purpose, expert craftsmanship and proper finish, true design is an essential part of good workmanship and of the craft itself."
Small Mirror with Tooled Leather Frame
[A hand-drawn illustration of the finished piece — a rectangular mirror set in a tooled leather frame with a scalloped, dotted border — is printed beside the paragraph below.]
A good way to keep small mirrors from breaking, particularly when they are being carried in handbags, is to mount them in a tooled leather frame. A neat border can be tooled around the edge of the mirror cut-out, and this border can match the purse it is to be carried in in some manner, making very nice gift. As an added touch, the name of the lucky recipient of this kind of a gift can be tooled or stamped on the back. The edge can be laced neatly, (or saddle-stitched). These would make very nice small sale items, as a wide variety of colours and designs can be used. - Margaret Hunt.
All material published in Canadian Leathercraft is the property of the Canadian Society for Creative Leathercraft and may not be reprinted in any form without the permission of the Society.
President: Jack Meharg, 36 Bailey Crescent, Scarborough.
Vice-Pres.: Ray Potter, 106 Guestville Ave., Toronto.
2nd Vice-Pres.: Madeleine Mitchell, 17 Light St., Woodstock, Ont.
Treasurer: Joyce Poulsom, 28 Georgina St., Lindsay, Ont.
Rec. Sect.: Kay Cloughley, R.R.#1, Hawkestone, Ont.
Corr. Sect.: Lillian Kay, Apt.1703, 195 Exbury Rd., Downsview, Ont.
Editor: Mary Patterson, 270 Durie St., Toronto M6S 3G3
Membership: Mrs. Hilda Chynoweth, Norland, Ont.
Reporters This Issue: Belleville Branch.
[The masthead is printed one office to a line; set out here that way, which keeps "2nd" with the Vice-President's line rather than carrying it onto the next, so that Madeleine Mitchell reads as 2nd Vice-President and not a second "Vice-Pres." The Society's own typographical slips are kept as printed: "carft" for craft, "profti" for profit, "suitalbe" for suitable (hyphenated "suit-albe" across a line-end).]
Page 2 — SHOP HINTS
SHOP HINTS
If your mallet face has become badly dented from long, hard use, you will find that you have much better control and accuracy if you sandpaper it smooth and flat again. Rawhide mallets can be sanded just as nicely as wooden mallets, though with a little more odour! Keep one face of your mallet smooth for use when you are carving, and leave the other face as is for pounding lacing, chisels, drive punches, and stamping tools, etc. Margaret Hunt.
If you find that your arm gets very tired when using a wooden mallet, try switching to a rawhide one which has more return "bounce". This resilience means that you have to use energy to drive the mallet downwards, and the bounce of the rawhide will return the mallet UP. This upwards lift that you don't have to ask your muscles to do is the more tiring of the two parts of each mallet stroke. Another remark on this same subject is to remember to use the mallet with the END of the handle in your hand, as this ALSO adds to a natural, bouncing "return" of the mallet. Many people tend to hold a hammer up near the head, thus "choking" the motion. Just try the two different positions and you should be able to quickly feel the different. (This is particularly apparent for those of us who have worked in metals as a craft!)
Also, if you STILL feel muscle weary, check that your work table is not too high for you, as a driving force from a hammer should be DOWN, not above the waist, where the shoulder has to lift the arm up to an uncomfortable height. If you can't change your table height, just change the height of the seat that you sit on. A high stool will permit you to have more space to let the mallet face "drop" down on the work. Mary Patterson.
When using steel stamps, either letters or numbers, mark the front with red nail polish so that you can always pick them up with the markings in the right direction, instead of backwards or upside down.
Laura Bush.
Paper Patterns for odd shapes:
If you are planning to use another item, such as a wooden dish, etc. for a moulded dish, or if you are trying to fit the outside curves of of bottle to cover it in leather, you will often find that it is really impossible to measure the size of piece of leather that you will need. It would be simple to just place a damp piece of leather in place in a wooden bowl, or any such item, but the dampness might ruin the original. Try wrapping the original securely in Saran Wrap, (or moulding it down in the instance of a bowl). You can then either directly place the damp leather on it, OR place a soaking wet piece of brown wrapping paper over it from which to measure the pattern. This must be VERY wet as it is the surface tension created by the film of water that makes it adhere to the plastic wrap.
When covering a bottle, this wet paper pattern will make a perfect fit on the outside curves of a bottle, (and then the pattern piece of paper can be hang up to dry.) Keep the paper VERY wet, as it really helps the job. Be sure to check AFTER the paper is dry, for it will have shrunk a little through the process, as it is fibre, and all natural fibres tend to shrink. This way of pattern making will allow you to make some extremely complex curved patterns with a minimum of effort.
Mary Patterson.
[The page number at the foot reads "2.", not "26". The rest of the page matches the paper, including the Society's own slips "the outside curves of of bottle", "can be hang up to dry" and "quickly feel the different", all kept as printed.]
Page 3 — USE OF LEATHER - an excerpt; C.S.C.L. BRANCH PRESIDENTS - 1983-1984
USE OF LEATHER - an excerpt submitted by Margaret Hunt.
When primitive man began to use the skins of beasts as material for making additional protective covering for his own body, he certainly used rare judgement, and, when at a later stage the art of preparing and the curing of pelts slowly developed, a material was given to the world which, after untold ages, still remains the strongest flexible substance in common use.
The skill of the tanner is, indeed, orthy of admiration, for,. by treating the natural skins with oils, various chemicals, and vegetable agents, he produces at will a material having the hardness of metal and the softness of woven silk- ever aided in his work by the knowledge and experience of generations of craftsmen extending far into the past.
Truly, there is nothing like leather. Its' durability, strength and lightness, and the ease with which it can be cut and joined, make it an almost ideal substance for use for a thousand and one purposes.
The desire for ornamentation and adornment is almost as old as mankind, and it must have been very early in history that the decoration of dressed skins began to develop. Throughout the East, this art has been practiced from very early times, particularly almost the wandering tribes of Asia and northern Africa, who decorated their armour and harness with dyed wool and silk, enriched with precious stones. The art was introduced to Spain by the Moors during their occupation, and in this ocuntry it reached a very high standard of perfection. The Crusaders also brought back many of the methods of the Saracens, whilst modelled leather was introduced to the Venetians by Oriental merchants. The monks of the Middle Ages used modelled leather for binding their finely illuminated manuscripts, and a number of their beautiful specimens of work have come down to us, examples of which may be seen in the British Museum and other museums.
The important point to notice in connection with the various steps in development of this Art is that the treatment in each case was unique, and that all students of the craft should aim for similar originality. In dealing with leather you have a material which can be led, but not driven.
Firm, but gentle treatment, and much loving care and attention will be rewarded by the expression of your personal ideas in an article of lasting beauty, which is Art in its truest sense.
C.S.C.L. BRANCH PRESIDENTS - 1983-1984.
Barrie: Mrs. Kay Cloughley, R.R.#1, Hawkestone, Ont. L0L 1T0
Belleville: Mrs. Margaret Hunt, Box 4340, Trent Rd., S.S.10, Belleville, K8N 4Z3.
Norland: Mrs. Emma Windatt, Fenelon Falls, K0M 1N0.
Hamilton: Mrs. Ruth Haig, 264 Duke St., Apt. 401, Hamilton, L8P 1Y3.
Toronto: Mr. Ray Potter, 106 Guestville Ave., Toronto, M6N 4N6.
Woodstock: Mrs. Jean Pickering, 204 Elizabeth St., Thamesford, Ont. N0M 2N0.
Membership Chairman: We are indebted to Bea Austin for the many years of fine work that she contributed in this post, and welcome the help of Hilda Chynoweth, Box 68, Norland, Ont. K0M 2L0, who will be carrying on in this most important post.
[The Branch Presidents are printed one to a line, set out that way here and separated from the paragraph that follows them; Mrs. Jean Pickering's address is printed "204 Elizabeth St., Thamesford, Ont. N0M 2N0." Two further readings in the paragraph below: "\ie are indebted" is set out as "We are indebted" and "many years of Tine work" as "many years of fine work". The Society's own slips are kept as printed: "orthy of admiration" for worthy, "in this ocuntry" for country, "particularly almost the wandering tribes", and "For information, contacted Mrs. Chynoweth".]
For those who read our Canadian Leathercraft in local libraries, you are welcome to join in any local branch, or join as a Member-at-Large. For information, contacted Mrs. Chynoweth, or tel: 705-454-3206.
Page 4 — CLUTCH PURSE
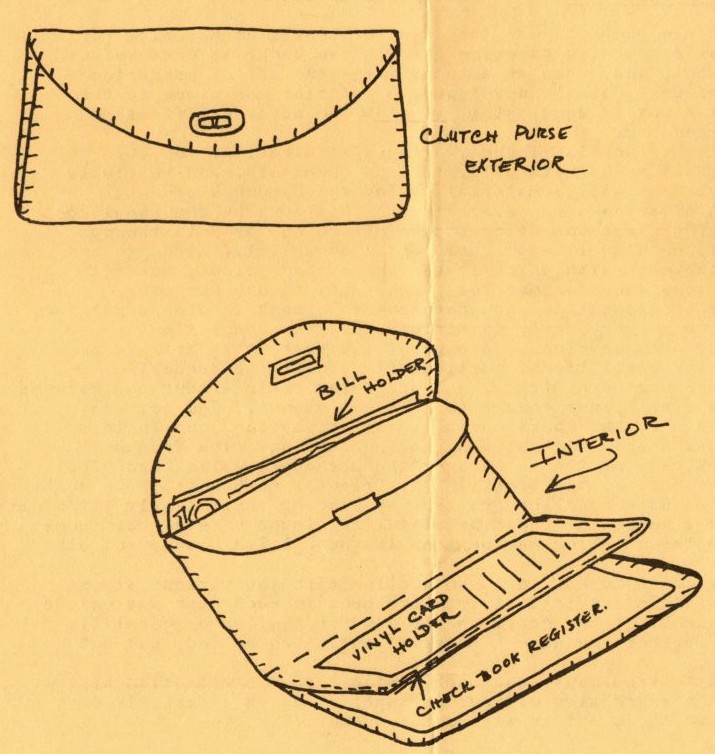
CLUTCH PURSE by Margaret Hunt.
[The typed prose below is set out as printed; the hand-lettered diagram labels beside it are transcribed from the original.]
Clutch Purse Exterior. Interior: Bill Holder, Vinyl Card Holder, Check Book Register.
Material List: Tooling hides. Morocco (any colour). Lining leather. Turnlock clasp. Bar snap. Extra lacing calf for whip stitching and running stitch. Lacing calf - 1/8" - 6 2/3 yds. for purse. Rubber cement. Vinyl card insert. Size 11 sewing machine needle. Sewing machine.
Note: This pattern is an adaptation of one from the magazine "Make It With Leather", which I have made. I didn't use the sewing machine stitching, as I preferred to use single whip stitching and running stitch. Belleville Branch has had a workshop using this pattern.
Margaret Hunt.
Page 5
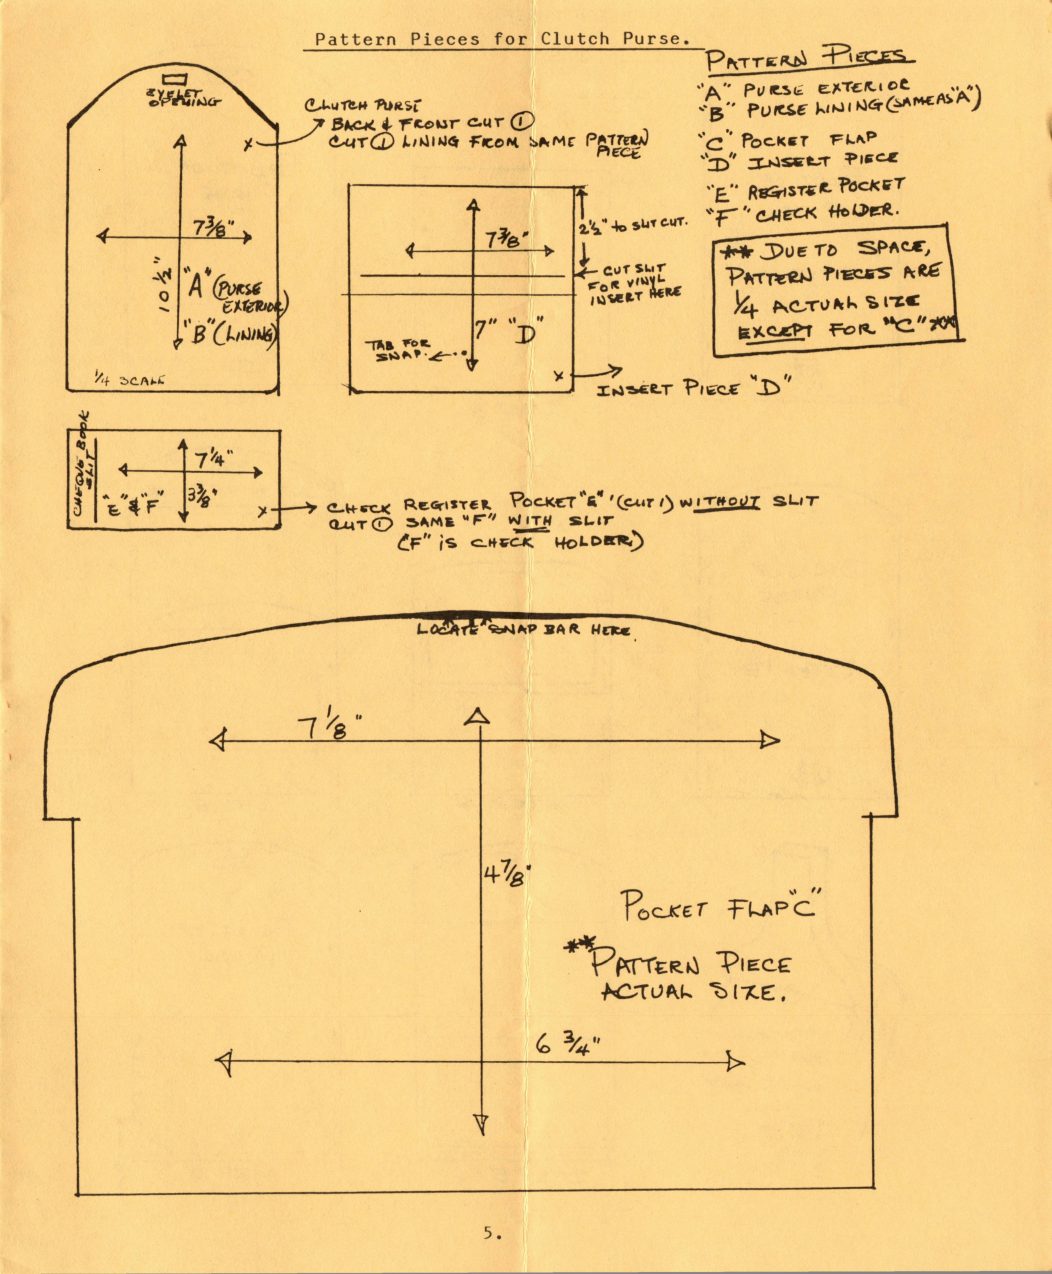
Pattern Pieces for Clutch Purse.
[This page is a hand-drawn pattern diagram, mostly numbers and short hand-lettered labels; transcribed below.]
PATTERN PIECES: "A" Purse Exterior. "B" Purse Lining (same as "A"). "C" Pocket Flap. "D" Insert Piece. "E" Register Pocket. "F" Check Holder.
** Due to space, pattern pieces are ¼ actual size, except for "C".
Piece "A" (Purse Exterior) / "B" (Lining): eyelet opening at top, 7⅜" wide, 10¼" tall. Clutch purse back & front cut 1; cut 1 lining from same pattern piece. ¼ scale.
Insert Piece "D": 7⅜" wide, 7" tall, 2½" to slit cut, cut slit for vinyl insert here, tab for snap.
Check Register Pocket "E" & "F": 7¼" wide, 3⅜" tall, cheque book slit. Check register pocket "E" (cut 1) without slit; cut 1 same "F" with slit ("F" is check holder).
Pocket Flap "C" — pattern piece actual size. 7⅛" wide across the top, 4⅞" to centre, 6¾" wide at base. Locate snap bar here.
Page 6
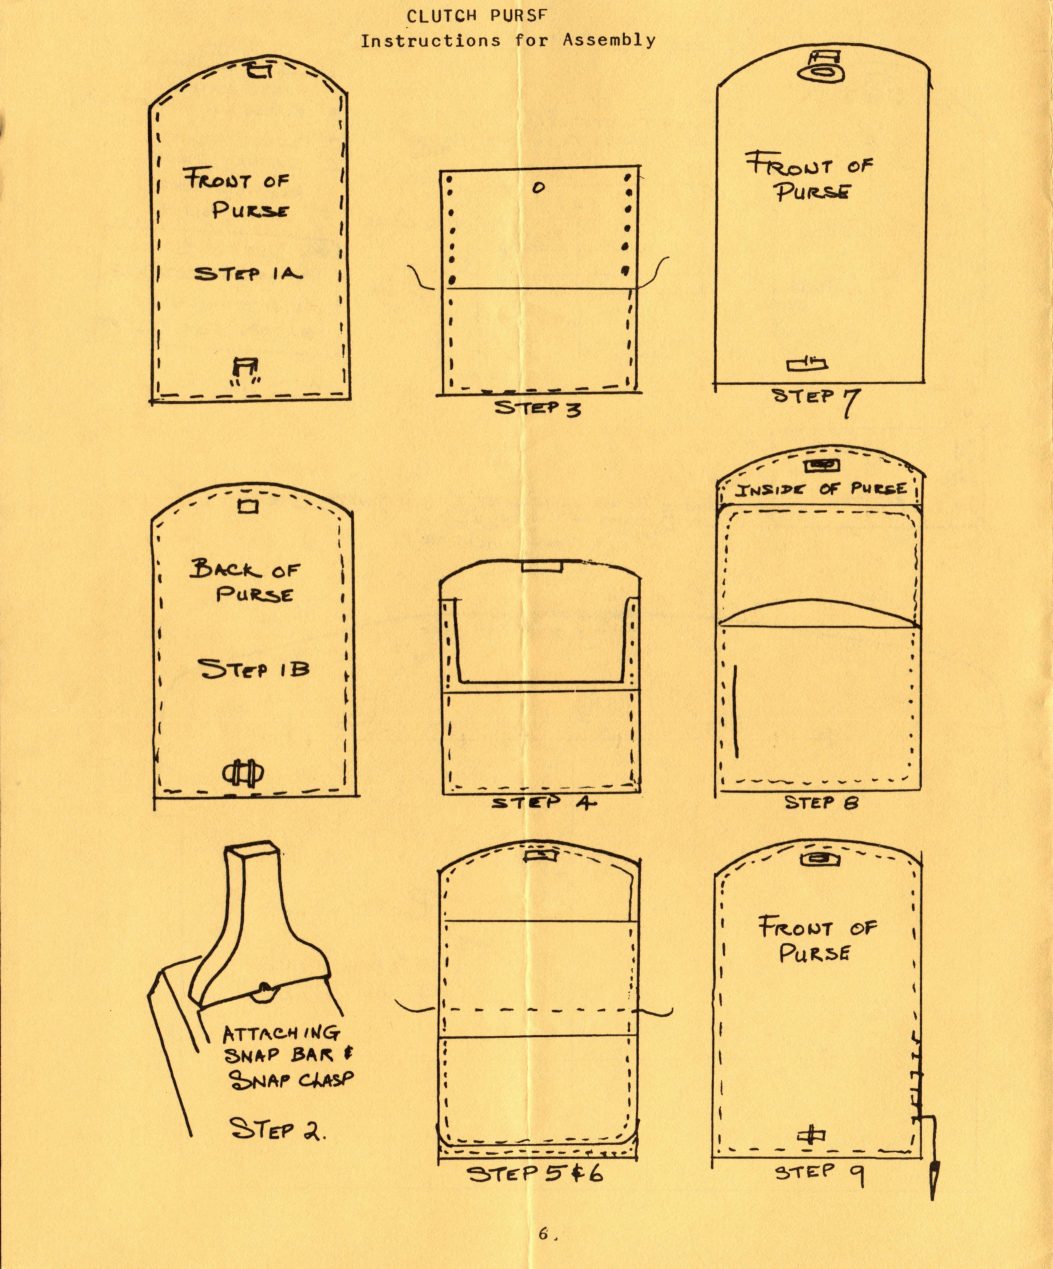
CLUTCH PURSE
Instructions for Assembly
[Nine-step assembly diagram, hand-lettered; transcribed below.]
Front of Purse — Step 1A. Back of Purse — Step 1B. Attaching Snap Bar & Snap Clasp — Step 2. Step 3. Step 4. Step 5 & 6. Front of Purse — Step 7. Inside of Purse — Step 8. Front of Purse — Step 9.
Page 7 — CRAFT FILM SERIES
Clutch Purse - Instructions
Step 1: Trace Patterns on leather and cut out with sharp knife and punch lacing holes. Tool or carve design if desired and punch holes. Punch holes in Back "A" for turnlock and turnlock prongs. Skive all pieces of leather where necessary.
Step 1A: Insert prongs of turnlock from grain side of Back "A", Step 1B: Turn Back "A" over and place the turnlock back plate over the prongs. Bend the prongs over by tapping with a mallet. Step 2: Attach snap bar to Pocket Flap"C" and snap clasp to Insert
Piece "D".
Step 3: Align check register Pocket Piece "E" with bottom of Insert
Piece "D", flesh sides together. (Stitch together along sides and bottom on sewing machine.) I sewed mine by hand using a single whip stitch along sides and bottom instead of machine stitching.
Step 4: Align top edge of Insert Piece "D" with notches on Pocket
Flap "C", with flesh sides together turn over and mark guidelines for glueing on Insert Pice "D" along the bottom edge of Pocket Flap "C". Apply rubber cement along edge of Pocket Flap "C" and glue in Insert Piece "D".
Step 5: Align last lacing hole on side of Pocket with 23rd lacing hole on sides of Lining "B". (Count up from bottom.) Stitch to Lining "B" by sewing machine. (I did it by hand.)
Step 6: Glue Lining "B" to Back "A",
Step 7: Cut away lining from inside for eyelet. Attach eyelet and eyelet back.
Step 8: Align check Holder Piece "F" with bottom of Back "A" and cement in place around edges.
Step 9: Lace around edges using single loop lacing stitch, catching in pocket sides.
Margaret Hunt
CRAFT FILM SERIES
[A stray mark before "potter" is left out here. The two March dates below are printed exactly as they stand: the Society gives the pre-emption and the resumption both as March 8th ("on March8"), which cannot both be right — the seven programmes it lists run Feb. 9, 16, 23 and March 8, 15, 22, 29, so the pre-empted week was almost certainly March 1st. Left as printed. "a second timeand" is also the paper's own.]
We trust that most leatherworkers have taken advantage of viewing the recent (continuing) CBC TV series of 7 programmes called Hand and Eye. Feb. 9th was"All That Glistens", a summary of gold, silver and precious stone work, followed On Feb. 16th by "Glorious Mud", the art of the potter. Weaving and other fibre art are portrayed on Feb. 23rd, and, after a programme pre-emption on March 8th, the series resumes on March8 with "Fire and Sand: The Mysteries of Glass". "Touch Wood" on March 15 covers the use of wood for a variety of uses from homes to musical instruments. March 22nd covers the art of sculpture and other large works of stone and metal, mainly commemorative works such as monuments, and is entitled "Against Oblivion". The final programme on March 29th will be "The Love of Gardens". We have been taping these programmes for viewing a second timeand they can be available to other CSCL members who may miss one or more of them, (Beta filming).
Page 8 — ELEPHANT BOOK MARK; UPCOMING C.S.C.L. EVENTS
ELEPHANT BOOK MARK by Laura Bush
[The head of this page is a hand-drawn pattern plate, hand-lettered; transcribed below.]
PATTERN PIECES: the elephant body, lettered "ELEPHANT (CUT 2)", with the eye marked as a filled dot, a dotted line showing where the heart-shaped saddle sits on the back, and the ear position marked "SEW EAR HERE"; a small tongue-shaped ear, "EAR CUT 2"; and a heart, "SADDLE CUT 2". Beside them is a drawing of the finished bookmark: the stuffed elephant with its ear and saddle sewn on and the ribbon running from the back seam up through the ring.
Material: A few scraps of 2 colours of felt, (or suede), plus a 12" or13" piece of 3/4" grosgrain ribbon, (or thin suede). A small bone or plastic ring, 2 tiny beads for eyes, cotton batting, and either crochet cotton (for sewing felt), or suitable leather sewing thread.
Method: Cut felt pieces using pattern, 2 each of elephant ears and saddle, with the saddle piece of contrasting colour. (Same method with suede or thin calf.) Overcast felt with crochet cotton, or with thread for suede, and sew each to each side of head at front, as marked on pattern. Sew eyes in place. Stitch or overcast the two body sections together, using some polyester stuffing as you go to plump out the body. Hinge the heart-shaped saddle pieces together at top with a few stitches, then tack to top of back, and underneaths the body. Either crochet over bone (plastic) ring with single crochet, or cover with scrap of leather glued in place. Ribbon or suede strip for page marker should be sewn into back seam as you go, and the other end is pulled through the ring, and fastened neatly.
WINTER'S END CRAFT SHOW
Queen Elizabth Building -CNE GROUNDS - TORONTO - Apr. 25-Apr.29
Hours: Wed. Apr. 25- 7:00 p.m. -10:00 p.m.
Thurs., Fri. & Sat. - Noon to 10:00 p.m.
Sunday Apr. 29 - Noon to 6:00 p.m.
UPCOMING C.S.C.L. EVENTS
ANNUAL MEETING of C.S.C.L. - APRIL 13 - APRIL 15th WOODSTOCK, ONT.
For details, registrations, map, etc., please see enclosed special folder. Reserve now for a fine week-end.
LEATHER '84 - BIENNIAL SHOW (JURIED)
SCARBOROUGH CITY CENTRE
OPENING: Thursday July 5th - 8:00 p.m.
PUBLIC VIEWING: July 6th to July 31st.
*** All C.S.C.L. members are eligible for entry
All entries must accompany pieces, and MUST BE RECEIVED NO LATER THAN MAY 25th, 1984.
.....PLEASE SEE ENCLOSED CALL FOR ENTRY FORM......
[The Winter’s End Craft Show hours are printed on separate lines under "Hours:" — Wed. Apr. 25, then Thurs., Fri. & Sat., then Sunday Apr. 29. The building is printed "Queen Elizabth Building", the Society’s own slip, kept as printed.]