
An issue of the Society’s newsletter, transcribed from the original.
(11 pages, 1.5 MB)
the full-resolution scan, 24 MB, for close research
Page 1
Canadian Leathercraft
Volume XXXVIII
NO. 2.
0045-5121
Winter 1989
TABLE OF CONTENTS
Page No.
Index 1.
Instructions for a Wet Molded Leather Pocket, Cliff McTavish - Mississauga Branch 2 - 5.
Leather - Back to Basics Course, Haliburton School of Fine Arts, Ruth Haig - Hamilton Branch 3.
David McPherson - Leathercrafter - Hamilton Branch, In an Article Called Leather by E. Harrison 6.
Christmas Pins, Betsy Rennie - Hamilton, Branch 8.
Weston Trophy Winners - 1957 to 1989 10.
1989-1990 Executive Council 12.
Entries in this contents list run to two or three typed lines where they name an author or a school, the continuation indented, and the page number is set at the right on the entry's last line. It is set out above in the page's own order and with its own numbers. The Executive Council is indexed to page 12, one sheet beyond the eleven this issue carries.
All material published in Canadian Leathercraft is the property of THE CANADIAN SOCIETY FOR CREATIVE LEATHERCRAFT and may not be reproduced in any form without the permission of the Society.
President: Ruth Haig, #401, 264 Duke St., Hamilton, Ont., L8P 1Y3.
1st Vice-Pres: Don Macleod, 2165 Corsair, Mississauga, Ont., L5A 2L7.
Treasurer: George McPhail, 3 Lambton Ave., Toronto, Ont. M6N 2S2.
Recording Sec: Muriel McKnight, 70 New St., Hamilton, Ont., L8P 4J4.
Corresponding Sec: Betsy Rennie, 1357 Baldwin St. Burlington, Ont., L7S 1K1.
Membership: Joyce Scruton, 212 Southview Rd. Oakville, Ont., L6K 2P4.
Editor: Audrey Gorton, 22 Redwing Rd., Hamilton, Ont., L9A 3Y9.
The masthead block (volume, issue number, ISSN, season/year) is set out here line by line and column by column as the page prints it. The Table of Contents gives the Index its own page number, "1.". The postal codes are as printed: President Ruth Haig's "L8P 1Y3", Treasurer George McPhail's "M6N 2S2". This issue predates the Society's later practice of withholding contact details, so officer addresses are kept exactly as printed.
Page 2 — Instructions for a Wet Molded Leather Pocket, Cliff McTavish - Mississauga Branch
INSTRUCTIONS FOR A WET MOLDED LEATHER POCKET
1. Apply rubber cement to working surface (x-ray plate).
2. When cement gets tacky, place wooden form in centre of working surface.
3. Remove one piece of cased leather from plastic bag. The leather will have to be dried until the moisture content is right.
4. Place leather flesh side up over form. The leather should overhang the top by 1/4" and the sides by 1-1/2". Holding leather in place, form leather over edges and down sides with a bone folder and fingers. The wrinkles that develop have to be compressed to lie smoothly against the form. With bone folder, crease the leather in at the 90 degree angle between form and working surface all the way around form. Large wrinkles will develop between crease and outside edge. Continue to smooth out wrinkles. The leather is now basically shaped. Remove leather from the form and apply rubber cement to the grain side of the leather from the crease to the outside edge. Place leather back on the form and work leather using fingers and bone folder to compress leather in tight against form. The rubber cement will hold the leather down but will still allow the leather to be compressed until it is smoother. When cement sets, the molded leather will be force dried with a hair dryer. When dry, the molded leather will be coated with contact cement and allowed to dry.
5. The x-ray plate stiffeners will be cut, sanded, glued together and stuck in place. Apply another coat of contact cement.
6. Dry second piece of cased leather until moisture content is right. Place leather grain side up over form & work leather as described earlier. When leather is molded to a basic shape, remove and coat flesh side with contact cement. Be careful not to get glue on the on the grain side. Place leather back over form & mold as before. With the glue still wet, you will have plenty of time to compress and mold leather. If leather is to be dyed do it now. When glue sets a little, the leather can be force dried with the hair dryer.
7. When leather is dry, the x-ray plate working surface can be pulled away. The rubber cement on the bottom leather should be removed, the top edge cut even with the mold and the shaped opening can be can be cut. The top edges should be finished and the baby dot stud and eyelet should be installed.
8. Glue the paper patterns to cardboard and cut out.
9. Using patterns for belt loop, back and flap, mark 6 oz. leather with scratch owl and cut out. Apply masking tape to the back of leather. If stamping, carving or dyeing, that should be done now. When dry remove tape.
10. Skive the belt loop 1/2" back from the flat to end. Mark stitching lines, gouge fold lines and do the edges.
11. Do the edges of flap and gouge fold lines. The flesh side of the back and belt loop should be dressed. Moisten the first gouge of flap and fold. Mark the position of the belt loop on the back. Glue and stitch the top of belt loop to the back. Moisten the gouged fold lines and shape over a piece of 8 oz. leather. Glue bottom rounded edge of belt loop and stitch.
12. Apply contact cement to edges of back and pocket. With the aid of waxed paper, line up edges and stick together, Wheel stitch marks around the crease of pocket. With wing dividers, mark another line 1/8" out from stitching line. Cut the excess leather away from packet on this line. With a stitching groover, mark stitching line on back. Stitch the back to pocket. Moisten second
[The twelve numbered steps of this project are printed with their numbers leading each one; this page carries steps 1-12, the last continuing onto page 3.]
Page 3 — Leather - Back to Basics Course, Haliburton School of Fine Arts, Ruth Haig - Hamilton Branch
gouge in flap and fold. Mark position of baby dot cap and socket by pressing leather onto the pocket stud. Punch a hole and instal instal cap and socket. Do the edges and finish.
Cliff McTavish,
Mississauga Branch.
HALIBURTON SCHOOL OF FINE ARTS
Leather — Back to Basics ___ INSTRUCTOR: Ruth Haig
DATES: — July 9—13
FEE: $76.00
Students attending this leather course will learn numerous techniques including lacing, tooling, modeling, embassing, saddle stitching and general construction. Two—three projects will be completed: a bookcover, a box and possibly if time allows a shoulder bag. Leather will be available for purchase at cost. RUTH HAIG teaches leather workshops throughout Ontario. Her work has been exhibited at the Hamilton Art Gallery Spec- Stator Gallery, Etobicoke Civic Centre Gallery and the Scarborough City Centre Gallery and has won many ribbons including the C.S.C.L. Guild, C.N.E. and ''Image '84''. Ruth is President of the Canadian Society. for Creative Leather Craft this year.
The original prints "embassing" for "embossing", kept exactly as printed.
This page continues step 12 from page 2. "Punch a hole and instal instal cap and socket" repeats "instal" exactly as printed — the Society's own typing slip, not a misreading here — and is kept as printed.
Page 4
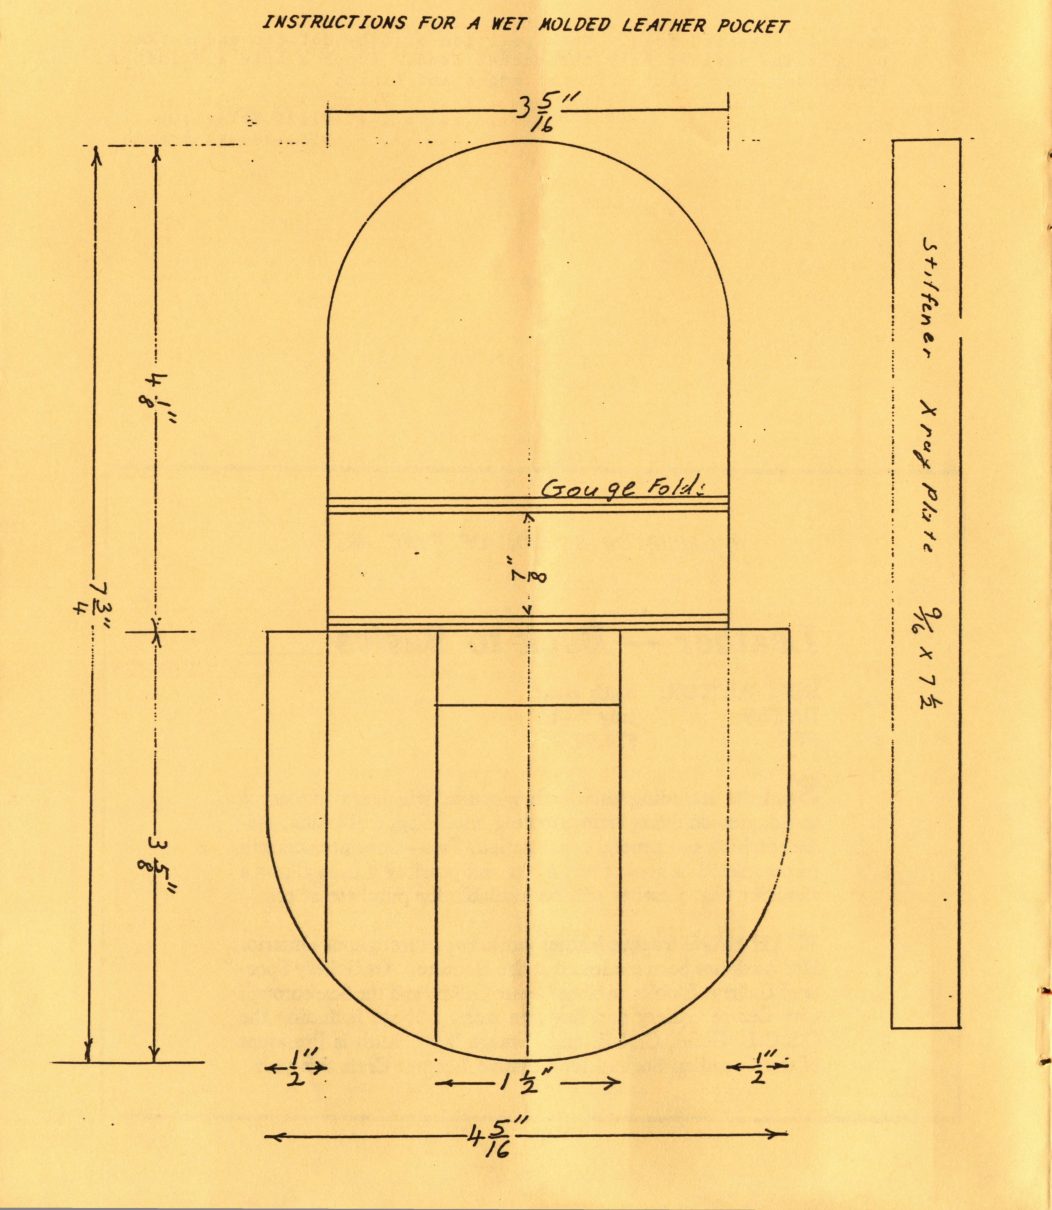
INSTRUCTIONS FOR A WET MOLDED LEATHER POCKET
Pattern for the main pocket body: a rounded-top outline 3 5/16" wide at the top curve, 4 5/16" wide at the base, 7¾" total height (4⅛" upper section, 3⅝" lower section), with two "Gouge Folds" marked ⅞" apart partway down, and ½" and 1½" reference marks at the base. A separate strip is marked "Stiffener X ray Plate, 9/16 x 7½".
This page had first come through only as scattered fragments ("is INSTRUCTIONS FOR A WET MOLDED LEATHER POCKET Ss Sl JF", "2 2") from a dense, dimensioned diagram; it is reread here in full. This is the main body pattern piece for the same project as the piece dimensions on page 5 of this issue (belt loop, stiffener plate, pocket cutting line); the diagram itself is not reproduced. No members are named on this page.
Page 5
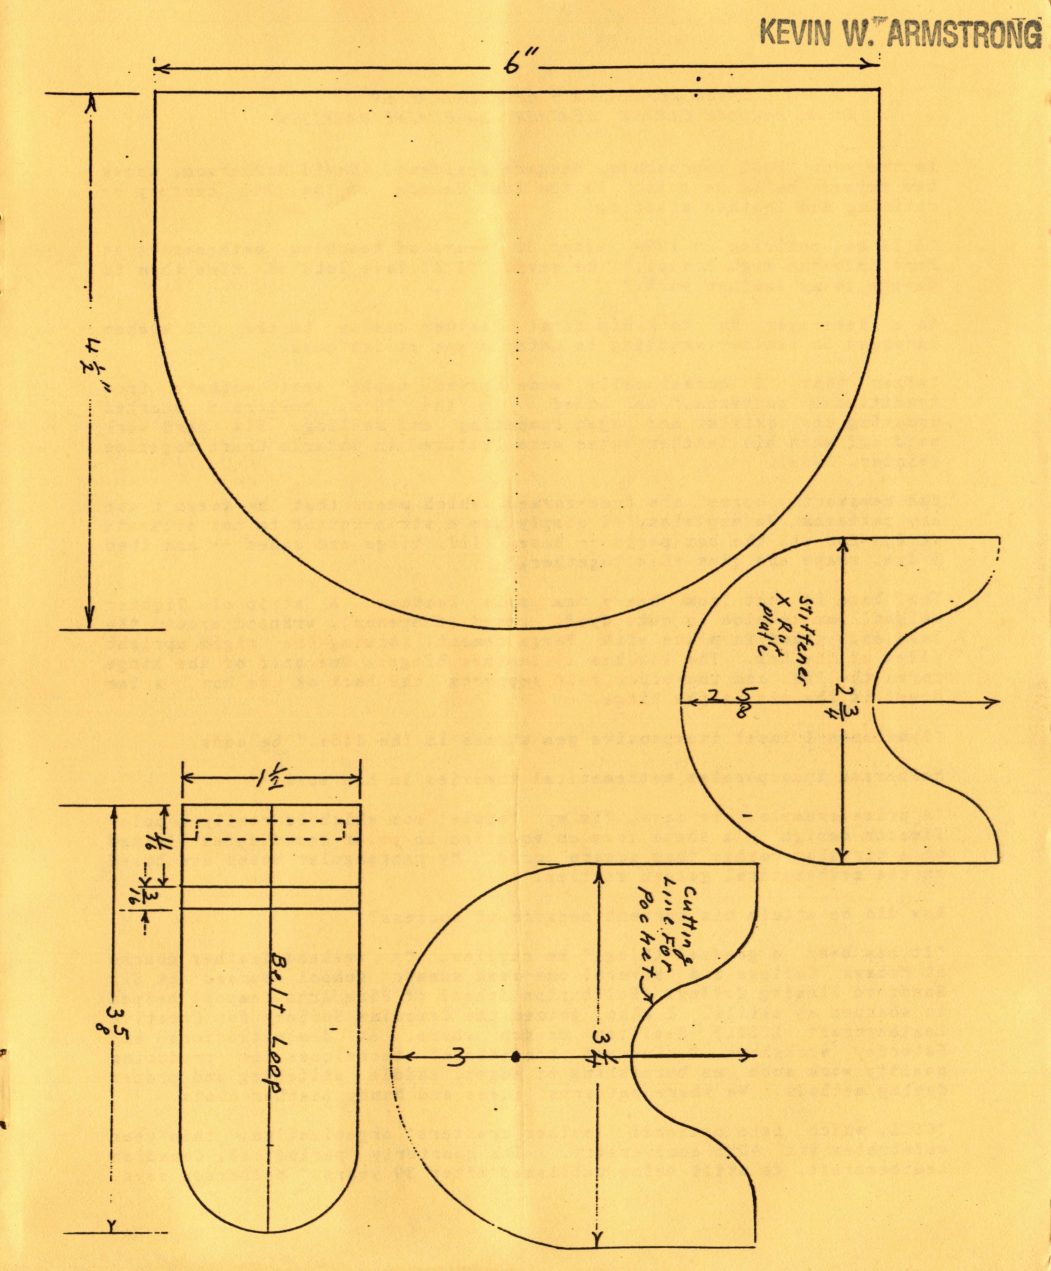
Pattern pieces for a wet-molded leather pocket: the main body piece (6" wide, 4½" deep, rounded bottom), a belt loop (1½" wide, 3⅝" long, with marks of 11/16" and 3/16"), a stiffener/rear plate (2⅝" across and 2¾" high), and a pocket piece with a cutting line for the pocket marked (3" across and 3¼" high).
This page had been passed over as an illustration with no text; it is in fact the pattern-piece diagram for the "Instructions for a Wet Molded Leather Pocket" project whose instructions are on pages 2-3 of this issue, with the main piece drawn on page 4, and its dimensions are transcribed here in full — the diagram itself is not reproduced.
Page 6 — David McPherson - Leathercrafter - Hamilton Branch, In an Article Called Leather by E. Harrison
DAVID McPHERSON - LEATHERCRAFTER In An Article Called "LEATHER" by ELAINE HARRISON
As the year 2000 approaches, Niagara resident, David McPherson, knows two things he'll be doing in the last decade of the 20th century -- retiring and leather crafting.
"I'll be retiring in 1994 after 30 years of teaching mathematics at Port Colborne High School," he says. "I'll have lots of time then to devote to my leather work."
As a teen-ager, he took his first leather course in the ''50's when interest in leather crafting in Ontario was at its peak.
"After that, I occasionally made carved maple leaf wallets from traditional patterns," he added. In the '70's, McPherson started updating his skills, and began competing and selling. His hard work paid off when his leather boxes were featured in Ontario Craft Magazine (Winter, 1989).
The newsworthy boxes are free-formed, which means that he doesn't use any patterns. He explains, "I simply use a strap-cutter to cut accurate strips for all the box parts -- base, lid, hinge and sides -- and then I dye, shape and glue them together."
The base is cut from heavy 6mm sole leather. A strip of lighter weight, 3mm cowhide is cut, dyed, cased (dampened), wrapped around the base and glued in place with Barge cement, forming the rigid upright sides of the box. The box has a leather hinge. One half of the hinge forms the lid, and the other half supports the back of the box. A 5mm dowel is the pin in the hinge.
"Sometimes I inset inexpensive gem stones in the lids," he adds.
McPherson incorporates mathematical theories in his work.
"A prime example,' he says, "is my 'apple' box which is really a polar limacon design -- a shape from an equation in polar coordinates plotted on a circular rather than square grid. My rectangular boxes are based on the mathematical golden section."
How did he attain his current measure of success?
"It has been a gradual thing," he replies. "A weekend leather course at Mohawk College and several one-week summer school courses at Sir Sandford Fleming College (Haliburton School of Fine Arts campus) helped to sharpen my skills. I also joined the Canadian Society for Creative Leathercraft (CSCL) Hamilton Branch where, at demonstrations and Saturday workshops, I learned traditional techniques for producing quality work such as burnishing of edges, saddle stitching and proper dyeing methods. We share patterns, ideas and handy leather hints.
"CSCL, which is a national leather crafters' organization, this year celebrates its 40th anniversary. Its quarterly periodical, Canadian Leathercraft, is still being published after 39 years," McPherson says.
Page 7
As a member of CSCL, the Niagara Guild of Crafts and the Ontario Crafts Council, this veteran leather artist competes in those shows and at the Canadian National Exhibition. His work has been catching the eye pf judges: His apple-shaped box one him the CSCL 1989 Irva Ford Award for best molded piece, and his rectangular boxes won him three ribbons in 1989 at the 39th Annual awards dinner, and the Best Functional Piece in Leather award in Haliburton. In recent years, his work has been featured in numerous provincial and national exhibtions, has also earned for him such prestigious recognition as the Tandy Leather Award, and an Ontario Crafts Council Design Award.
"Handcrafted leather goods now tend to have a plain unadorned look which emphasizes the leather itself. In the past, there was more ornate carving found on leather products," he reflects.
Leather is sometimes baked. To make leather bowls, he uses the cuir bouille technique which involves casing and shaping the leather and then baking it in a slow oven to harden it.
He said, "When making earrings and brooches, I enjoy experimenting with new designs. Recently a customer had me make a brooch which she designed with a religious symbol as a gift for a nun. It turned out well. Stoppered glass bottles which I cover with thin skiver leather make nice decorative urns, and maple leaf wallets are still popular gifts for mailing abroad."
He adds, "Although holly berry pins are a seasonal favourite, my work is available year-round from my home and at two galleries: Gallery on the Lake, Buckhorn, and at Ward & Eis (Gallery-by-the-Bay), Petoskey, Michigan."
McPherson, who was born March 26, 1937, on Kettle Creek near Port Stanley, says that leather -- man's oldest fabric -- feels nice to work with. "It doesn't take a hundred hours to complete an article either."
This Niagara Peninsula crafter's work provides him with a pleasant pastime and a stepping-stone to retirement. "I have an entire room now set aside for leather as a studio at our home in Port Colborne," he says. "The decade of the eighties was good for me because of Canadians' increased appreciation for handcrafted goods, including leather."
No doubt art lovers in the ''90's will continue to check artistic leather pieces for the "McPherson" inscription -- a hallmark of fine Niagara handiwork.
This article is typed verbatim from Vol. 3, Issue 2, (March 1990) of "50 AND OVER IN NIAGARA."
The page prints "national exhibtions", "His apple-shaped box one him the... Award" and "eye pf judges" — "one" for "won", "pf" for "of" — all kept as printed.
[The sheet carries small marks in its left margin.]
Page 8 — Christmas Pins, Betsy Rennie - Hamilton, Branch
CHRISTMAS PINS
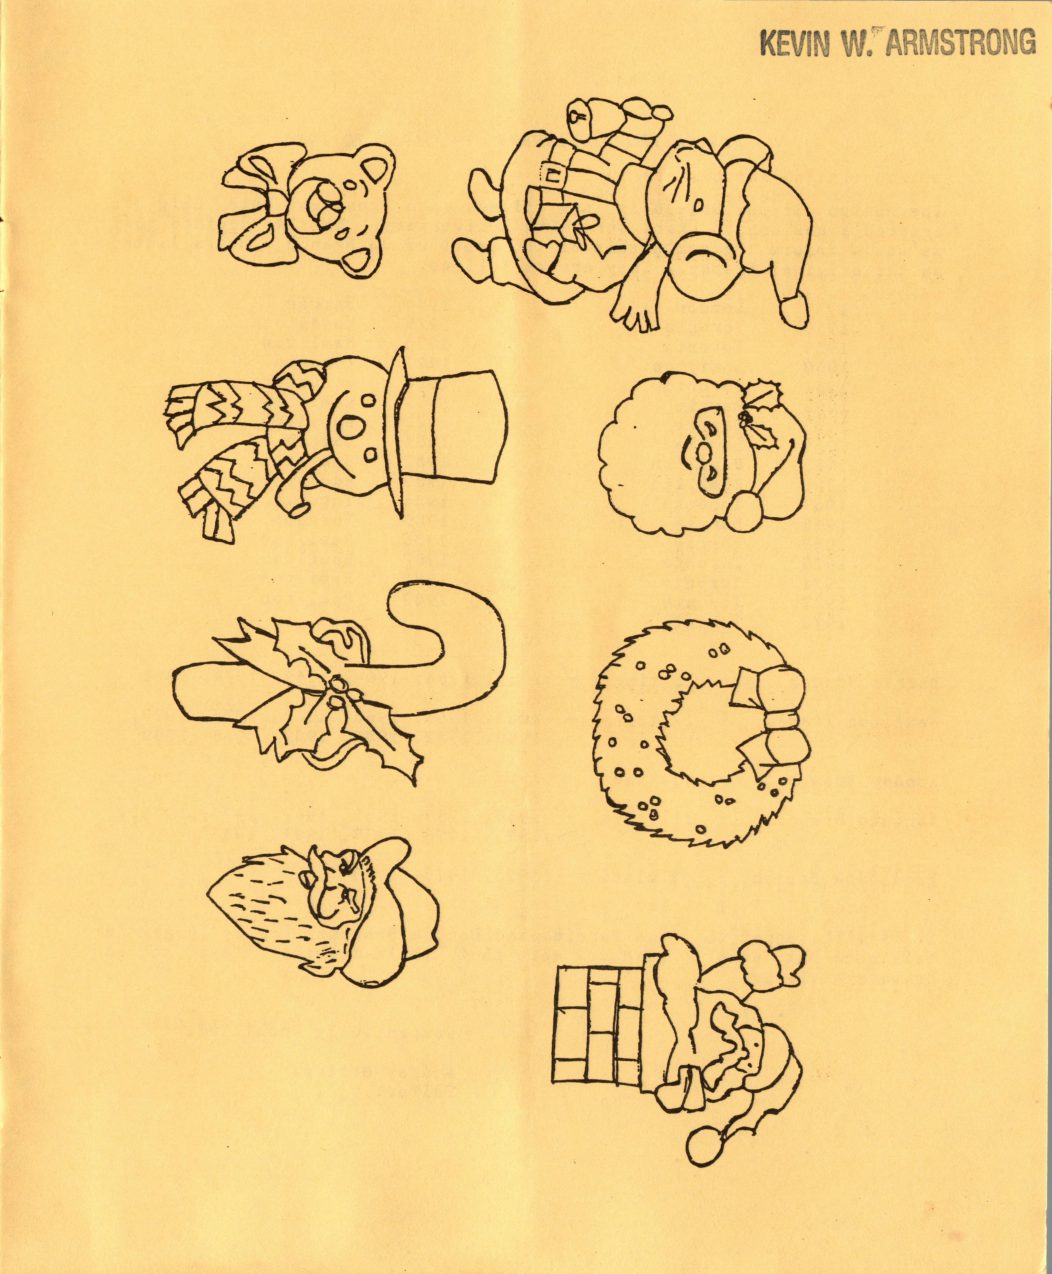
This is a small project that beginners can easily do and yet have a lot of fun making. These pins are also an idea for fall bazaars and craft sales. They have all the bright colours you see on decorations in the stores during the Christmas Season.
MATERIALS NEEDED:
| 3-4 oz. veg-tanned leather | Saddle Lac |
| 1" pin backs | Acrylic Paints |
| 5 Minute Epoxy Glue | Modeler or Stylus |
| X-Acto Knife or Scalpel Knife | Swivel Knife |
1. Trace patterns onto tracing film.
2. After wetting the leather in the usual manner, trace the pattern onto the leather using the pointed end of a modeler or stylus.
3. With your swivel knife, cut all the lines. The eyes and circles on the wreath and candy cane can be done with a small seeder.
4. Bevel all the lines except the whisker lines in the Santa Mouse.
5. With a modeler, draw in the wavy lines in the beards.
6. Now you can paint these pins to make them look attractive. For the candy cane do the white background before you paint the red lines on top.
7. When the paints dray, use the X-Acto Knife or Scalpel to cut each pin out. (Be careful of your fingers.)
8. Paint the edges using whatever colour that is corresponding to it.
9. When dry, use Saddle-Lac to spray the pins. This will give them a nice shine and protect the surface from wet weather.
10. Check the pin backs for rough edges. If they are rough, sand them with emery cloth.
11. When the Saddle-Lac is completely dry, mix the epoxy according to directions. Put the epoxy on a small piece of wax paper. Then with a tooth-pick spread a line about 1" x 1/4". Put the pin into place, then spread the epoxy over the pin back, covering the surface. I do about five pins at a time. Note: Make sure your pinbacks are open while you are gluing. This will help prevent accidental "welding" of the pin mechanism.
12. Let the epoxy dry for about an hour and then with an old paring knife, trim off any epoxy that might have gotten on the turning mechanism. Also, clean the epoxy off the part that goes through the clothing, if necessary.
These are just a few ideas for patterns that can be used. There are many more ideas on greeting cards, in colouring books or even on gift wrap.
Betsy Rennie,
Hamilton Branch.
The materials list and all twelve numbered steps match the print exactly, including "When the paints dray" (step 7), which is printed exactly so.
Page 9
Eight Christmas ornament or appliqué tracing patterns: a teddy bear with a bow, an elf or gnome figure, a snowman in a top hat and scarf, a holly-trimmed Santa face, a candy cane trimmed with holly and a bow, a wreath with a bow, Santa's head, and Santa emerging from a chimney.
This page had been passed over as an illustration with no text. It is a sheet of Christmas ornament patterns; there is no other text on the page.
Page 10 — Weston Trophy Winners - 1957 to 1989
WESTON TROPHY WINNERS -- 1957 TO 1989
The Weston Trophy Shield is now filled, and President Ruth Haig has ordered a new one to start our 40th Anniversary. We also decided that we would inform the membership of the previous 33 Branch winners listed on the original trophy. They are as follows:
| 1957 London | 1974 | Barrie |
| 1958 Toronto | 1975 | Woodstock |
| 1959 Toronto | 1976 | Hamilton |
| 1960 Hamilton | 1977 | Toronto |
| 1961 Toronto | 1978 | Woodstock |
| 1962 Barrie | 1979 | Hamilton |
| 1963 Barrie | 1980 | Hamilton |
| 1964 Barrie | 1981 | Barrie |
| 1965 Hamilton | 1982 | Hamilton |
| 1966 Hamilton | 1983 | Woodstock |
| 1967 Toronto | 1984 | Toronto |
| 1968 Barrie | 1985 | Toronto |
| 1969 Barrie | 1986 | Hamilton |
| 1970 Toronto | 1987 | Hamilton |
| 1971 Toronto | 1988 | Hamilton |
| 1972 Toronto | 1989 | Hamilton |
1973 Toronto
Barrie Branch - 6 times - 1963, 1963, 1964, 1969, 1974, 1981
Hamilton Branch - 12 times - 1960, 1965, 1966, 1968, 1976, 1979, 1980, 1982, 1986, 1987, 1988, 1989
London Branch - 1 time - 1957
Toronto Branch - 11 times - 1958, 1959, 1961, 1967, 1970, 1971, 1972, 1973, 1977, 1984, 1985
Woodstock Branch - 3 times - 1975, 1978, 1983
It is with regret that the Barrie and London Branches are no longer in existence but we are glad to note that their members stayed on as Members-At-Large.
Respectfully submitted,
Audrey Gorton,
Editor.
the branch totals (6+12+1+11+3 = 33) already matched the "33 Branch winners" stated above. Left exactly as printed, not corrected: Barrie's own list repeats "1963" twice, and Hamilton's list claims 1968, a year the table above assigns to Barrie. the table itself has Barrie winning 7 times (1962, 1963, 1964, 1968, 1969, 1974, 1981), one more than this summary's own count of 6 — the Society's 1989 tally and its own year-table disagree by one, and both are printed exactly as shown; neither is amended here.
Page 11
1989-1990 EXECUTIVE COUNCIL CANADIAN SOCIETY FOR CREATIVE LEATHERCRAFT OFFICERS.
| Past President | Madeleine Mitchell | (519) 537-7821 |
| President | Ruth Haig | (416) 525-0780 |
| 1st Vice President | Don Macleod | (416) 277-2058 |
| 2nd Vice President | ||
| Recording Secretary | Muriel McKnight | (416) 529-9149 |
| Corresponding Secretary | Betsy Rennie | (416) 639-0771 |
| Treasurer | George McPhail | No Telephone |
DIRECTORS.
| Kevin Armstrong | (416) 278-4666 |
| Bea Austin | (416) 522-8282 |
| Harold Brister | (416) 279-0333 |
| Fred Brown | (416) 626-3184 |
| Laura Bush | (613) 392-1475 |
| Audrey Gorton | (416) 389-9567 |
| Lillian Kay | (416) 241-0730 |
| Jessie Little | (416) 783-8603 |
| Lea Love | (416) 276-7340 |
| Jean Pickering | (519) 285-2518 |
| Gladys Riddell | (416) 762-7466 |
| Joyce Scruton | (416) 844-9471 |
| Helen Wheaton | (519) 432-0178 |
| Bruce White | (416) 755-4464 |
| Bill Whittingham | (416) 239-3743 |
EX-OFFICIO.
Chairman of the Council
| of Fellows | Dorothy Muma | (416) 654-5635 |
| Teaching Standards | Robert Muma | (416) 654-5635 |
| Archivist | Kevin Armstrong | (416) 278-4666 |
| Librarian | Rene Hackstetter | (416) 535-8509 |
| Editor | Audrey Gorton | (416) 389-9567 |
BRANCH PRESIDENTS.
| Hamilton | Muriel McKnight | (416) 529-9149 |
| Mississauga | Don Macleod | (416) 277-2058 |
| Norland | Hilda Chynoweth | (705) 545-3206 |
| Toronto | Rene Hackstetter | (416) 535-8509 |
| Woodstock | Madeleine Mitchell | (519) 537-7821 |
The gap after "Fred Brown" in the Directors table is blank paper crossed by a fold crease, and nothing is set there. This table and the Officers table above it, and the Ex-Officio and Branch Presidents tables below it, match the print exactly, including the blank 2nd Vice President row and "No Telephone" for George McPhail. This 1989 issue predates the Society's later practice of withholding contact details, so every number here is published as printed.