
An issue of the Society’s newsletter, transcribed from the original.
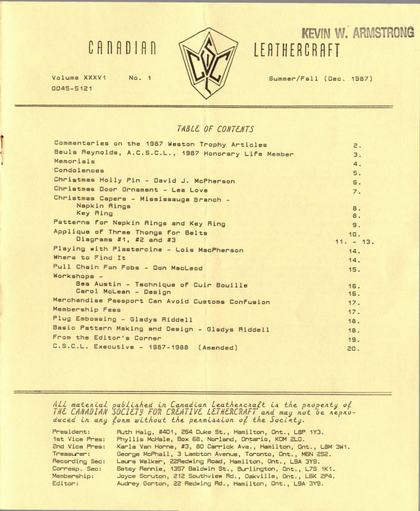
(20 pages, 2.7 MB)
the full-resolution scan, 47 MB, for close research
Page 1
Canadian Leathercraft
Volume XXXVI No. 14 Summer/Fall (Dec. 1987) 0045-5121
TABLE OF CONTENTS
Commentaries on the 1987 Weston Trophy Articles 2.
Beula Reynolds, A.C.S.C.L., 1987 Honorary Life Member 3.
Memorials 4.
Condolences 5.
Christmas Holly Pin - David J. McPherson 6.
Christmas Door Ornament - Lea Love 7.
Christmas Capers - Mississauga Branch - Napkin Rings 8.
Christmas Capers - Mississauga Branch - Key Ring 8.
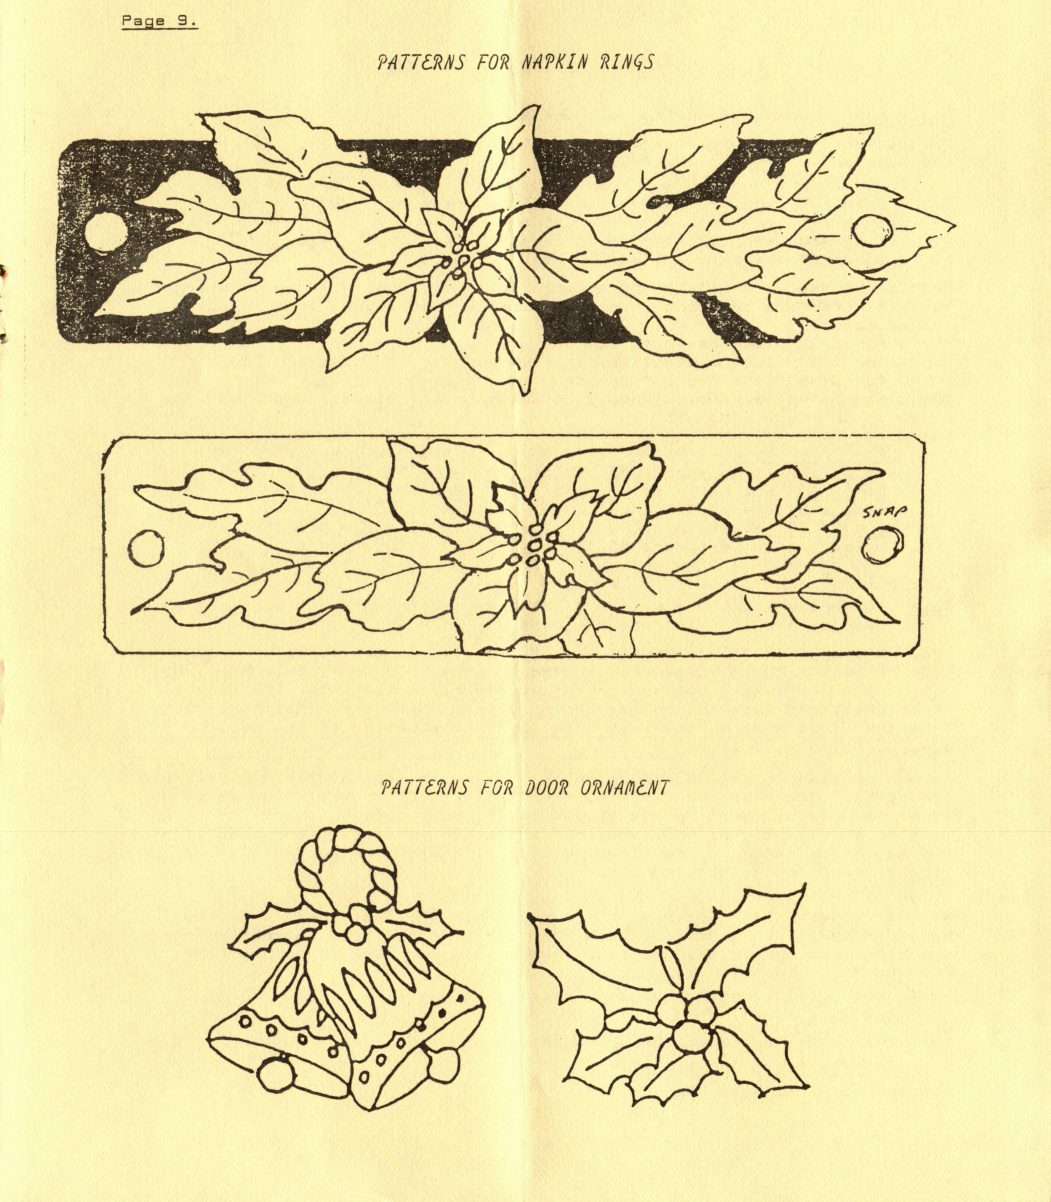
Patterns for Napkin Rings and Key Ring 9.
Applique of Three Thongs for Belts 10.
Diagrams #1, #2 and #3 11. - 13.
Playing with Plastercine - Lois MacPherson 14.
Where to Find It 14.
Pull Chain Fan Fobs - Don MacLeod 15.
Workshops - Bea Austin - Technique of Cuir Bouille 16.
Workshops - Carol McLean - Design 16.
Merchandise Passport Can Avoid Customs Confusion 17.
Membership Fees 17.
Plug Embossing - Gladys Riddell 18.
Basic Pattern Making and Design - Gladys Riddell 18.
From the Editor's Corner 19.
C.S.C.L. Executive - 1987-1988 (Amended) 20.
This contents list is printed one item to a line with its page number at the right. It is set out above in that form, matching the page's own order and numbers.
All material published in Canadian Leathercraft is the property of The Canadian Society for Creative Lethercraft and may not be reproduced in any form without the permission of the Society.
President: Ruth Haig, #401, 264 Duke St., Hamilton, Ont., L8P 1Y3.
1st Vice Pres: Phyllis McHale, Box 68, Norland, Ontario, K0M 2L0. 2nd Vice Pres: Karla Van Horne, #3, 80 Carrick Ave., Hamilton, Ont., L8M 3W1.
Treasurer: George McPhail, 3 Lambton Avenue, Toronto, Ont., M6N 2S2. Recording Sec: Laura Walker, 22 Redwing Road, Hamilton, Ont., L9A 3Y9. Corresp. Sec: Betsy Rennie, 1357 Baldwin St., Burlington, Ont., L7S 1K1. Membership: Joyce Scruton, 212 Southview Rd., Oakville, Ont., L6K 2P4. Editor: Audrey Gorton, 22 Redwing Rd., Hamilton, Ont., L9A 3Y9.
Page 2 — Commentaries on the 1987 Weston Trophy Articles
The judging notes for the 1987 Weston Trophy number five entries under each of Hamilton, Toronto and Woodstock, 1 through 5; every numeral and the heading “Toronto.” print clearly. “might mave made” in Ruth Haig’s entry is printed so.
COMMENTARIES ON THE 1987 WESTON TROPHY ARTICLES
At the time the last bulletin went to press, the commentaries for the Five pieces each the Hamilton, Toronto and Woodstock entered in competition for the Weston Trophy were not available. The following are the judges' comments.
Hamilton. 1. Bea Austin - Small Basket
Pleasing to the sight. An excellent dye job and an excellent project. (Suggestion: alternative handle).
2. Dave McPherson - Small Box
An excellent job of colouring. The lid stays open or shut. Good rectangular shape. The negative panel on the lid is Slightly askew. This may be due to slight warp on lid.
3. Ruth Haig - Covered Bottle
Excellent workmanship. Fine dye job and professional work On cap. The applique might mave made more of a contrast.
4. Address Book - Karla Van Horne
Excellent saddle stitching. Good design. Pockets not useful, not efficient. Spine binding too rigid. It would be difficult to use it for the purpose for which it was designed.
5. Geometric Album Cover - Betsy Rennie
We like the strong boards necessary in an article which will have a great deal of use. A good dye job and excellent stitching. A pleasing design. Negative pattern not quite straight.
Toronto. 1. Jack Meharg - Clock
A rather unique design. Pendulum adds to the project as does the use of black with copper. Lamination needs more sanding and Filling (heel ball).
2. Jessie Little - Clock
Unique design. Edges well finished. Well co-ordinated colour wise.
3. Mary Patterson - Pendant
Nice use of metal and leather showing good proportion. Tooling could have been deeper.
4. Lillian Kay - Blue Jay
A good colour job. It should be more apparent that it is leather.
5. Margaret LaChappelle - Card Case
Here we have a utilitarian card case. There seems to be some difficulty in closure.
Page 3 — Beula Reynolds, A.C.S.C.L., 1987 Honorary Life Member
The judging notes continue the numbered run of five entries begun on the previous page; every numeral prints clearly, as does Carol McLean’s name (already printed with a capital L) and the year “1987” at the head of the honorary life member notice. Nothing on this page needed restoring.
COMMENTARIES - Continued
Woodstock. 1. Carol McLean - Box
Here we have a different concept of box construction which is very pleasing. Lid teeters a little (corner to corner).
2. Jean Pickering - Carved Writing Case
Excellent saddle stitching. It gives a feeling of pleasure when picked up. Two-tone effect was questionned. Would it have been more effective in one colour? Flap is a little Stiff. This will be remedied by use.
3. Loreen Manuel - Red Note Book
Flexible. Excellent work. A very fine project. The tooling might have been a little deeper.
4. Madeleine Mitchell - Desk Set
This is another project very pleasing to the eye. An excellent design. The suitability of suede was questionned.
5. Beula Reynolds - Cuir Bouille Jug
Well proportioned and original. A very good colour choice. Saddle stitching on the handle might be improved.
BEULA REYNOLDS A.C.S.C.L.
1987 HONORARY LIFE MEMBER
Ever since I have known Beula Reynolds, about 12 years,I've never known her to be without a project underway. Projects for Beula are often beautiful leather articles that are carefully Planned and executed with a carftsman's skill, and perhaps, completed in the wee hours of the morning before the judging. Many of these pieces have ended up with Craftsman or Salon ribbons.
Beula's other projects may include offering a helping hand to a novice leather worker, or promoting the C.S.C.L. with unparallelled support. Through the years of her membership, Beula has held a good number of C.S.C.L. Executive positions, including President. In 1987, she chaired the Nominating Committee and is currently President of the Woodstock Branch.
Beula has pursued her interests in leather craft by taking classes with many well-known C.S.C.L. Fellows -- Fred Brown, Jean Hunter, Irva Ford, Robert Muma -- just to name a few. She joined C.S.C.L. in the mid-60's and became an Associate member in 1970.
The Woodstock Branch has benefitted from Beula's generosity and kindness in many ways. She has organizaed and taught at many branch workshops, sharing her skills and time, and she has opened her home for demonstrations, meetings and workshops.
Beula's other interests extend to family, Friends, and nature, but I Suspect there will always be a special affection in her heart For the C.S.C.L. and its members.
Madeleine Mitchell
Page 4 — Memorials
MEMORIALS
The Passing of Irene Lane.
It is with sadness that the Hamilton Leathercraft Guild reports the passing of Irene Lane on August 16, 1987.
Irene had been a member of the Hamilton Guild for many, many years, accompanying Betty Henstridge, who also passed away several years ago. Both Irene and Betty were well known to many in C.S.C.L. Irene had a wonderful sense of humour, and was a real "giver" rather than a "receiver".
She had the distinction of completing 54 years of service with Eatons. Following her official retirement, she worked in her same position part time.
She will be greatly missed by: her co-workers at Eatons, her family, her church and her many friends.
In Memoriam - Clara Cavanaugh.
While not a charter member of C.S.C.L. which began in Toronto in 1951, Clara Cavanaugh was impressed by the leather work that was being done at that time. Her interest in leather led her to travel by bus from Barrie to the city to take lessons from such teachers as Bob Muma and Don MacKinnon.
She became a member of C.S.C.L. in 1953 and had already begun her long Career as a leather teacher. She and her pupils formed the nucleus of the Barrie Branch of C.S.C.L. She became an Associate of the Society in 1953 and went on to become a Fellow in 1955. Over the years she served Faithfully and well on the Executive Council and also as President of the Council of Fellows.
As a Fellow, one is expected to emphasize original design and patterns and this was always one of Clara's strengths. She often used unique designs featuring the flowers and birds of Canada in her work.
Over the years Clara's leather work has been recognized by C.S.C.L. and other prestigious organizations by the presentation of prizes and awards. While she appreciated the recognition of her work, Clara took even more pleasure in the achievements of her pupils. She strove to instill in us the standards of C.S.C.L. and an appreciation of a well Finished article.
During the past four years she had little use of her right hand due to Pain in her thumb, however, it was remarkable what she could accomplish with her left hand. Her husband Ken had been a great help to her over this trying time.
She had hoped to be able to write to the many friends who sent her cards and letters and those who visited her at home or in hospital, and sent flowers and other gifts. She appreciated the Frequent visits of Olivia Smith while she was in hospital in Toronto and the calls to her daughter Helen to ask about her recovery.
In Clara we have lost a superior crafts person, an excellent teacher, and a good friend.
Page 5 — Condolences
MEMORIALS
A Tribute to Olivia Smith.
It is a time to remember Olivia Smith although she is no longer with us.
Her Irish wit and keen understanding of human nature endeared her to many Friends and to her family. She still met regularly with friends of C.P.R. days.
A multi-talented person, Olivia studied not only elocution but had a deep appreciation of music.
Olivia had her Fellowship standing in C.S.C.L. and was a staunch supporter or C.S.C.L. and what it stood for. She was never hesitant to take a stand.
I think Olivia was like the artist who said "that nothing is ordinary if you know how to use it". She was not a dabbler in crafts and certainly had the talent and perseverance to take ordinary materials, such as a piece of leather, a sheet of copper or silver, or a lump of Clay, and form these with planning and patience. She did create many things of beauty.
We have seen Olivia's beautiful trays, boxes, belts and coasters to name only a Few. We have marvelled at the beautiful Finish. When asked how she obtained that patina, Olivia would answer with a chuckle, "Oh, just spit and polish".
Olivia was a sharing crafts person and over the years did many demonstrations. Help and advice was always readily available to the individual crafts person.
Although unable to work at her craft during the latter years, she was at our meetings and her advice was highly valued.
Her church held a special place in her life and her wonderful faith Carried her through many trying times.
Now we speak of a suitable memorial to Olivia. She left a rich legacy to those of us who are willing to claim it. It is to be hoped that some of her dedication will rub off on us. What we fail to use we lose. I suggest that we could best honour Olivia by our works rather than our words and a re-dedication to C.S.C.L.
"To improve the golden moment of opportunity and catch the good that is within our reach -- is the great art of life". Samuel Johnson.
Jessie Little
Condolences.
Condolences are also offered to Joyce Scruton and Muriel McKnight on the loss of their husbands, and Hilda Newitt on the loss of her mother.
Page 6 — Christmas Holly Pin - David J. McPherson
Christmas HOLLY PIN
Matenialsa 7-8 ounce cowhide (1" x2-3/8'') green dye (I dilute Fiebings - with alcohol) red acrylic black acrylic 1-1/4" pin back 3/4" circle of skiver polish coat
Tools 3/4" punch and mallet swivel knife knife #6 rotary punch edge beveler brushes for dyes and acrylics barge cement, white glue burnishing tools
Diagram
Pr red berries
- use 3/4" punch to cut four part circles out of. each side of the 1' x 2-3/8" piece as in diagram. Use a knife to better shape points and stem of leaf. Edge bevel all back edges. Dampen. Burnish back and edges. Use swivel knife to cut centre vein and three curved views on each side. A blade that has been filed to make deep wide cuts makes veins show well. Shape the leaf turning up points and stem by hand. Let dry.
- cut three holes in left-over part circles with #6 punch and save the cut-outs. Paint them with red acrylic (diluted with water) on top and sides. Let dry.
- dye leaf green on top and edges. The colour on the back does not matter. Let dry.
- glue on three red berries near the stem of leaf with white glue. Use barge cement to put pin back on, and secure it with the circle of skiver over the base of the pin back. Trim skiver where necessary.
- paint over the back of the pin, and edges if desired with black acrylic (diluted with water). Burnish down any sharp edges on the back. Let dry.
- apply polish coat, let dry, and polish three times.
- HAVE A HAPPY CHRISTMAS.
The signature below is set in script and prints clearly as David J. McPherson, matching the credit on the contents page; nothing on this page needed restoring.
David J. McPherson
[A stray underscore is not part of the printed text: "tools Diagram Pr _red berries -" is set out here as "tools Diagram Pr red berries -".]
Page 7 — Christmas Door Ornament - Lea Love
CHRISTMAS DOOR ORNAMENT
1. Cut piece of 2-3 oz. leather 2-1/2" x 24"
2. Mark centre line down leather
3. Round top and bottom or shape as desired.
4. Mark first hole 1-1/2" from top.
5. Mark second hole 1-1/2" from first hole.
6. Mark third hole 3/8" from second hole.
7. Continue down leather marking holes as per Nos. 5 and 6.
8. Your last hole should be 3-1/2" from the bottom.
9. You should now have space for one bell cluster and seven holly clusters.
10. Trace and carve the bell cluster placing the centre of the cluster on the first hole. Holly clusters should be ± 1/4" above hole.
11. Finish back with lining, if you wish.
12. Finish edges and ribbon piece as desired and stain bell and holly clusters to your taste.
13. In the centre of the bell cluster above the holly, place grommet to hang on door. You might consider placing grommet above the ball cluster.
14. Punch holes.
15. Lace bells to project.
16. Cement lacing to back at the top and bottom to hold everything in place.
These instructions are per a sample made by Lea Love. The original design came from a Pennsylvania Dutch tole painter and was adapted to leather.
Page 8 — Christmas Capers - Mississauga Branch - Napkin Rings; Christmas Capers - Mississauga Branch - Key Ring
CHRISTMAS CAPERS
Often it is not the "main" gifts that are difficult to find at Christmas, but those little extras -- stocking stuffers, friendship or hostess gifts -- that cause the headaches. The following small projects, festive Christmas napkin rings & an "easy to-find-at-the bottom-of-a-purse" key ring, might Fill you bill.
NAPKIN RINGS: (3 ounce Leather/
See pattern suggestions on separate page.
These can be dyed or painted, lined or slicked smooth on the flesh side. Since they are used for such a short period each year, the snap closure Facilitates easy storage and they will fit nicely into a small package For gift-giving. You might want to place the snap closures on "hidden" tabs, glued to the flesh side and coming flush with the edges. The holders can, of course, be glued or stitched closed, if you wish. Ad- Just the length to suit your purpose.
If you decide to cut the floral pattern out, with no "strip" you may have to add a leaf at either or both ends of the pattern. If you use a hidden tab closure, you may have to shorten the strip a little. Size must also be adjusted upward for bulky napkins.
KEY RING:
1. Measure three strands of lacing, twice as long as you need and fold them over to form six even strands. (Suede lace Strips are ideal for this type of beadwork). e. Loop-knot the strands over the ring.
Pull taut and thread all the strands through the concho of your choice. a Push one bead on the first two strands, one on the middle two strands and one on the last two strands. Push all three beads up to 1/2" from concho.
4. Push one bead on second and third strands and one bead on the fourth and Fifth strands. Push both up to about 1/2"" From the first three beads.
5. Repeat Steps 3 and 4 and then Step 3 again. You will have 5 rows of beads.
6. Continue, or stop when you wish, depending on the length of the "tail" you want for your key ring.
Mississauga Branch
Page 9 — Patterns for Napkin Rings and Key Ring
PATTERNS FOR NAPKIN RINGS
[This page is a plate of pattern drawings, described here in words rather than reproduced stroke for stroke. No names or captions print on the page beyond the two headings below.]
Two poinsettia napkin-ring patterns (one on a dark ground, one on light, the second marked "SNAP").
PATTERNS FOR DOOR ORNAMENT
A holly-and-bell ornament and a holly-and-berries ornament.
Page 10 — Applique of Three Thongs for Belts
APPLIQUE OF THREE THRONGS FOR BELTS
Reference: Leather Braiding by Bruce Grant.
A belt made from these instructions will be a braided belt. To braid the belt you will need the following:
1. Three lacing needles any type. (Suggestion: Life-Eye Needles). e. A spool of genuine leather lace. (See motes re lace). 3. One belt strip, minimum 1-1/4" wide. 4. Lacing fid used to enlarger and shape holes for lacing. S. Diagram of the belt. (See diagrams 2 and 3).
Each of the holes are 1/2" apart for 3/32" lace, but this can be changed to suit different belt and lace widths. The hole sizes for the lacing are as Follows:
- for 3/32" lace use a #0 punch
- for 1/8" lace use a #1 punch
- for 3/16" lace use a #2 punch
The distance between holes should be about 5 to 7 times longer than the width of the lace used.
Examples -
- for 3/32" lace -- 3/32" x 5 = 15/32"; 3/32" x 7 = 1/2". The holes should be spaced 15/32" to 1/2" - (use 1/2").
- For 1/8" lace -- 1/8" x 5 = 5/8"; 1/8 x 7 = 7/8". The holes should be spaced 5/8" to 7/8" - (use 3/4").
- for 3/16" lace -- 3/16" x 5 = 15/15"; 3/16 x 7 = 1/5/16". The holes should be spaced 15/16" to 1-5/16" - (use 1-1/4").
Making the Belt.
Note: Diagrams 2 and 3 are from 3/32" lace but changes to lacing holes can be made for different widths.
Measure and punch all holes for lacing. Do all measurements on grain »Side of belt. Punch holes From the grain side. To draw lines the length of the belt use a compass or adjustable dividers. Find the centre of the belt and mark the centre lacing holes. Mark the outside holes From the first hole to the last hole. Mark the centre of the belt. Mark you 1/8" border.
Take a compass or adjustable dividers and set it to the distance between the holes. Start at the first outside lacing hole and walk the compass or adjustable dividers to the middle of the belt. There should be marks left on this line. Do the same from the other side using the same line. Now match the marks on the first outside line with the second outside line by whatever method you choose.
Punch out the holes.
With a rampart of adjustable "V" gouge, gouge the leather between the holes on the Flesh side. Do this the length of the belt but not across the belt. Make sure the gouge is deep enough and wide enough for the lace used. This will give you a groove for your lace.
Tool your outside border whatever pattern you want.
Dye your belt.
Lace the belt. Use instructions supplied on diagram #1. Line your belt.
Now you have finished your belt.
Page 11 — Diagrams #1, #2 and #3
[This page is a dense step-by-step lacing diagram, numbering each step by hole (A, B or C plus a number) and an over-or-under instruction; it is described below rather than re-keyed hole by hole, since a mistyped digit here would mislead a crafter following the pattern more than a plain description would. No names on this page beyond the cited author.]
APPLIQUE OF THREE THONGS FOR BELTS
Reference: Leather Braiding by Bruce Grant, pages 158 and 159.
A numbered step-by-step diagram: three lengths of lace, started at holes A-2, B-3 and C-2 from the back of the belt, are worked over and under one another through a sequence of numbered holes to finish the appliqué pattern; the last steps take the lace at A or C through B-1 to B-3 to finish the belt end.
Page 12
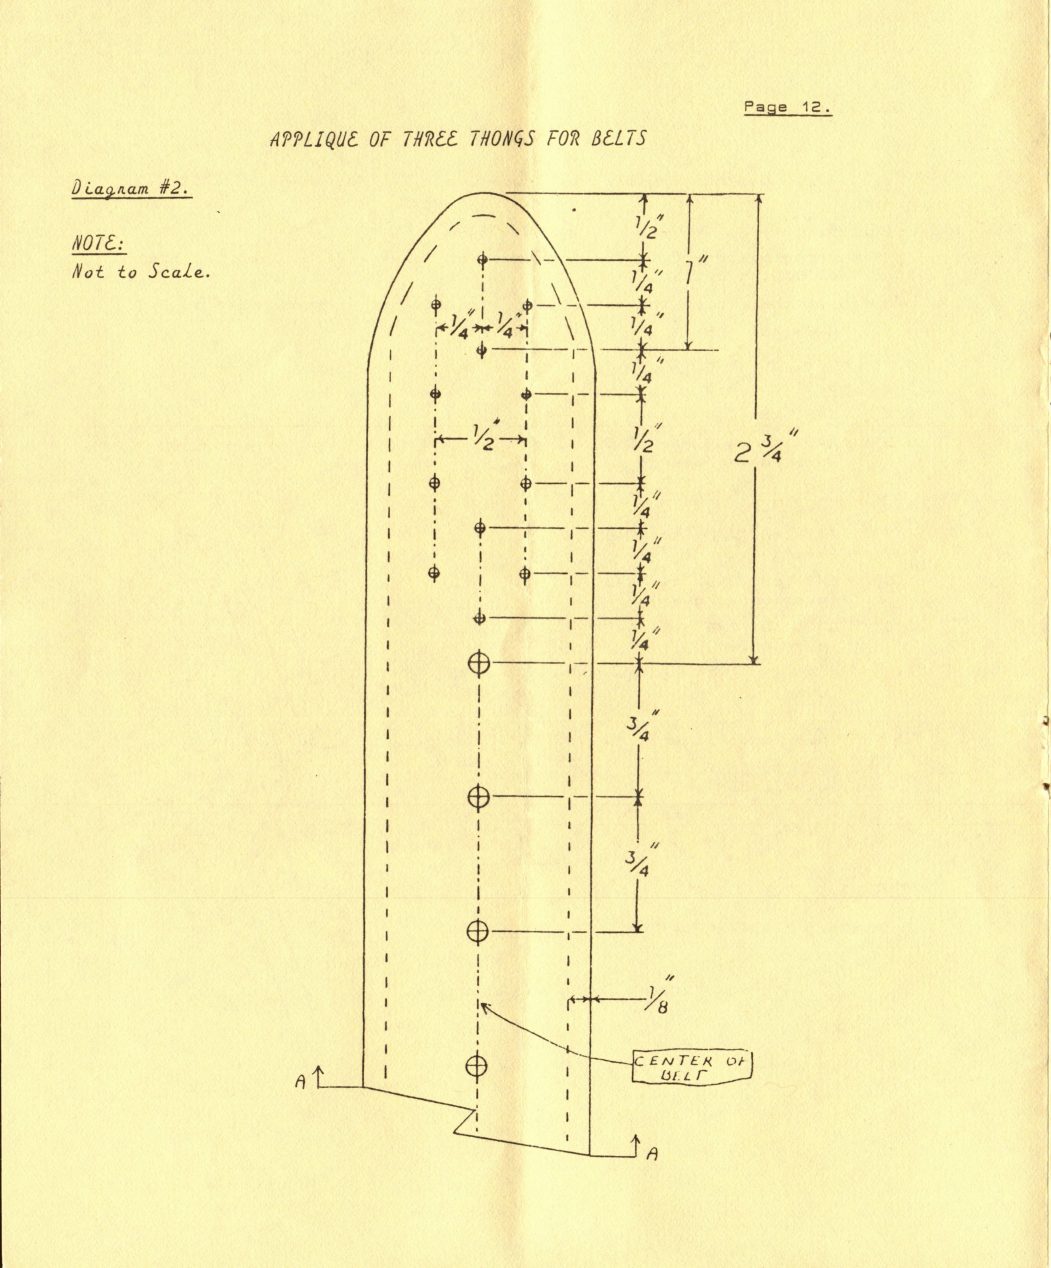
APPLIQUE OF THREE THONGS FOR BELTS
Diagram #2.
NOTE: Not to Scale.
[This page is Diagram #2 of "Applique of Three Thongs for Belts": a scale pattern for a rounded belt-tip, marked "Not to Scale", with a row of hole-spacing measurements (mostly 1/4" and 1/2" increments) down each of three parallel lacing lines and a "Center of Belt" callout at the base. No names appear.]
Page 13
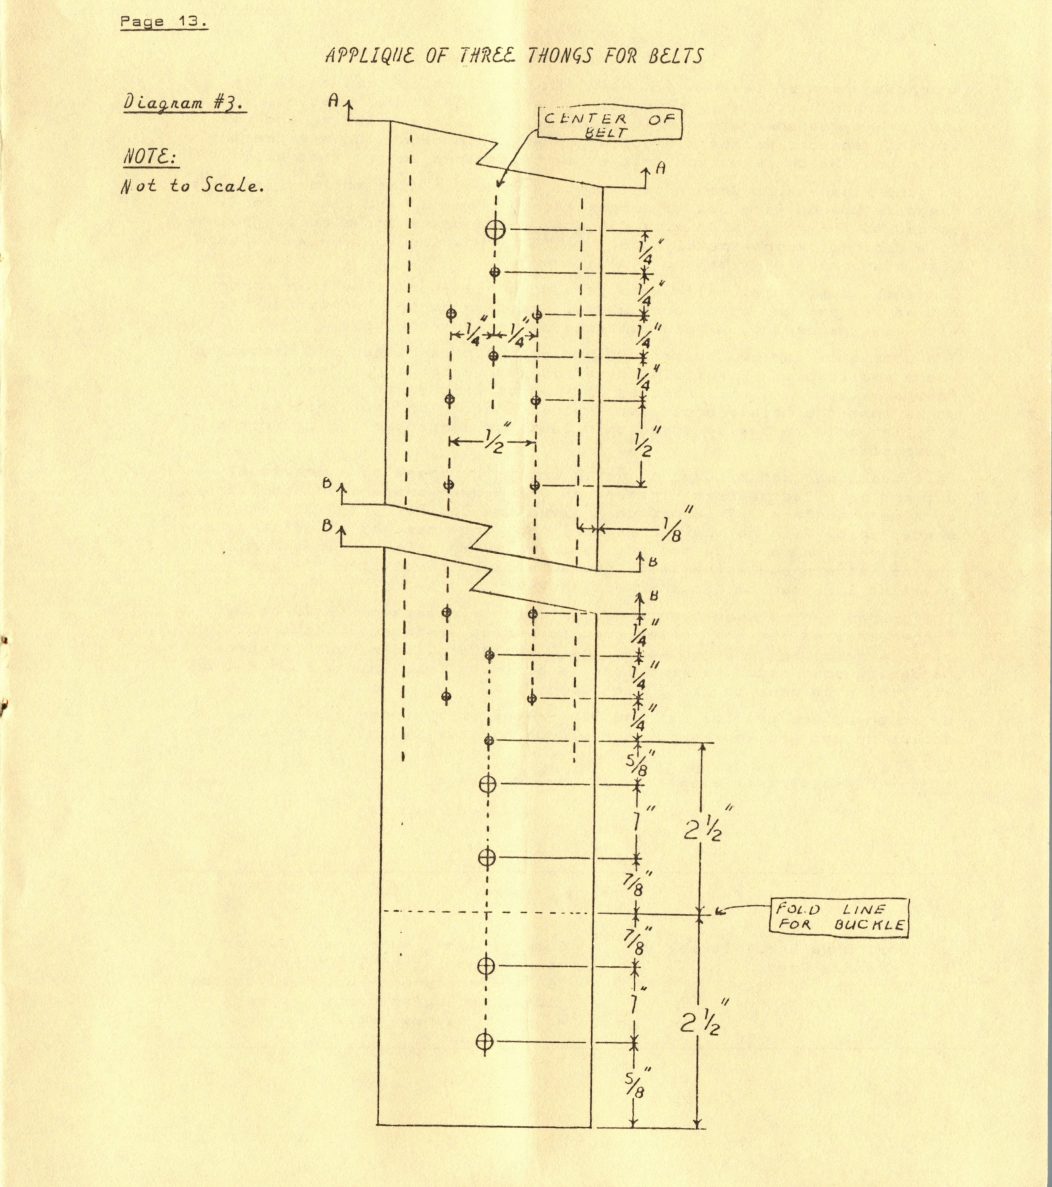
APPLIQUE OF THREE THONGS FOR BELTS
Diagram #3.
NOTE: Not to Scale.
[This page is Diagram #3 of "Applique of Three Thongs for Belts", continuing Diagram #2 on the previous page: the belt strap's "Center of Belt" section, with hole-spacing measurements (1/4" to 7/8") down three parallel lacing lines and a "Fold Line for Buckle" callout partway down. Marked "Not to Scale". No names appear.]
Page 14 — Playing with Plastercine - Lois MacPherson; Where to Find It
PLAYING WITH PLASTICINE
A popular form of leather embossing in the ''forties'" was modelling over a board coated with plasticine. At the '87 Annual Meeting, while Lillian Kay demonstrated her considerable skills at molding and embossing, someone wondered aloud as to why this technique had seemingly vanished. No one knew and only a few remembered doing it at all. So, the Mississauga Branch decided to go back in time and try it again. Masonite boards were cut to approximately 8" x 12" and plasticine bonded to the rough side with fingers, waxed paper and a rolling pin to a depth of approximately 1/8". (1/4" is better, but we were faced with a shortage of time and plasticine.
Our successes varied, with some getting a "cleaner" line than others, but we all managed to produce a small pattern at this workshop. As with most embossing, simple patterns seemed to work best.
The substance can be "squished" into areas to be raised and depressed where applicable. Plasticine does not bounce back like foam, so the leather stays put until removed and can be left on to dry. This ensures that the raised areas stay raised and can be kept that way with a Filler or with two to three thin coats of carpenter's glue on the Flesh side.
This technique can be used to raise and shade areas on a previously cut and bevelled pattern, instead of using pear shaders or modellers on a hard surface. This not only gives the desired life, but also shaded areas with mo tool marks or lines, and does not affect the carving already done. (Do not try to bevel after raising a pattern, since the now stretched leather will resist a clean bevel lime. A prebevelled line can be "touched up", however.) *
The boards can be used over and over, with old pattern marks being Finger-kneaded out and rolled back to a Flat surface with the rolling pin. A wrapping of Saran keeps the substance pliable, but if some hardening does occur between uses, a 5 minute trip into a 200° F oven will bring it back to "rollable" condition.
So go ahead and try it! If you don't like it, you can always take up sculpting and who knows what marvellous creativity that might be produced?
NOTE: Plasticine is available at Lewiscraft.
The signature below is set in script and prints clearly as Lois MacPherson, matching the credit on the contents page and her office as Mississauga Branch President; nothing on this page needed restoring.
Lois MacPherson
WHERE TO FIND IT
| National Shoe Specialties, | Buckles, straps, rivets, curved |
| 3015 Kennedy Road, | needles and stitching blades, |
| Scarborough, Ontario, | 18" x36" neoprene (pound-o) boards, |
| glues (including barge), dyes, | |
| waxes, finishes, etc. |
[Restored against the printed page: the boards are 18" x36", and the list of goods ends "glues (including barge), dyes, waxes, finishes, etc." on the two lines below]
Page 15 — Pull Chain Fan Fobs - Don MacLeod
PULL CHAIN FAN FOBS
A couple of years ago I installed a reversing 3 speed Fan on the ceiling of our cottage. You know the kind, with pull cords hanging down. One pull is for the OFF/3 speed, one is for Forward/Reverse and the third is for the lights.
This past summer the fan was used almost continually to keep the air circulating and fresh as it cooled our Living Room/Kitchen Area. The one thing that always confused everyone was which pull to pull? Different lengths didn't help too much, especially when they all had the game golden hassles at the end. (Different colours would have helped).
By the end of July I came up with a little idea and it took out all of the confusion.
1. For the On/Off 3 speed I made a rectangular fob showing the letter
"S'" and a pyramid of dots as decoration to show 3 speeds. ¢. For the lights (On/Off) I made a pear shape (light bulb). 3. For the third pull I had to go one step further. The fob is round with "F' an one side and "AR" on the other side. This wasn't enough. I made a couple of dies from a piece of aluminum channel -
(a) was shaped 1/16'* x 1/2" sume to represent the fan blades. (b) was shaped Saummem arrow fashion to represent the airflow and direction.
Eyelet ©
Stamp =
Two pieces glued back to back
Two pieces glued
(contact cement) back to back
(contact cement)
2-1/2" diameter
3/4".
Stamp
The signature below is set in script and prints clearly as Don MacLeod, matching the credit on the contents page; nothing on this page needed restoring.
Don MacLeod
Page 16 — Workshops - Bea Austin - Technique of Cuir Bouille; Workshops - Carol McLean - Design
WORKSHOPS
DATE AND TINE: Saturday, January 9, 1988 -- 9:30 a.m. to 4:30 p.m.
| PLACE: | St. Margaret's Church, Emerson and Royal, Hamilton. |
| INSTRUCTOR: | Bea Austin |
| TOPIC: | The Technique of Cuir Bouille |
| COST: | $10.00 per person |
| PROJECT: | To make a Cuir Bouille Jug |
Materials Required: 6 oz- leather (for 1-3/4" dowell - bottom 1% x 1%!
dowell jug 5% x 10%'')
cutting knife and cutting board
Overstitch wheel - #5 or #6
dividers
awl and stitch awl
harness needles #2 or #3 (2 of either) (heavy waxed linen thread for #3 white wax linen thread for #2) pencil sandpaper scissors ruler or square any other supplies you wish to bring
Please: Submit your name to Ruth Haig of the Hamilton Leathercraft Guild For inclusion in this workshop. This is a workshop conducted by the Hamilton Leathercraft Guild.
Bring your own lunch -- Coffee and Tea will be Provided.
DATE AND TIME: Saturday, February 6, 1988 -- 9:30 a.m. - 4:30 p.m.
| PLACE: | St. Margaret's Church, Emerson and Royal, Hamilton |
| INSTRUCTOR: | Carol McLean of C.S.C.L. |
| TOPIC: | Design |
| COST: | $10.00 per person |
Please: Contact Ruth Haig of the Hamilton Leathercraft Guild for Further information and inclusion in this workshop. This workshop if a project of The Artisan's Guild of Hamilton.
Bring your own lunch -- Coffee and Tea will be provided.
PLEASE REFER TO THE LAST BULLETIN FOR THE MAP TO GET TO ST. MARGARET'S CHURCH.
Page 17 — Merchandise Passport Can Avoid Customs Confusion; Membership Fees
MERCHANDISE PASSPORT
CAN AVOID CUSTOMS CONFUSION
The Following article appeared in The Toronto Star on September 9, 1987 and Ruth Haig thought that it might be of interest to some people ---- Potential exporters who take product samples out of. Canada for a temporary period would do well to remember that their goods, like people, need passports to get customs clearance.
To these and other people, the CARNET CANADA division of the CANADIAN CHAMBER OF COMMERCE, offers what it calls "merchandise passports" to help smooth out customs procedures in about 40 countries.
The CARNET passport can help overcome problems of delays, red tapes and other forms of inconvenience, says a brochure provided by the chamber to The Star. It's a customs document prepared for presentation to for sign customs authorities.
Not only exporters but a lot of other people may have need for a "CARNET' to save time and effort at every customs station.
"Salesmen carrying samples, exhibitors participating in Foreign trade Fairs, engineers and architects with valuable drawings, musicians and Film crews are among the growing list of Carnet users, Carnet Canada says.
In Fact, all kinds of commercial samples, professional equipment, goods For display in trade fairs or exhibitions are covered by a CARNET. For instance, items that have "travelled on Carnets" range from aircraft to Fur coats, from jewelry to electronic-products, Carnet Canada reports. Other items include professional equipment such as precision testing and maintenance devices, photographic and recording equipment, theatrical customs and sets -- even racing cars and show horses.
"The whole concept centres around the term temporary; the goods must leave the country you visit within a year," the brochure advises potential Carnet users.
There's a fee charged for a Carnet passport, based on the value of the goods it covers.
For more information about this service, call CARNET CANADA's head office in Montreal at (514) 866-4334.
MEMBERSHIP FEES
Just a reminder that membership Fees are due and payable on April '1st each year.
Would the branches please send up-dated lists in the year the fees are applicable.
Member's-At-Large are requested to send their name, address, phone number, etc. along with your payment in order that the membership list is kept current. If a change of address comes part way through the year please let the Membership Chairman, Joyce Scruton and the Editor, Audrey Gorton know as soon as possible. Thank You.
Page 18 — Plug Embossing - Gladys Riddell; Basic Pattern Making and Design - Gladys Riddell
Both instructional lists on this page and the next are numbered steps in the original, printed clearly throughout; nothing here needed restoring.
PLUG EMBOSSING
1. Trace the desired pattern on the leather.
2. Tool your design on all types of leather by going all around the design.
3. While your leather is wet, use your modelling tool or a modeller with a spoon end to do your embossing.
4. With these tools on the underside of your leather start pressing the design by stretching the leather until your design takes form on the top side and is to your satisfaction. Remember: Do not let your leather get dry, keep it moist. When working on cowhide, wet it on the top side. Morocco is wet from the bottom side. When the pattern is completed on the topside, use your modeller to outline the design, then let it dry.
5. To make your design keep its shape you can fill the stretched area from the back. It can be done with several types of materials. Some of these materials to use are:
(a) cotton batten and glue mixture (b) Bond Fast
(c) leather shavings and glue
If you want a pliable fill use:
(a) rubber cement with cotton or leather shavings (b) white cement
(c) barge
(d) several coats of shellac
For large objects you could use: -
(a) a wooden form
(b) sawdust and barge
(c) heavy duty Cat's Paw contact glue
(d) plastic wood which has already had several coats of shellac applied beforehand as the plastic wood bleeds
You may also make a plug by cutting a duplicate design slightly smaller. When the embossing has been completed cut it to Fit and then skive all around to fit it Flush into the embossed area.
Gladys Riddell
BASIC PATTERN MAKING AND DESIGN
1. Make a pattern you desire, then choose your design to correspond with your pattern.
2. Place the pattern on the material from top to bottom. (From the neck to the tail, which is the length of the skin).
3. IF you want an article made sturdy, you place the pattern on the spine from the neck to the tail, which is the toughest part of the skin you are using.
4. If you are making an album cover, book cover or any article that is to stand up to abuse, use the butt part. (This is the back of the animal). This goes for all types of lather skins.
Page 19 — From the Editor's Corner
BASIC PATTERN MAKING AND DESIGN
5. Once you get your pattern designed and ready to put on the leather, plan the design you wish to use. Any simple design like a curved branch of maple leaves or a cluster of oak leaves is preferrable. 6. IF you feel that you cannot plan a design of your own, go through magazines and take parts From different pictures until you get the design you desire and one that will work well on your pattern. 7. Another way to make up some designs is to take strips of paper.
Fold your strips of paper in sections of 1/4", 1/3", 1/2" and 3/4" For guide lines. Cut out pieces of the folded strip of paper and see what you can come up with.
Gladys Riddell.
FROM THE EDITOR'S CORNER
Connection.
In the last bulletin on Page No. 5, an error was made in the amount of Fiebings Dark Brown Dye to use under the heading EDGE DRESSNG. Would you please correct this to read: "1 full capfull"
Proposed Exhibition and Sale. '
A proposed sale at the Black Creek Pioneer Village in the early Spring of 1988 was discussed at the Executive meeting. We would like Feedback on this and we would also like lots of helpers. Bob Sutton is the Chairman of the committee.
leather 'SS.
Leather '88 will be held at The Hamilton Spectator Gallery from September 27 to October 31st, 1988. The Hamilton Quilters' Guild have been invited to join us. Support the C.S.C.L. with your articles.
(988 Annual.
Norland is hosting the 1988 Annual from May 6 to May 8, 1988. Phyllis McHale would like an estimate of those who plan to attend and require rooms. Costs plus tax are as follows:
Single, $55.00; Double, $68.50; Triple, $75.00, Quad, $85.00. Please inform her of the type required and perhaps who you are going to share with, if applicable.
Member's-At-Large.
Would you please send Joyce Scruton and myself an up-dated name and address, phone number etc. Also please inform her to what period you have paid your dues in order that the memberships records are verified.
Page 20 — C.S.C.L. Executive - 1987-1988 (Amended)
C.S.C.L. EXECUTIVE - 1987-1988
OFFICERS
| Past President | Madeleine Mitchell | 1-519-537-7821 |
| President | Ruth Haig | 1-416-525-0780 |
| 1st Vice President | Phyllis McHale | 1-705-454-1237 |
| 2nd Vice President | Karla Van Horne | 1-416-547-4518 |
| Treasurer | George McPahil | No Telephone |
| Recording Secretary | Laura Walker | 1-416-389-9567 |
Corresponding Secretary - Betsy Rennie - 1-416-639-0771
The fourteen directors are numbered down the page, 1 through 14, each already printed with its own telephone number; nothing here needed restoring. The Treasurer is printed here as "George McPahil"; the masthead on page 1 of this issue spells the same name "McPhail" — a genuine inconsistency in the Society's own printing, left as set.
DIRECTORS
| 1. Kevin Armstrong | 1-416-278-4666 |
| 2. Bea Austin | 1-416-522-8282 |
| 3. Fred Brown | 1-416-626-3184 |
| 4. Laura Bush | 1-613-392-1475 |
| 5. May Corbett | 1-705-728-3259 |
| 6. Kay Cloughley | 1-705-497-3214 |
| 7. Jessie Little | 1-416-783-8603 |
| 8. Lea Love | 1-416-276-7340 |
| 9. Don MacLeod | 1-416-277-2058 |
| 10. Dorothy Muma | 1-416-654-5635 |
| 11. Jean Pickering | 1-519-285-2518 |
| 12. Gladys Riddell | 1-416-762-7466 |
| 13. Joyce Scruton | 1-416-844-9471 |
| 14. Helen Wheaton | 1-519-432-0178 |
EX-OFFICIO
| Archives | Carol McLean | 1-519-537-7684 |
| Editor | Audrey Gorton | 1-416-389-9567 |
| Librarian | Marg Hunter | 1-416-459-9798 |
| Teaching Standards | Bob Muma | 1-416-654-5635 |
| Membership Chairman | Joyce Scruton | 1-416-844-9471 |
| Publicity | Audrey Gorton | 1-416-389-9567 |
BRANCH PRESIDENTS
- 1-416-389-9567
| Hamilton | Audrey Gorton | 1-416-389-9567 |
| Mississauga | Lois MacPherson | 1-416-842-1383 |
| Norland | Hilda Chynoweth | 1-705-454-3206 |
| Toronto | Bob Sutton | 1-416-633-2736 |
| Woodstock | Beula Reynolds | 1-519-539-3251 |
The next bulletin is the responsibility of Norland and Members-at-Large. I would appreciate material from them and also any other which can be included.